Tag Archives: Palmer PRoducts windscreen adapter

Rally Raid CB500X – the first 2000 miles

CB500x Index page
Rally Raid Level 3 kit plus BARTubeless sealed rims on Heidenau K60 / Golden Tyre GT201 tyres. RR rack and backplate, Palmer Products screen, Barkbuster Storms, Tutoro oiler.
Weight about 220kg (485lbs) plus 25 transit/10kg piste payload. Me, 105kg in gear

AMH-Tread-Chooser-Adv
x2k07

It hasn’t rained much yet, but as expected the all-road tyres: Heidenau K60 and similar Golden Tyre GT201 on the back – are flawless for what they are. Crossed Spain at low 30s psi, now running high 20s road and track and not one scare so far. Obviously they don’t have the edge bite of a proper knobbly, but for my sort of riding on dry, stony tracks, that’s academic on a heavy CB500X. A back TKC on an F800 that did just 900km with us looked like it was half gone by the end.

x2k06

To date the BARtubeless wheels have lost no air except each time I check them, and the stainless HD spokes haven’t budged. Some front spokes have a minute half-mil creak in them, the rears are as solid as an alloy rim. This is after some mountain tracks that left one XR with a fully loosened set of front spokes. Whoever makes these wheels knows their spokes from their elbow.

x2k13
cbxl302

With me at 6′ 1″ plus riding boots, the Honda handlebars are too low for standing up for anything longer than an impact-absorbing jolt. Partly this is because they have to be set back so the Barkbusters can clear the dash on full lock (left – look long enough and it makes sense).
Having to sit down changes the way you ride on the dirt, and not in a good way. Perhaps refitting the OE bar ends might set the Barks further out to clear the dash. Iirc, John M said that V-Strom Bark clamps have the sort of bend that suits the X. Removing the Storms would be a shame but I may try that as I have some spare RR adjustable levers should I snap a Honda lever. Back home my stronger alloy fatbars are waiting on RR clamps, but they’re actually lower than the OEs so will need quite a stack of risers.
It reminds me of the problems you can have when converting a road-oriented bike into a trail bike, as I found with my TDM earlier in the year. Dedicated trail bikes have a higher headstock in relation to the footrests, something not very convincingly shown in the gif, left, with a 660Z behind a TDM.

x2k17

To get it right for my height may need at least two more inches of bar height if I’m to keep the hand guards. (Note in the picture right, my hands are above the bars in a comfortable stance and I’m only wearing thin-soled slippers). As that may need longer cables, reorganising the hand guards will be less hassle.

x2k14

As they come from RR, the forks are miles better than the OE arrangement, but after a couple of thousand miles of road and trail they don’t quite evoke the plushness of the simple, Hyperpro-sprung XCountry I used over the same terrain last year. The BMW forks didn’t have any adjustment but were set up (with a new back-end and me present) at HP HQ. Maybe that’s got a lot to do with it.

x2k11


Part of the negative impression has been down to the unnerving creaks from the cockpit as the bike hammered over the rocks and which gets mistakenly conflated with the fork action. A quick check over after the tour revealed that the two bolts supporting the whole fairing on the headstock (left) had come loose… again. It’s a good thing RR supply M8 nylocs for the job. Keep a eye on these bolts, off-roading CB-X people. Fyi, other than that there was nothing the Honda needed other than wiping the sand-caked chain with some used engine oil.
I also noticed one gaiter looked like it had ‘vacuumed in’ as if there was no breather hole and the pumping action had sucked it against the forks. This would cause stiction, and I recall Bas at HP telling me that eliminating stiction (drag) contributes greatly to smooth fork action. When I snipped the zip tie prior to cutting the whole thing off the tension was released. Looks like it was merely mounted with a small twist. Now it’s zip-tied back up and might help improve the fork action.

x2k16
nipx

The CB-X RR forks have preload adjustment and air bleeders (nothing to bleed so far) so, as I’ve progressively jacked up the back-end, the forks were well overdue for some preloading too. What looks like a 17mm lock nut is hard to get to with a socket as the bleeder gets in the bleeding way, but my trusty Knipex adjustables (which also make a great spoke wrench, right) managed to get in there. I turned the hex adjuster in seven faces (just over one turn). The forks still felt soft but we’ll see how it rides on the next tour. Now I know how, I can give it more turns down the track.

cbx-sp

The Palmer Products adjustable screen mount was of course great for the two-day 115kph transit of Spain and northern Morocco. But the first afternoon on the piste proved that the added kilo of weight and forward displacement of the mounting hardware supporting a tall Honda screen would probably break something if left for too long (that ride is what probably loosened the cockpit bolts). As it was, the other guy with a similar arrangement on his F800 had some screen screws fall out.
Another reason to remove it is the screen position feels rather unnerving close when briefly standing up on the piste. I know of a guy who was killed by his screen in a freak over-the-bars accident, and even if it didn’t guillotine me, I’d rip the whole thing off if I went flying the same way. The screen unscrews from the frame in five minutes and will go back on in ten for the ride home. Riding around warm and dry Morocco in short spells up to 100kph is OK without a screen.

spn

The Daytona heated grips were great on a foggy night and morning in north Spain, and doubtless will be even more useful on the colder ride back. Compared to Oxford grips I’ve had on other bikes recently, the adjustment is crude: off, very high (for short-term warming up, they say); and warm, which seems to equate with the medium setting on Oxfords. I don’t suppose they’ll be much cop if temps reach down to freezing point, but that’s the time for lined gloves.

x2k10

Running down through Spain it was clear the Tractive shock was loosening up from the way the headlight lit up road signs miles ahead. After a few days on the piste it needed urgent preloading. One of the more rallyesque riders in my group advised I first tried the easy option: a few clicks in on the low- and high-speed compression damping on the remote reservoir. That put me on 15 of 22 for low-speed, 11/18 high-speed, and 18/24 on the rebound damping at the base of the shock, but that didn’t do enough (click totals may vary from official Tractive sources; it’s what I felt).
John M warned me the spring preload would be a faff, but it’s actually not so bad: two big allens to remove the LHS footrest hanger and the preload collar or ring is there between some frame tubes. Mine was about halfway down the threads. There’s no usual lock ring requiring a C-spanner, instead there are about 8 peg-locating holes in the collar which I realise are for a hydraulic remote preload adjuster (left) which would eliminate all this aggro. But Tom G at Tractive explained they don’t suit the shorter and more constricted CB-X RR shock. That’s a shame as I’d buy one in a shot.
The shock comes with a multi-bit tool, but with the supplied 6-mm peg fitted, you can’t make enough collar-turn to line up the next hole before fouling a frame tube. After a bit of trial end error I found a short 5-6mm allen key levered with a ring spanner worked best. That gives you enough space to turn the collar from one hole to the next.
The preload ring is held in position with a single tiny hex-head locking screw. But as there’s only one it means the presumably essential locking requires you to bring that screw back into the narrow 20-30° working aperture between the frame tubes.
Doing this I managed 1.5 turns on the collar bringing the lock screw back in position. Next morning this was initially better but the shock was still occasionally bottoming out harshly on the rocks and even bottomed out gently over a fast concrete ford at 90kph. I know they say bottoming out proves all the suspension movement is being used, but this felt too soft for the hefty mass of a CB500X with me on it.

RRP304v4-500x500

I’ve never really got into suspension, having run what I brung for years until seeing the light with the Hyperpro XCountry. I still don’t fully comprehend the exact relationship between compression damping (high- or low-speed) and preload. I’m sure the answer is just a Google away, but assume adequate preload with sag must come first. That’s hard to do alone while cranking away on an allen key with a ring spanner. Two nights later I put another turn on the preload ring (2.5 from delivered). At this point on a cool morning it initially felt like it needed more rebound damping, but by now most of the piste was over and the forks were in greater need of attention.
I’ll do some more experimenting on the next lap, but do wonder if the remote reservoir’s position alongside the cylinder and behind the radiator  might negate their purpose in getting cooled away from the pumping hot shock. I touched the reservoir which was only warm; the mounting bracket maybe 40-50°C. When the bike’s thudding down a steep pass, working the suspension hard at little more than walking pace and the fan running, whatever’s in the reservoir will get quite hot. The shock action does seem to soften through the day and the temps here are only in the mid-20s.

The longer RR sidestand needs to be redesigned or beefed up. As a prop for a bike it works, but side stands can suffer upward impacts similar to bash plates, need to perch a bike on one wheel when doing wheel or chain work and may need to press down to break a tyre bead.

I came off the boat in Santander thinking the bike was leaning on the stand a bit more than normal. Turns out the lashing down – or maybe the crashing of the ferry on the overnight swell – had bent the stand so the foot was 2-3 inches further forward (left). This greater lean now puts more stress on it, and when retracted it stuck out.

P1140297


Closer inspection showed the bend was not on the Honda frame tab but  just below the stand’s pivot (above). The RR stand is made of flattened, not round tube, and the alignment of the flat face is right into the bending force. Checking my earlier pictures, it looks like the OE stand shares the same flattened profile (i.e.: not round tube), so it must simply be down to greater leverage on the new stand due to the added length.
Once I knew the problem I decided not to bend it back and took great care not to stress the stand when getting on and off. But two days into the tour it folded on me anyway (left). Kicking it back out of the way, I was surprised how thin the tube’s walls were, though I can’t say I’ve ever dissected a motorcycle side stand closely.
Luckily there was time to text John and get him to send a reinforced stand with one of the next group flying in. I figured this was a better solution than getting a bush mechanic to repair or make up a new stand, as the actual angle of the stand from the pivot is quite critical.
Now I see a picture of John’s chunky reinforcement (left), I think it may not go far enough past the point where mine fractured. I may get a fin of 2-3mm sheet spot-welded to the other flat face at the top of the stand, against the force of the bend.
Overall I think an equilaterally stiff round tube with a thicker wall will be a better long-term solution to the greater forces put on the RR stand, as well as a wider foot for soft terrain. When a side stand is all you have, it needs to be bombproof, but my experience is all part of the testing procedure.

cbx-footrests1

The big footrests are a revelation, offering great grip plus a broad platform on which to stand, were I able to do that for long. Even with full MX boots some riders found the normal-sized pegs on the XRs a pain to stand on for long. There’s no noticeable loss in comfort from the rubber-capped OE pegs, and the RR pegs are a tad lower and further back too (see above). I find the heel of my right boot touches the can’s heat shield when stood upright.

The RR skid plate / crash bar has lately been used as a surrogate prop in place of the side stand, and while it’s taken a few flying hits, I don’t recall bottoming out on anything big. It’s doing its vital job unobtrusively.

The RR rack hasn’t really been put to the test either, carrying light dry bags lashed to the side, with inner tubes and a fuel bag lashed on the inside spaces. As mentioned elsewhere, I miss an old-school tube rack’s tubes for something to grab on to.


P1000836
ma6-7g

Most of the off-road riding has been on stony or rocky tracks typical of Morocco, with very occasional soft sand or loose shingle in the oueds, and the odd fast gravel road. On these gravel roads the CB-X can go as fast as you like, the tame power delivery adding up to reliable traction on the hard, all-road tyres. The suspension is never taxed and appropriate use of the brakes for the conditions scrubs off the speed, with the added back up of ABS in case of a stray mule.
On the rough trails, particularly on the inclines, the CB-X is a bit of a tank, as is any bike this heavy. Such tracks (usually the abandoned and unmaintained middle sections between remote villages accessed from one end or the other) are not enjoyable on anything bigger than an XR250. The bike crashes along with the cockpit creaking as you try to minimise impacts while steering, braking and balancing. But these tracks very often lead you to the most spectacular places. One route (MA7 in the Morocco book, left and bottom of page) we reversed over the Jebel Timouka I wouldn’t want to repeat on the CB-X with six bikes in tow, but I’d sure like to ride it again.

The great thing is the engine’s soft power adds up to velcro-like traction rather than more photogenic, knob-ripping torque, which means you get no more tired than you need. Climbing a rubbly switchback feet up but sat down at walking pace, you’re not fighting the thud of a big single (or Boxer twin come to that) which needs to be damped with a slipping clutch, all of which makes the bike easy to ride. I find the six-speed gearing ideal for all this: low enough on gnarly pistes and with a top end 75-mph cruise. For once no need to meddle with the sprockets.
Most of the XRs had harmless low-speed falls, the F800 a few more. Apart from my bike falling over when the stand broke, I’ve not yet come close and I hope it stays that way. On a bike this heavy, falling or hammering the suspension until something breaks is to be avoided at all costs, even if it means I’m slowest in the group. The number one priority is preserving the bike to get me round the circuit and back home.

fueller

My fuel consumption’s varied greatly: Spain to Marrakech (sustained 115kph cruising where possible) returned 66.5; 63.5; 60; 57; 60; 61.5mpg UK. That’s between 20.2 and 23.2kpl (other conversions here or right).
Once on tour speeds rarely exceeded 90kph so that rose to 80.5; 87 and 78.5mpg (27.8 to 30.8kpl) which was better than some of the XRs, and usually a little better than the F800 which was a handful to ride smoothly at slow speed.

x2k12
dusty

I plan to change the oil and may need a new air filter back home. The Tutoro chain oiler doesn’t work so well on the piste: the oily sprocket picks up all the sand and grit but the lube goes nowhere. I turned it off; it’s back to hand oiling with a toothbrush.

x2kk1

The seat is hanging in there but I don’t think the Aerostich wool pad will help disguise the pulverised foam from too much sitting down. Whatever, it’s got to be better than an F650/800 seat. Eric used an ‘XL bubble wrap’ Air Hawk 2. Without it, even with a Wunderlich seat, he can’t go much over a 100kms.

There’s still experimentation to be done with the CB-X’s suspension and bar position, but as it is it’s hard to imagine doing what I’m doing on a standard CB500.Add the necessary proper engine and lever protection, and carrying ability and you have an all-road travel bike ready to go. Read a broader conclusion here after 5000 miles.

ma77

Honda CB500X Rally Raid bashplate, Palmer windshield adjuster

Main CB500X Index page
cbx-jmo

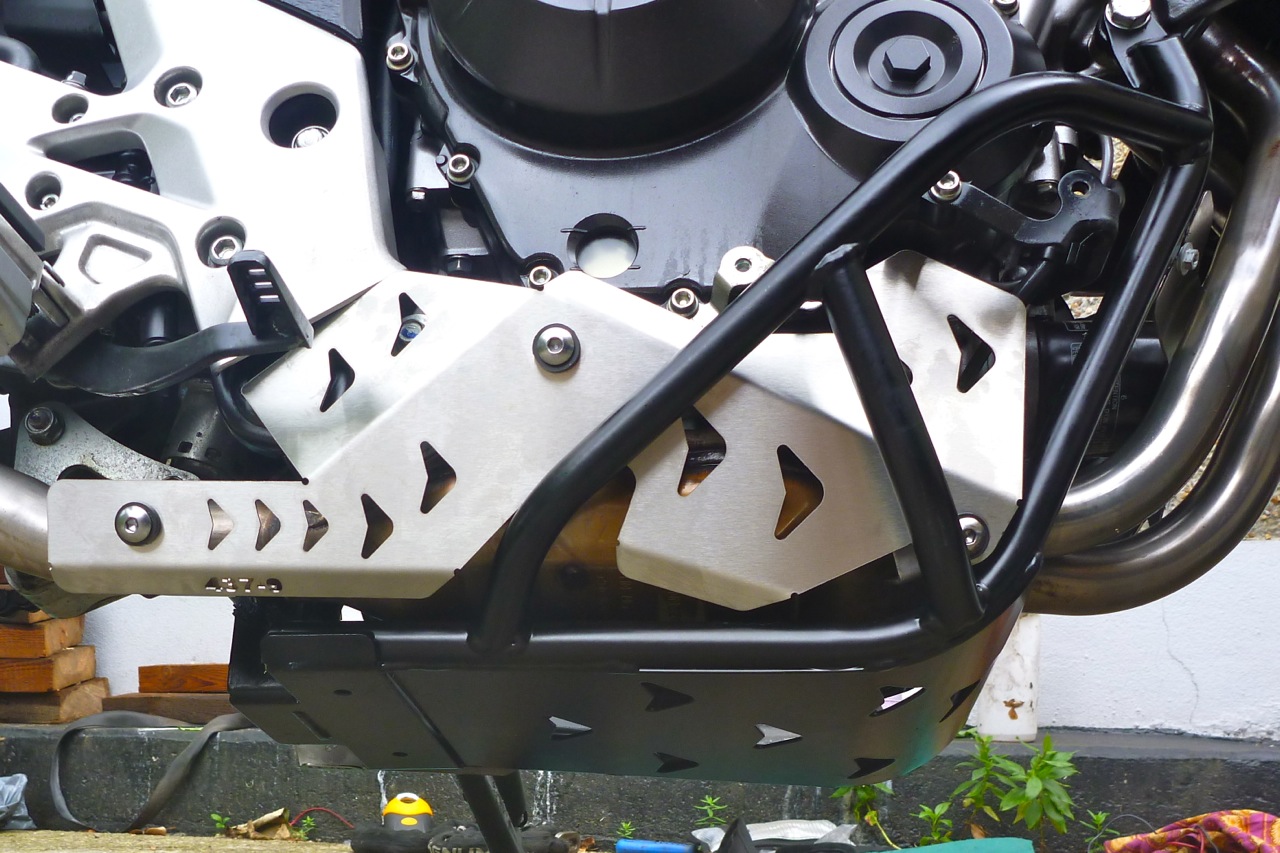
The CB-X comes with an 80s-style plastic belly pan which then as now, just keeps the flies off te engine. Along the right side is a thin, stainless cat guard but none of this will protect the pipes or the sump from a heavy dump onto a rock or from flying debris.

cbxbash-12

cbxbash-14

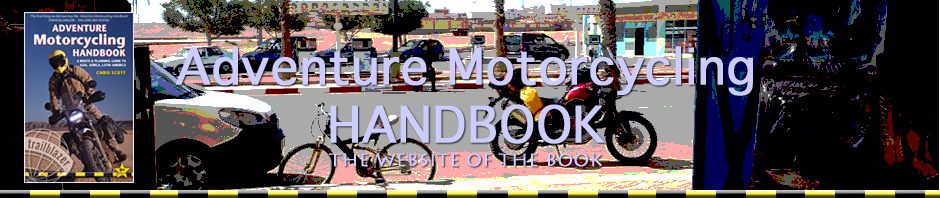
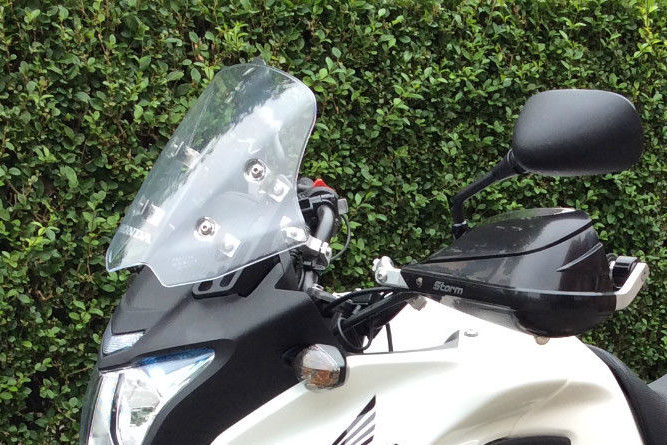
The Rally Raid bashplate crashbar cost a hefty £238 but is more than just a few slices of alloy bent, cut and welded into a protective clam shape. The CB-X is a bit different from a typical single cylinder trail bike in that the pipe goes under the motor. The slim cat is actually neatly integrated in the headers which tuck in alongside the sump (right) so cleverly, no extra depth is added unlike my last two ‘under pipe’ bikes. But the oil filter sticks out the front and the engine cases are vulnerable and so proper protection is needed all around.

plates
cbxbash-17

I didn’t look for alternatives but they are a couple out there (left) – both at around £100 but in relatively flimsy 3mm alloy and both retaining rather than replacing the thin stainless cat guard. SW Motech do make lower engine bars and upper tank guards at about €100 each, but it’s unclear whether their sump guard and the crash bar are compatible – it looks like it could be one of the other. With the Rally Raid unit the steel crash bars are integrated with the steel underplate and the whole thing weighs 3.4kg. Separate thin stainless panels are added behind the frame over the cat, across the front of the oil filter (right), and underneath the shifter on the left.

cbxbash-15

After removing the bellypan and cat cover, fitting started by slotting a pin to mount the back of the plate on the unused centre stand pivot tube. The powder-coated RRP pin felt just half a mil too thick, actually because a bit of rust has developed inside the centre stand pivot tube (left). Once that was scrapped out with a hacksaw blade it fitted in with some hammer aid, but even with a good greasing I get the feeling that pin may be in there for good.

cbxbash-19
cbxbash-16

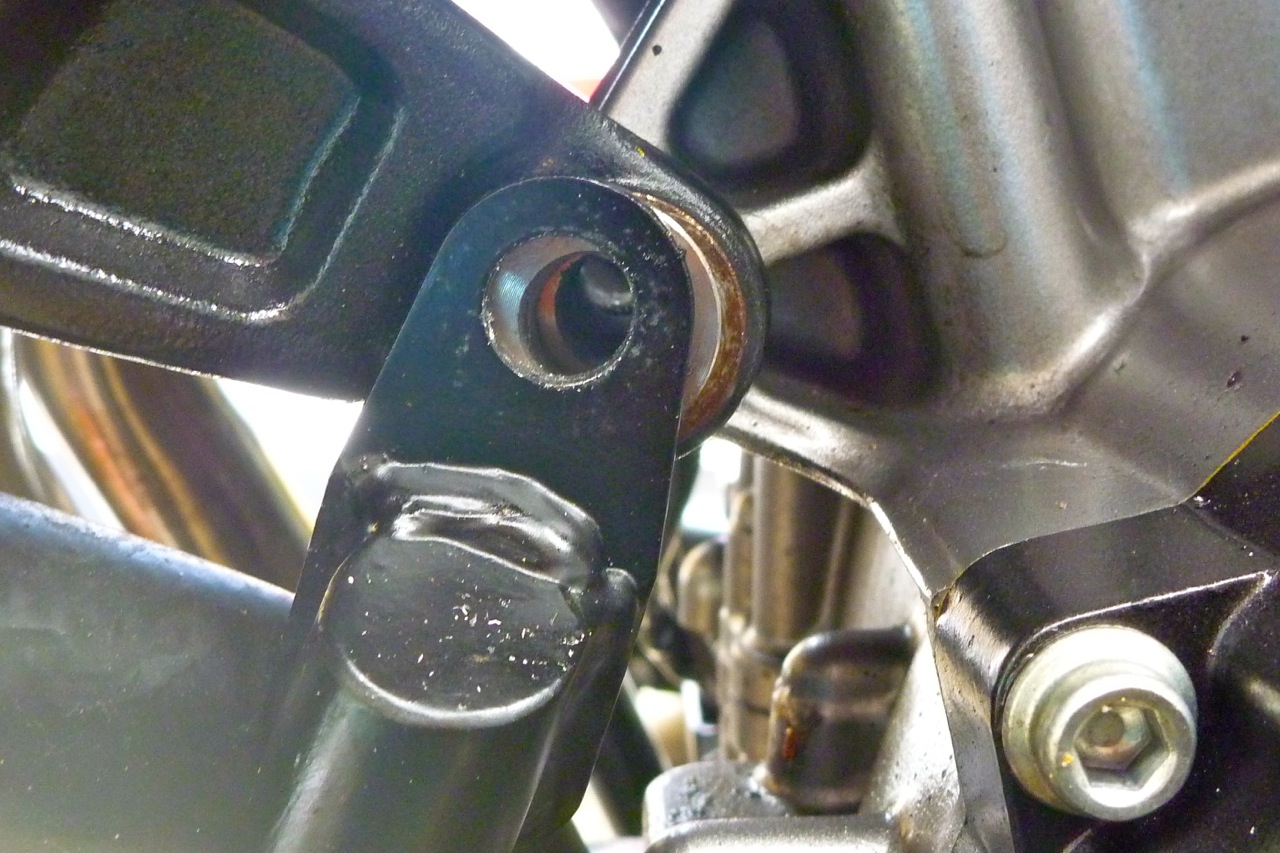
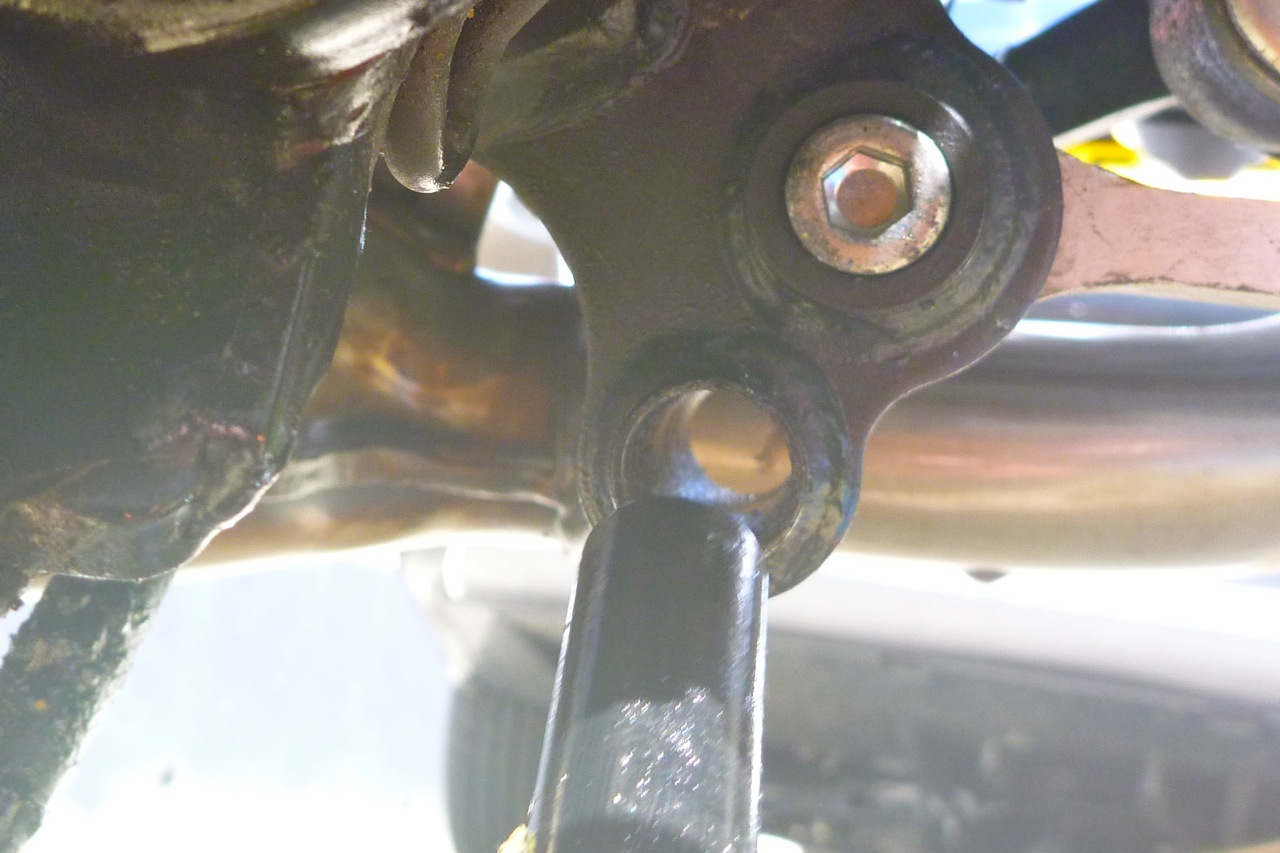
The RHS stainless cat cover (left) lined up just right – 10/10 for bend and cut – and the steel plate was ready to swing up into place to be bolted in place with the replacement front engine mounting bolts supplied. RHS bolt went in OK but on the left it was 5mm ahead (above right). Seems ‘they all do that, Sir‘ and some tactical levering with a hammer handle sorted the alignment to get the bolt in without cross-threading the engine’s alloy which would be deeply vexatious.

cbx-bashside
xtank7

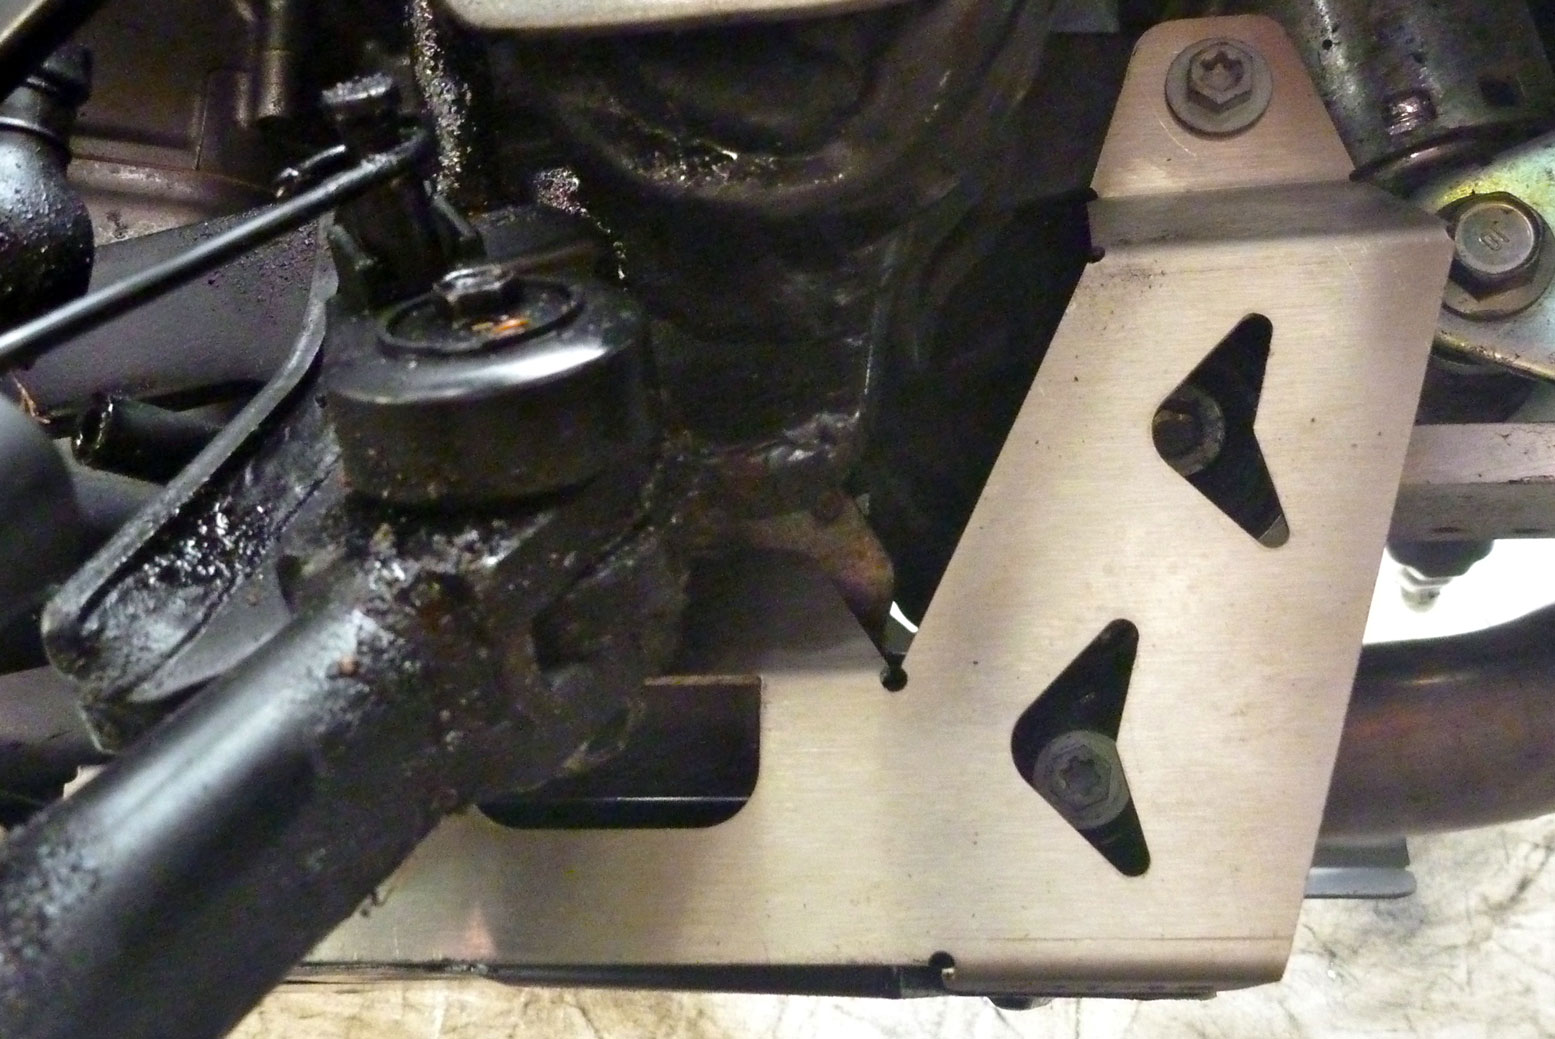
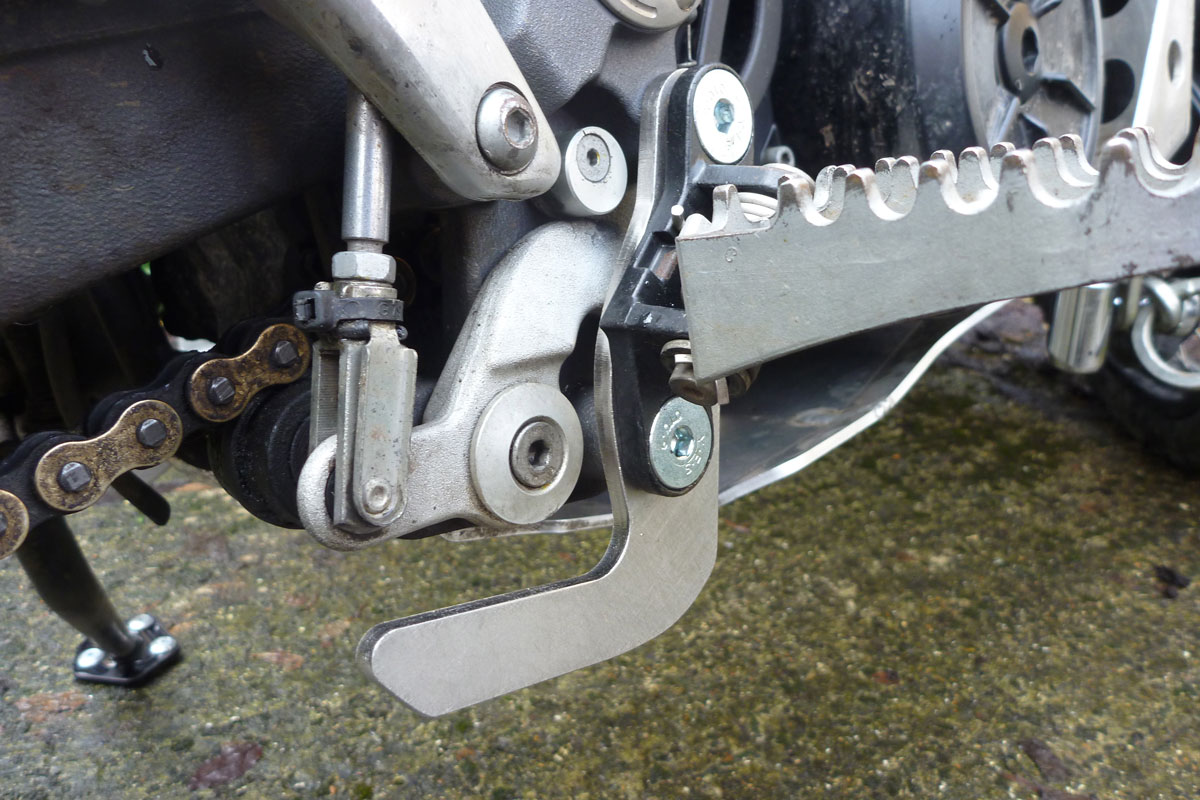
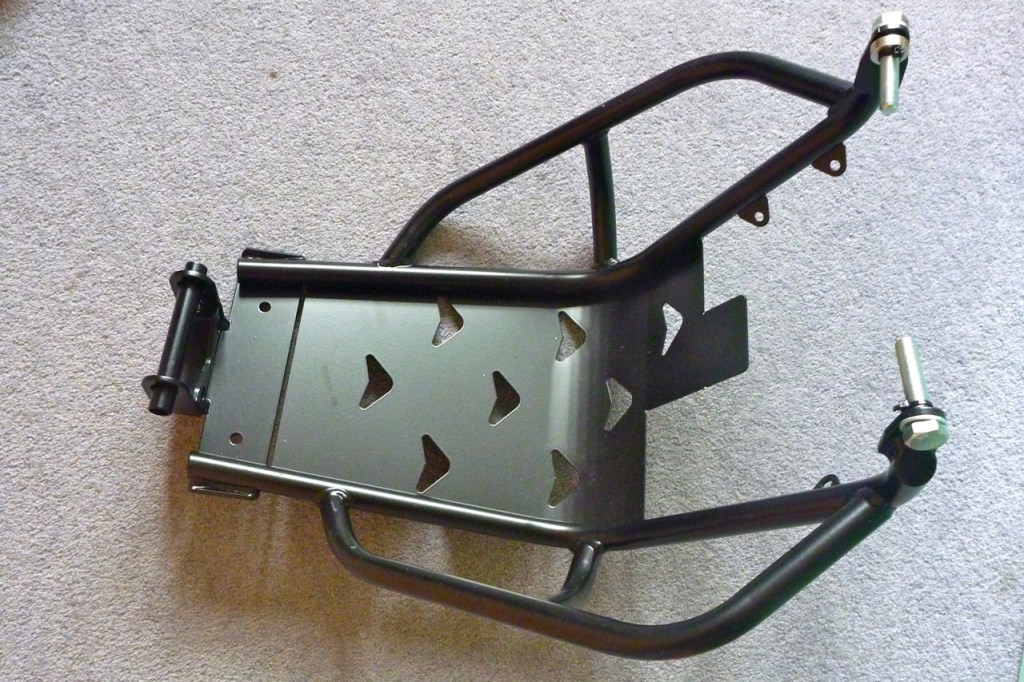
I’m not quite sure what the separate plate behind the side stand is protecting (left). Something to do with the shifter linkage? That’s reasonably well protected by the side stand mount and held on with a single bolt the plate looks a bit flimsy to do anything substantial, assuming it’s trying to be similar to plates which Erik Bok makes for X bikes (right).

tr-waterbot
cbx2-bash

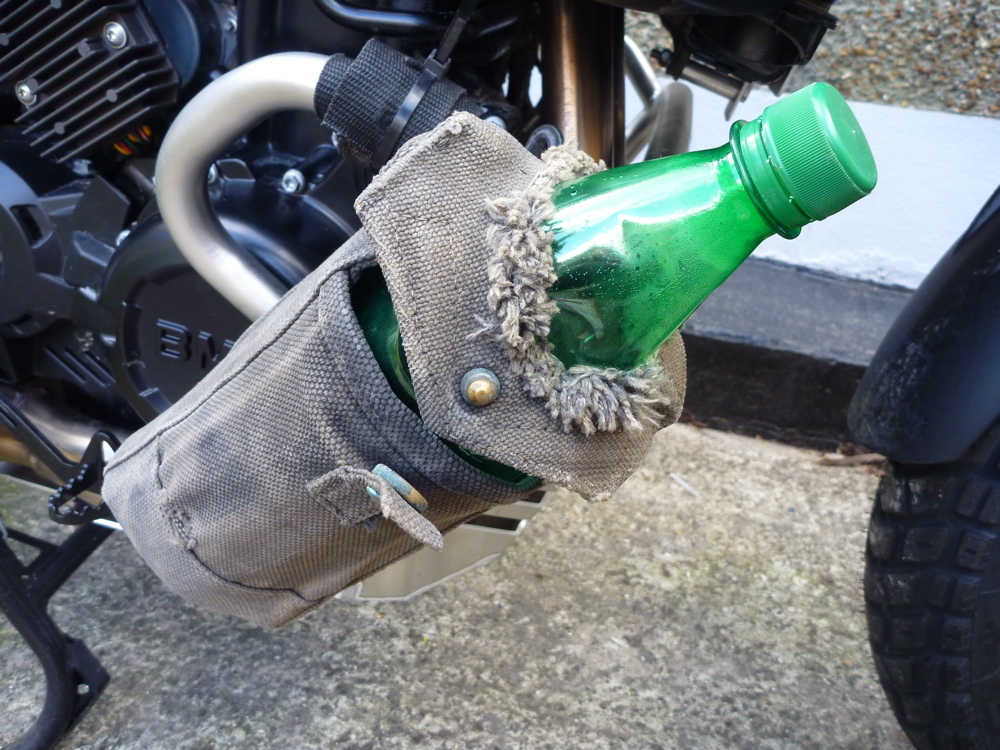
All up that took about an hour, plus another hour of going back and forth to the house to get extra bits and pieces, but I’m confident that any rock that dares to intimidate the steel base of this plate will end up with quite a headache. I did a 100-mile run and was pleased to noticed no resonance as you can get with some slabby bashplates, and the handy bars mean I can attach my ‘signature’ ammo pouch.


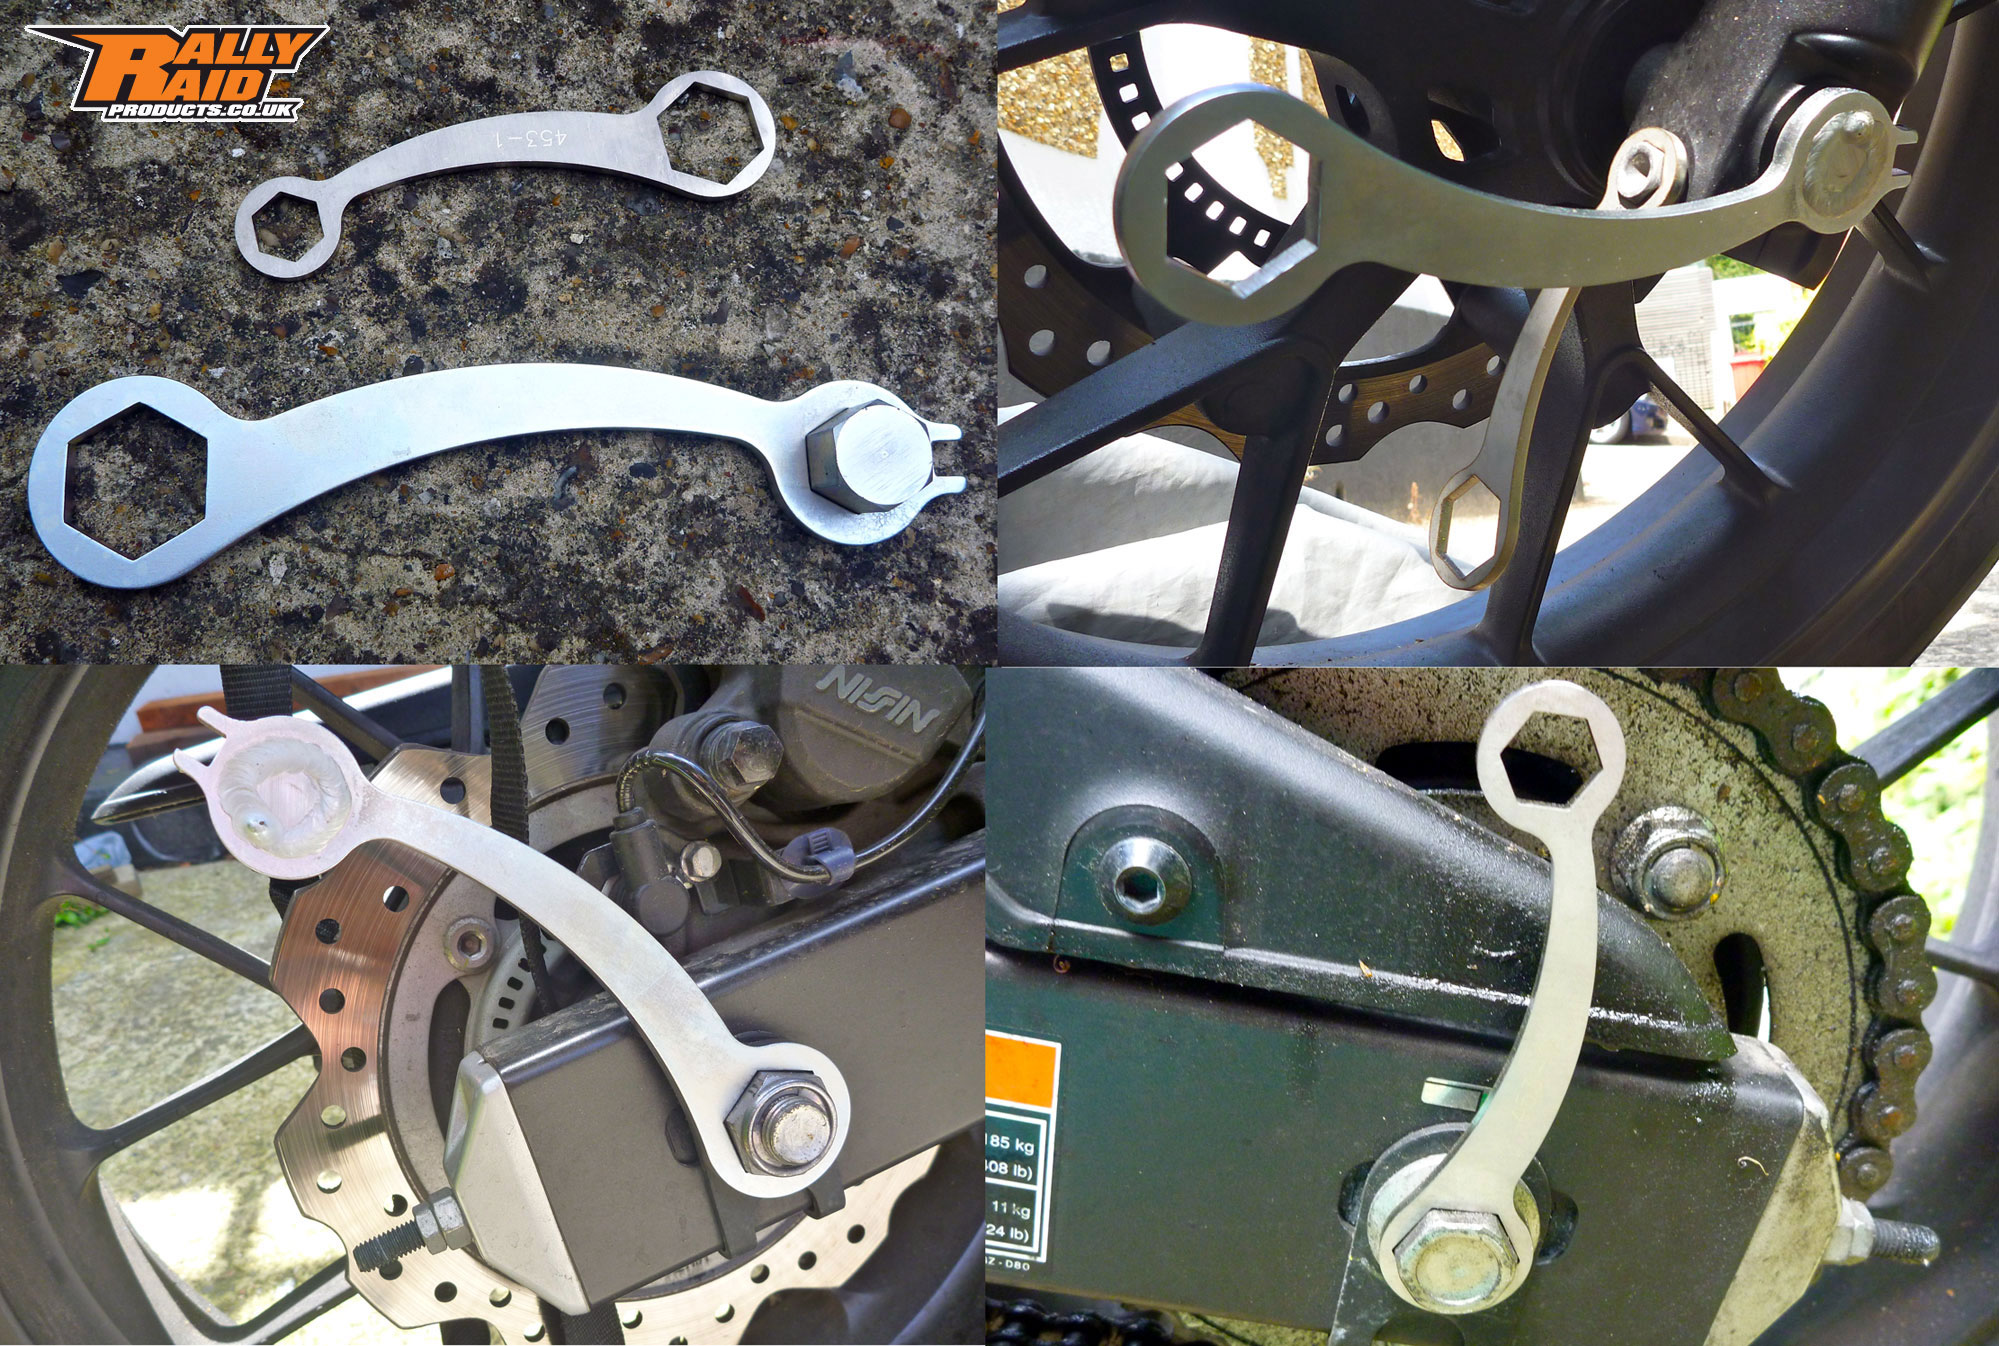
Rally Raid wheel wrenches

My bike came with no tools, even though the (used) test bike I rode in January had a set under the seat. Odd thing is they’re not even appearing on ebay or listed anywhere and word is some CB-X markets get them and some get nothing more than a hex key with which to pick your nose. Not even a C-spanner for the shock. It’s a bit like a car not coming with a jack. I know we know OE Jap tools aren’t exactly Snap-On Platinum Line but you do wonder if there’s some autistic bean-counter at Honda who isn’t able to fully appreciate the ill-will caused by absent tools with the tiny cost of sticking some under the seat. But we’ve been hearing this ‘spoil for a hap’orth of tar…’ business for years.

Rally Raid’s hard-working laser cutter to the rescue: two double-ended ring spanners in 2mm zinc coated steel (left) to cover all fittings for front and rear wheels and even a spoke key for the optinal wire wheel.

RRPspans

Windshield Adapter

cbx-beforescreen

On the CB500X forum there’s  a  l o n g  thread on screen options, and one thing you’ll soon learn is that what’s sauce for the goose is something else entirely for the gander. Some riders say stock is best, others find an aftermarket screen to be perfect/terrible and others even claim the bike is best with no screen at all. Well that just about covers it all then.

cbx-palmersid

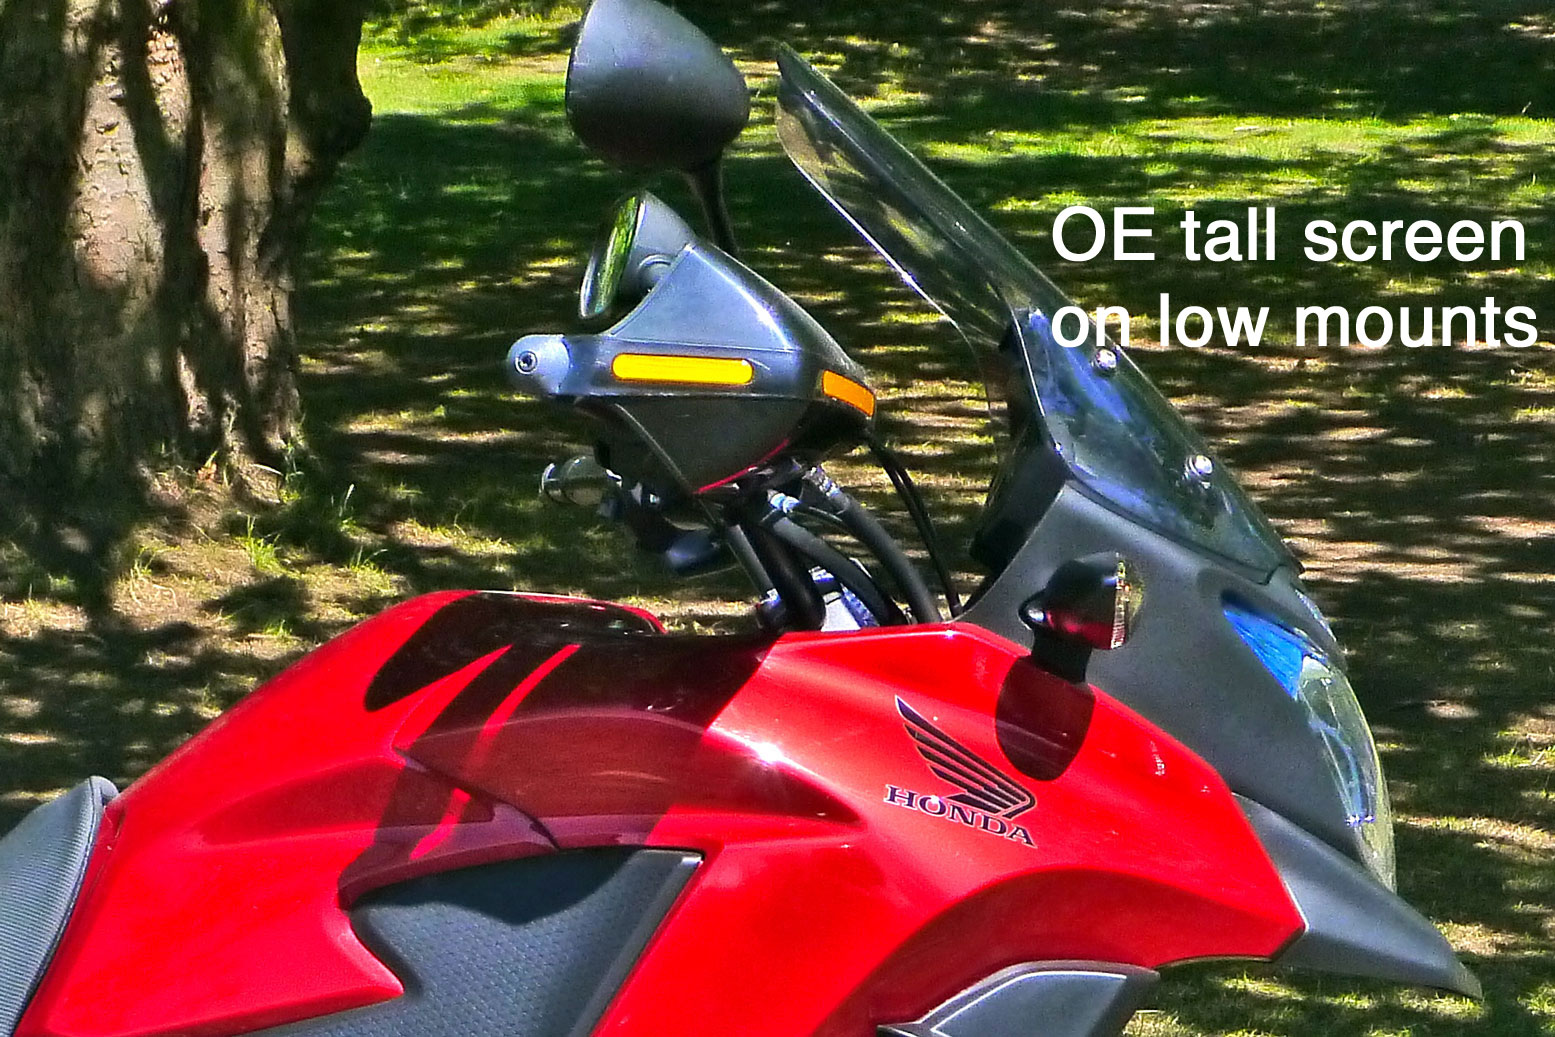
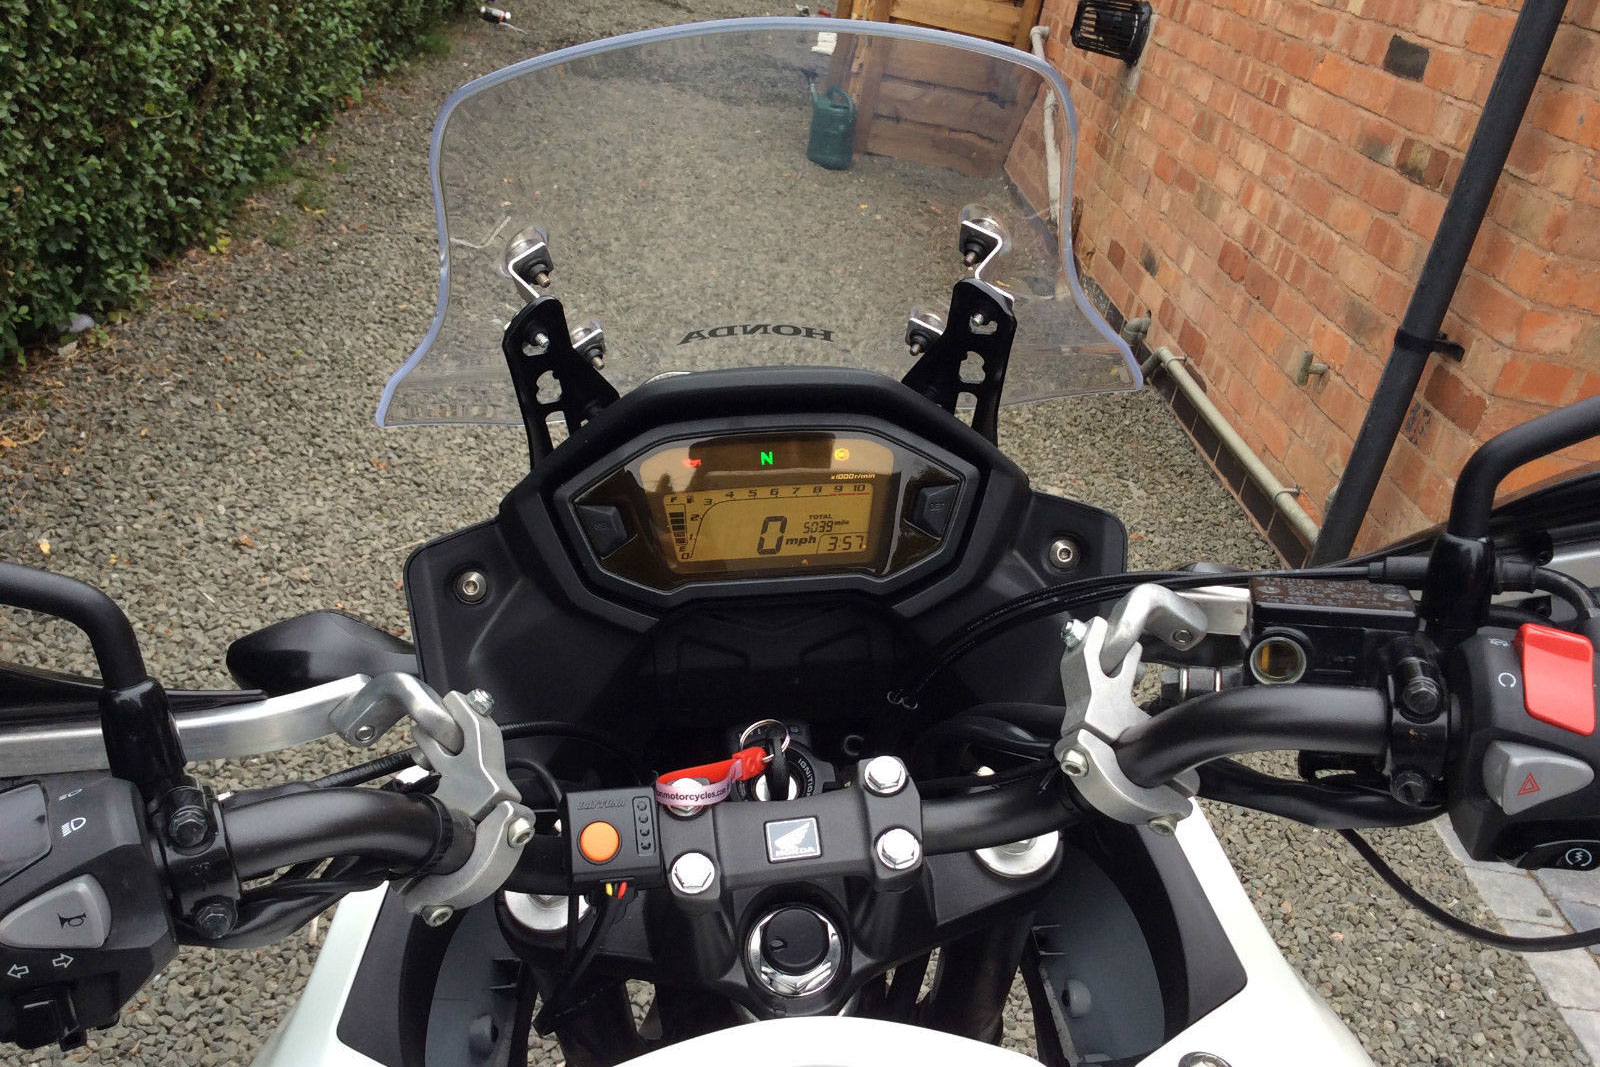
My bike came with a taller Honda screen installed which at 17″ (430mm) high x 15″ wide (curved) is OK but leans too far back (left). I can feel the air hitting the top 4 inches of my lid but I can’t say it’s unbearable buffeting or especially noisy. Let’s face it, I’m riding a motorbike not reposing in the back of a stretch limo listening to the Chemical Brothers. The bloke of the woman who sold me the CB-X suggested spacing the top mounts out by an inch or so to set the screen more vertically. It’s the sort of bodge I’d do without thinking on an old hack, but let’s try and keep this relatively new Honda looking proper for a while.

cbxbash-02

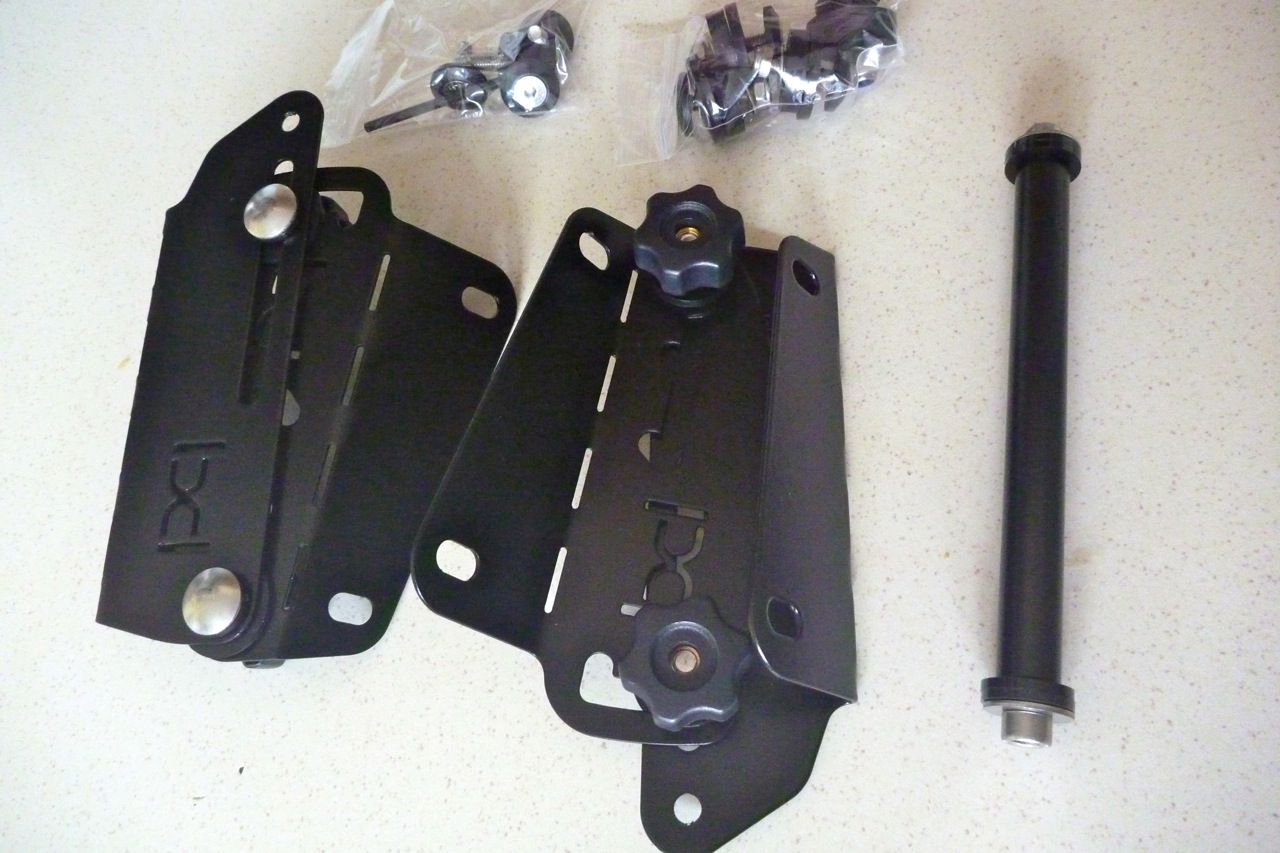
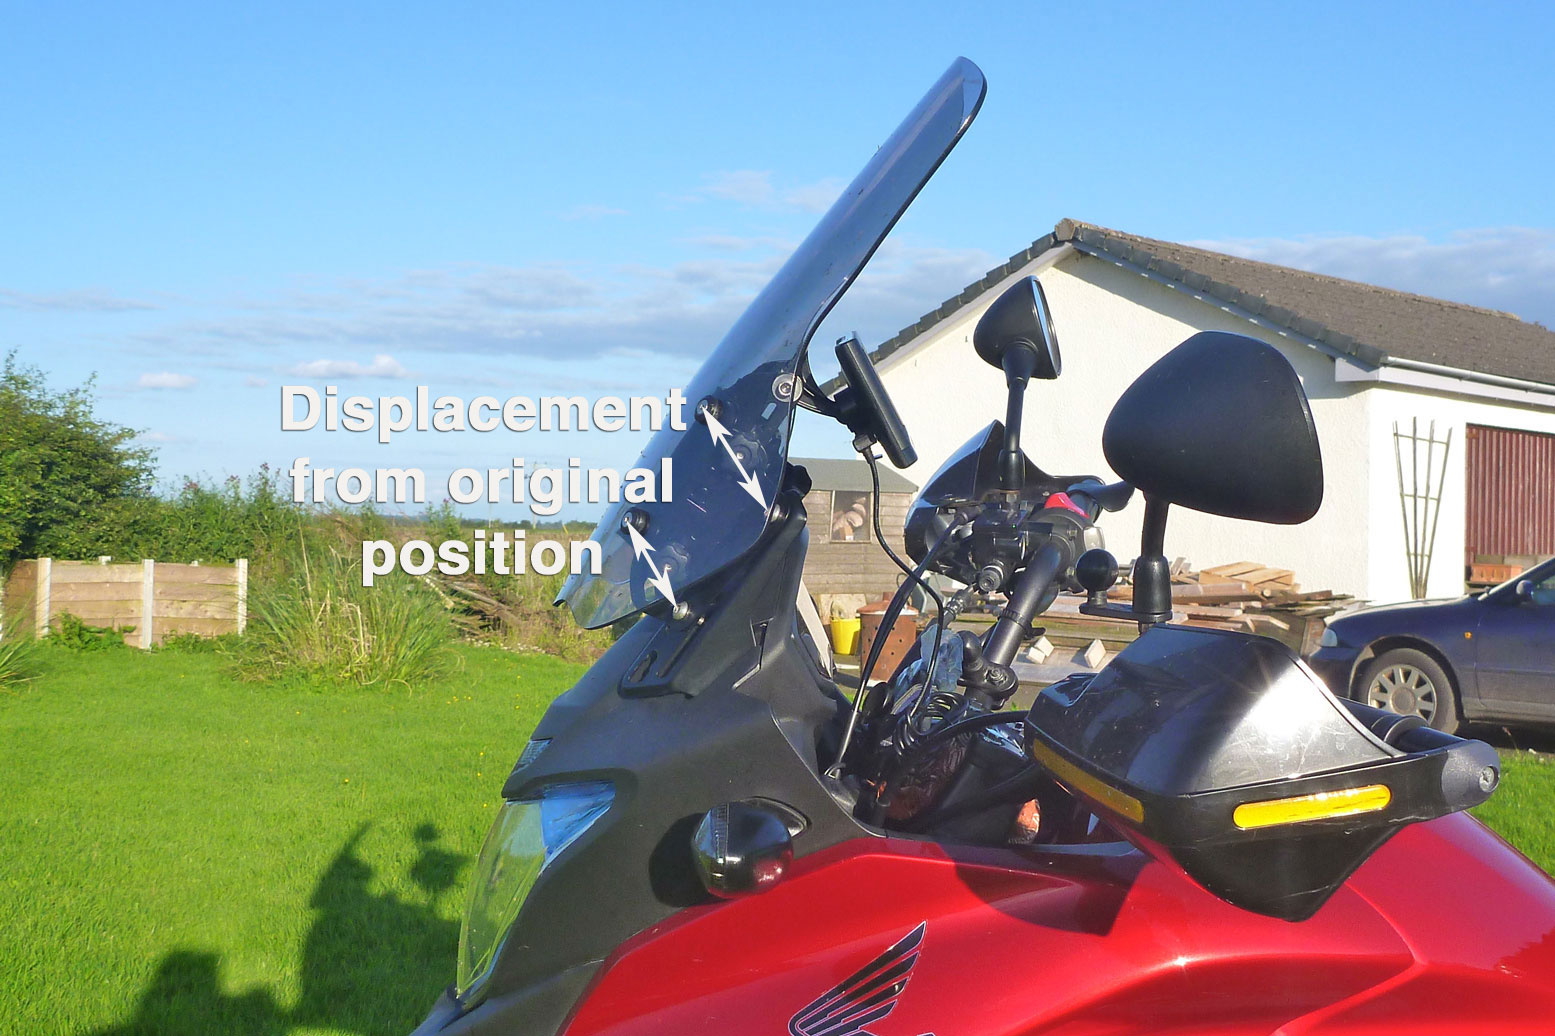
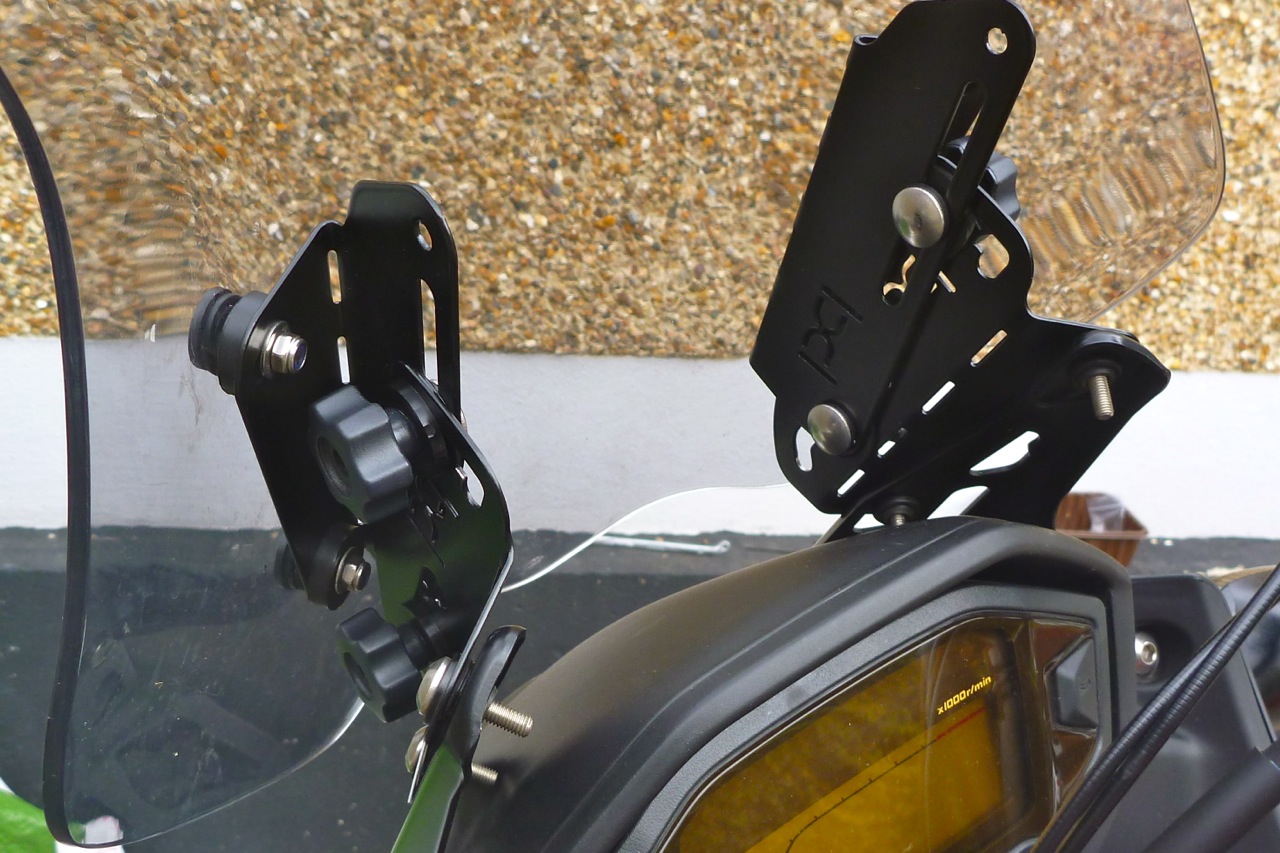
After reading that thread it seems to me that screen adjustability is the key if the goose and the gander are to be accommodated. There’s much more choice out there for CB-X windscreens than bashplates, from the likes of Givi, Puig, MRA, Madstad and others, some of them with fully adjustable mounting brackets. But because my screen is tall enough but just at a bad angle, I figured all I needed was a repositioning frame and the thread mentioned just such a thing: an adapter kit by Palmer Products who make them for dozens of bikes, and other stuff besides. Never heard of Palmer until now but their adapter fits between the OE screen and the fairing mounts to give three heights and three angles. Added to the Honda’s high or low position, that’s 18 possible positions. The full kit weighs 520g.

cbxbash-01
cbxbash-07

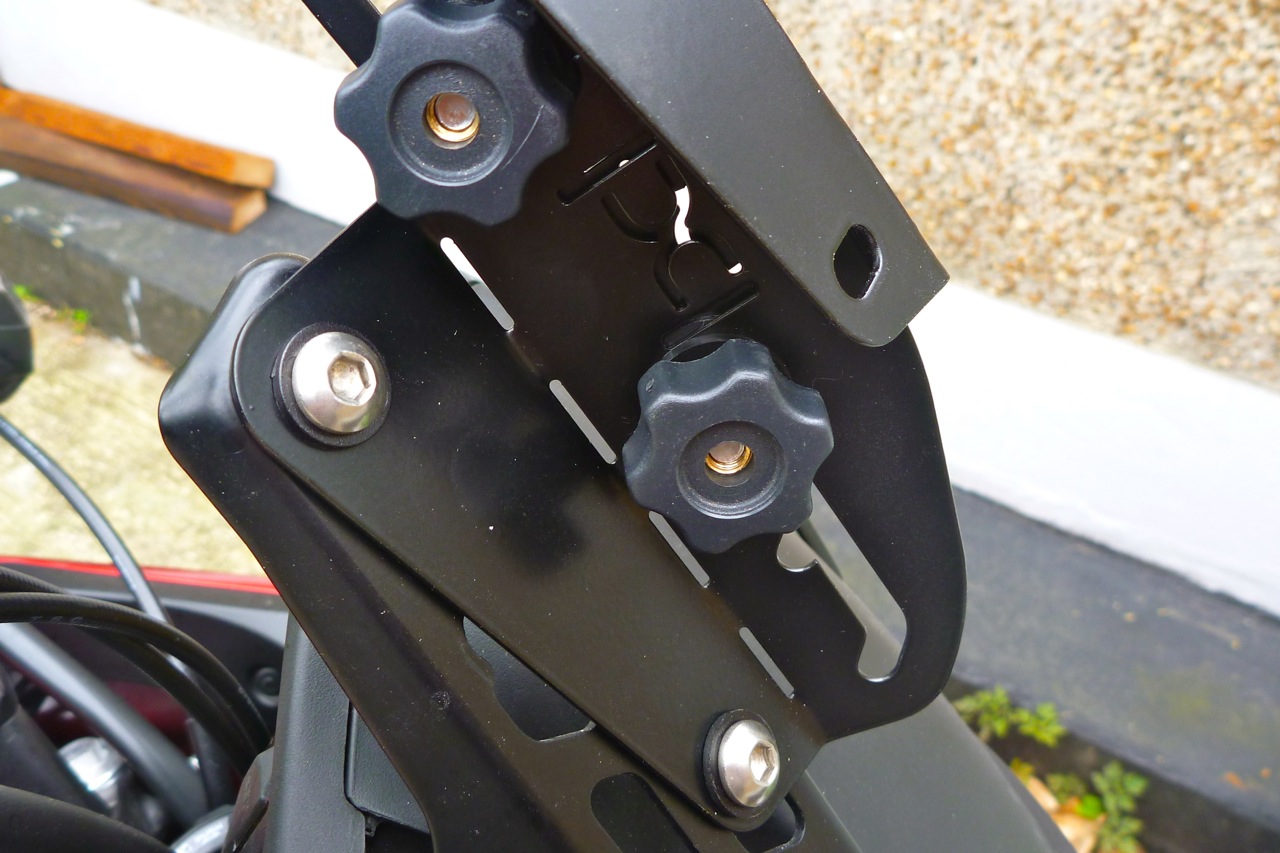
It took only 20 minutes to fit, reusing some of the Honda bolts despite a full set of fittings supplied. I paid extra for the knobs option to be able to adjust without tools, and in black rather than bare steel to perhaps make it less obtrusive on the move. With an accessory bar (not fitted yet), that came to £116, quite a lot but all nicely powder coated, well made and fitting right.

madstad

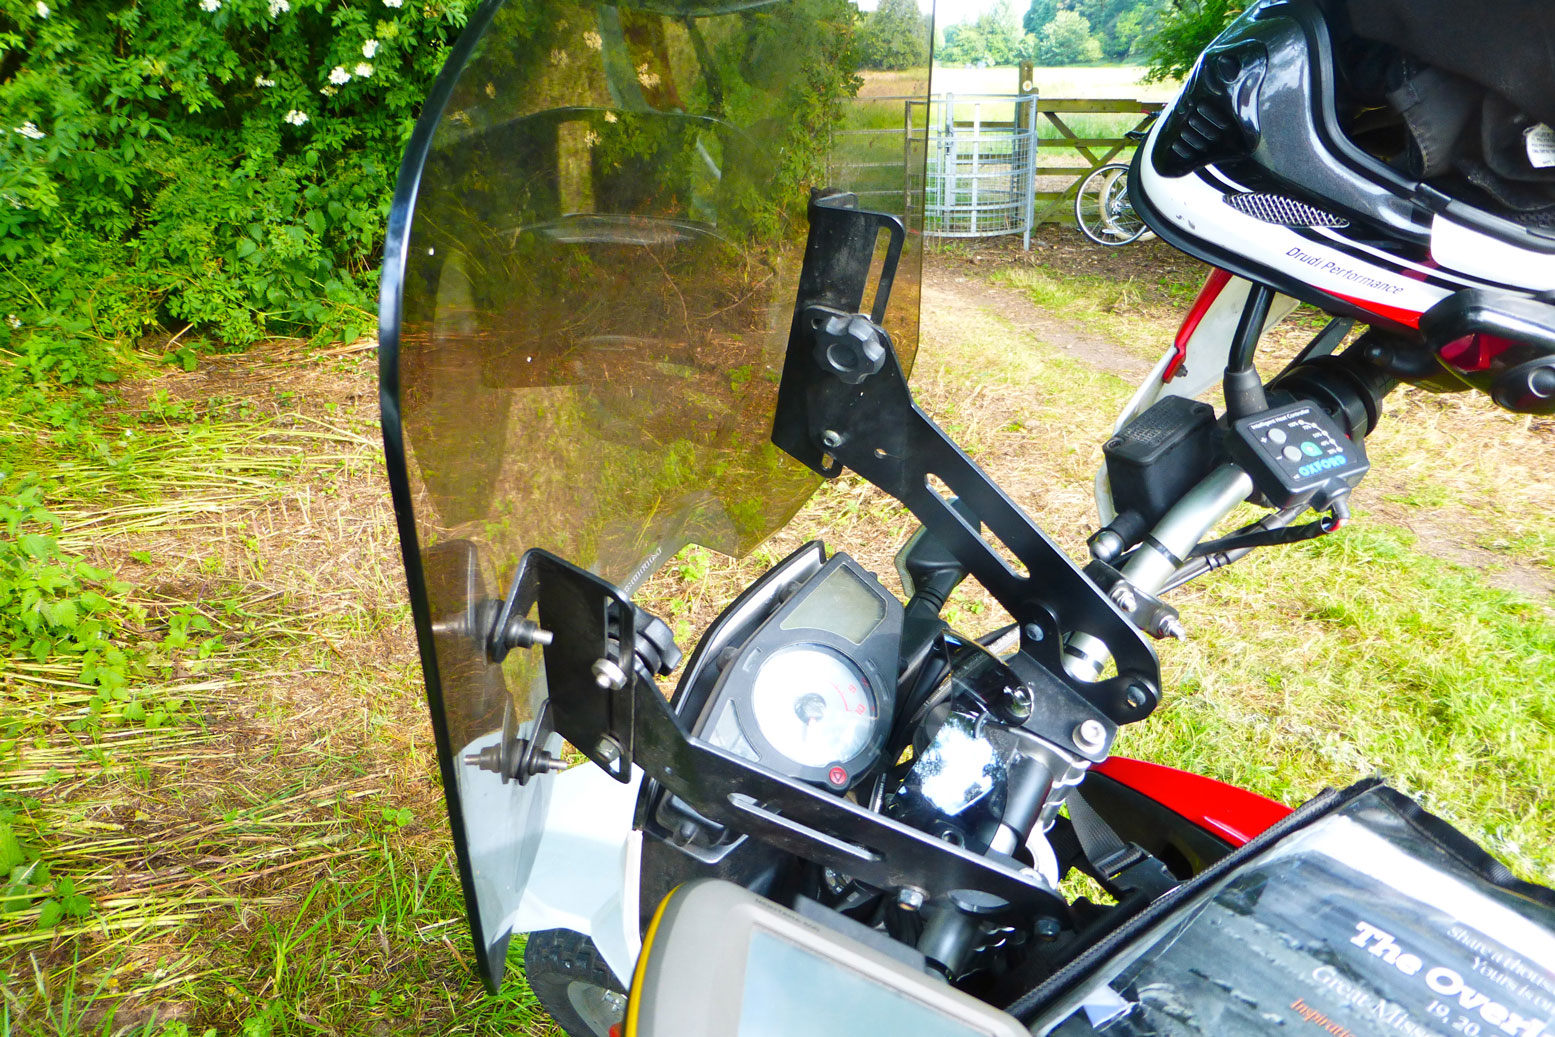
In the end I set mine up on the higher Honda level and then height 2/3 on the Palmer and 3/3 fully forward. The Palmer system looks broadly similar to a Madstad I saw recently at an overland show (right – a bar-mounted kit; they do CB-X too, see link below), but has indexing notches to give the three height and forward positions (though I suppose you could position between notches if you wanted). As it is with a US-made Madstad you have to buy their screen, costing over £200 although the few comments I’ve read not surprisingly rave about it because of the fine tuning.

cbxbash-11

I’m off on a long ride to far north Scotland next week and hope that before I arrive I’ll also have found an optimal position for the PP adjusted screen. More news about how it fared later.

Other bits lying in wait for the CB-X include a pair of fat Renthals to go with the RRP triple clamp when that gets in, and some RRP fat pegs which they kindly chucked in with the plate after John put me off some Pivot Pegz I was going to try off Adventure Spec. Right now I’m still enjoying the Honda’s  non-pivoting rubber-capped units but in the dirt they say wide platform pegs are the way to go and as part of my mission is to try new stuff, new stuff I shall try.

London to Ullapool ~ 777 miles later…

cbx-byrness

Even before I got to the end of Park Lane (a rare 40mph road in London) I could tell the Palmer wasn’t going to transform my ride to like sitting in the back of a stretched limo. Later, out on the A1 it didn’t feel much of an improvement, but as the OE screen wasn’t bad, this wasn’t bad either.
Good impressions (or indeed a comparison)  weren’t helped by the fact that I was now wearing my cheaper, noisier and more rattly Bell Moto 9 lid and not my X-Lite. And I keep forgetting to use earplugs.
At one point in the journey I moved it from Palmer height 2/3 and 3/3 fully forward to ⅔ and 2/3 – in other words angled a little more back. Well that didn’t make things worse so I’ve left it at that. The screen catches most bugs but a few still get to the visor – same with rain drops so the visor’s not out of the airflow which you’d think is the point. And the screen feels far forward for it’s slim width. The arms and shoulders catch some blast but, as has been said, I am on a motorbike. Later I noticed that over 70mph the flow does go right over which would suggest re-steepening the angle to 3/3 to make it do the same as slower speeds.

cbx-screener
cbx-cropper

Interestingly, a quick scan on ebay found a CB-X for sale and though he doesn’t mention it, at some point in 5000 miles of commuting he added some crude angle brackets to space his short OE screen forward an inch and at the same time raising the height a bit.  So there must be something to it. More experimentation is required with the Palmer, or just accepting I’m on a bike and remember the earplugs to retain what’s left of my hearing.

post
80mpg

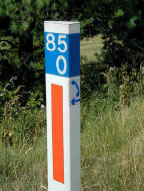
Other observations: helped a little by an Aero wool pad, the seat actually supported a 520-mile day. While doing 70mph where possible and down to 50 in traffic, the mpg was 80, with the odometre some 3.2% over (measured against roadside PKs (right) over 20km. So that’s a true 78mpg. And all in all, a great machine that’s about to get even great-er.

cbx-sunnyscot