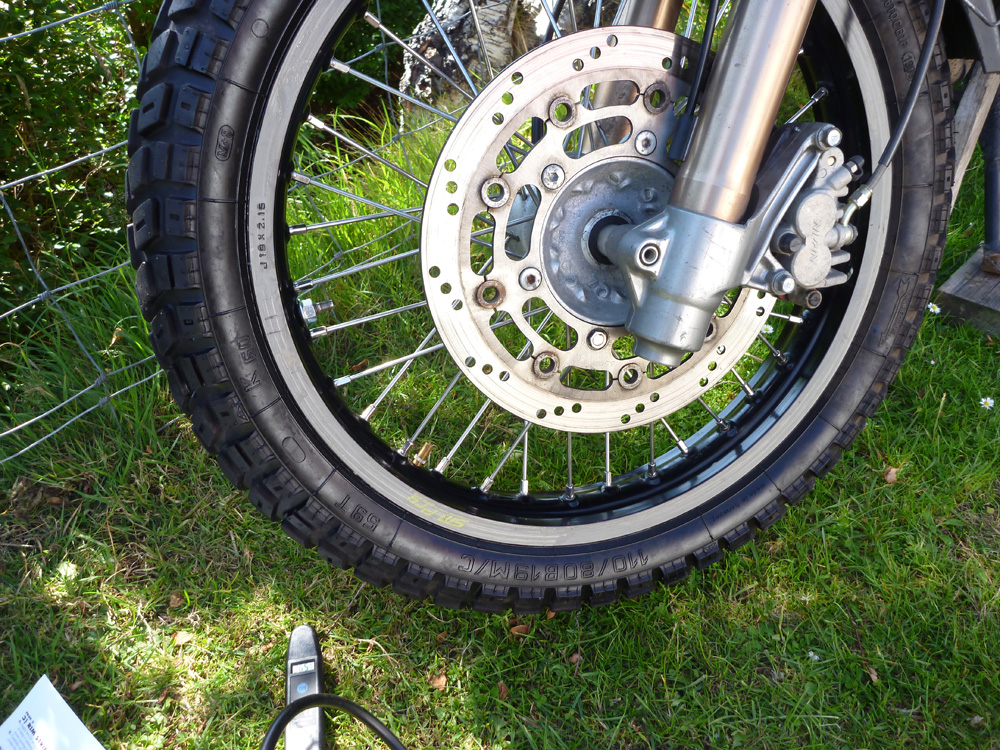
The GS-R has now shed it’s used road tyres and taken on a pair of 110/80 B 19Heidenau K60, the tyres that impressed me on the Morocco ride I took in March on the 650GS. At the same time I fitted Tubliss liners. I’m not completely set on these until they’ve proved they’ll hold air reliably – that will take a few days.
At the same time I inspected the front sprocket against a new one and found them near identical so will leave the current chain – age unknown – on the bike, even with the new back sprocket. In my experience o-ring chains last ages but then go quickly as the seals begin to fail. If I can catch the chain just before that, I might get more miles out of the sprox.
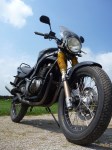
I also fitted a pair of taller, wider ‘flat track‘ handlebars, the sort of bars American street scramblers ran in the 60s and 70s, and the same price as a set of bar risers. What a great pair of bars, just as I knew they would be. The even looked good just lying on the floor.
Fitting was of course far from simple. Oh no. One crosshead on the LHS switch cluster turned into plastic at the sight of a screwdriver, cables needed re-routing rond the back of the triple clamp, but luckily the switch cluster wires – potentially the most complicated to modify – had plenty of slack tucked inside the headlamp. Anyway, much pissing about, dropped nuts, shorts cuts costing hours, but I got some bars, high and wide. Took the GS out for a lap and it feels so much more comfortable and confidence inspiring – just like a trail bike in fact. The front Heidi is worn in and normal, but I’m not keen about having to nurse an edgy back tyre while the new K60 on the back wears in. Without the weight, speed, power and breaking of the F650, it will take hundreds of miles, but I must say, so far it feels quite normal. Perhaps it was the bigger ‘Catspaw’ type K60 for bigger bikes that for a while felt odd on the BMW.
Anyway, here’s a cool film. Dave Aldana talking but shot in the UK of all places.
Tubliss Generation 2 is now widely available in 18, 19 and 21-inch sizes for WM3 (2.15”) or slimmer rims. I fitted one to the front of my Himalayan
My Suzuki GS-R ran 19-inch SM Pros and the plan was always to have them running tubeless, hopefully doing a more successful job than I did on my Tenere’s wheels a couple of years earlier. On that bike the sealed-up rear never missed a beat, but the 21-inch front leaked off-road and as I failed to monitor it, it got soft enough to ding a rim on a gnarly Moroccan climb and with that lose all pressure.
Back then I wanted to try Tubliss but they weren’t sold in Tenere sizes in the UK. I picked some up in the US for around £55 each. The vid below explains it all very loudly. Man that guy can talk!
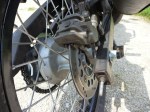
I was expecting a hard time fitting them in my Heidenau K60s – it’s a stiff tyre and you’d imagine the bulk or shape of the red plastic core and rim-lock might make tyre mounting even harder. When a sunny afternoon came by, I left the 4000-mile old K60 out against a wall to warm up a bit and then followed the clear instructions carefully. Off with the old Cheng Shin without too much difficulty, clean off the duct tape/rim tape residue and the drill an 11mm hole a few spokes up from the regular valve hole. I then talc’ed the inside of the red liner to slide better against its mini tube, lined up the rim lock clamp/tyre inflation valve and the nearby core inflator valve with the two holes in the rim (pic above; the instructions stress this is critical) and then mounted the core onto the rim.
How it works Tubliss works by using a small but extra thick bicycle-sized inner tube at very high pressure to expand the red casing onto the tyre’s bead, sealing it against the rim (see image below). By doing so it isolates the tyre’s main air chamber from the spoke nipples where air would otherwise slowly leak out.
This can be an odd concept to get your head around; a high-pressure mini-tube is still used to press and seal the tyre bead against the rim, but the tyre chamber itself is effectively tubeless. An additional hole for a rim lock is required so as to pin down the red casing and completely eliminate tyre slip and valve lean at low pressures (as happens with regular tubes at low psi). Because the thick Tubliss mini tube isn’t anywhere near the flexing tyre carcass and is inside the red casing, it would take an exceedingly long and sharp spike to puncture it. Plus everything remains cooler; the benefit of all tubeless tyres. You can still tune spokes, something not be so easily done with other spoke nipple-sealing methods. The rim lock uses a ‘hollow bolt’ which is also a valve to inflate the tyre chamber to a regular pressure. The original valve hole is used to inflate the red casing tube to 100 psi.
The core went onto the rim easily. Just follow normal bike tyre mounting techniques: make sure the red core is right down in the well of the rim as you lever the other end on. Usually I use diluted washing-up liquid but that tends to dry up quickly. This time I used more slimy 303 Protectorant; it’s the same as Armor All that Tubliss recommend. Use lots so it’s lubed forever inside. The core slipped on with no levers. WD40 will do, if stuck.
Next came the tyre. This was going to be hard, or so I thought. I double checked I had the direction arrow in the right orientation, then pushed the wheel down into the tyre using the folded metal plate which Tubliss supply, rim-lock down. Following the instructions closely (and having changed a few tyres in my time), the plate did genuinely help the core-fitted wheel slide into the tyre with less effort than normal. And if you kept pushing down as they advise, with a bit of multi-armed Vishnu-ing I got the wheel inside the tyre walls.
The rest – levering the tyre bead back onto the rim – was like regular tyre mounting: minimal lever force where possible combined with maximum lube, while always making sure the tyre bead opposite the levers is being kicked and crammed into the tyre’s well (central dip) so as to free up vital slack when levering to reduce the effort which is when mistakes are made and tubes get pinched. Like they say on the leaflet, lube is the key to this. In the end the last bit of tyre went on without the final lever. This used Heidi was not so hard to mount after all. The same-sized new K60 for the back was a bit more effort shoving inside the wheel, even with the Tubliss plate, but with slack and lube, it got there.
With all this done the next step was to see if the system held air once everything’s pumped up. There’s no reason to think the mini tube got pinched, protected as it is inside the red plastic core. The key is the red liner sealing against the bead of the tyre to keep the tyre at the right pressure. You need to put 100 psi into the mini tube to make sure it seals: You want to check your average mini compressor will have the power to do that, but because the volume is tiny it may be easier than you think – it’s not like pumping up a full sized moto tyre to 100 psi.
Testing, testing
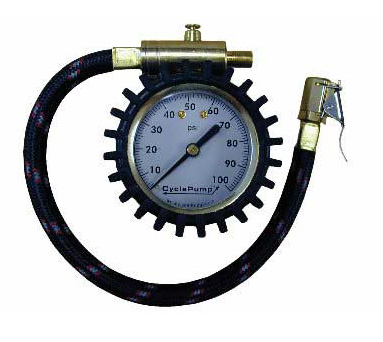
You may read complaints that fitting Tubliss doesn’t work first time round or doesn’t work at all – the tyre goes down – but so far overnight both tyres have held their pressure. Checking the tyre and core pressures after 10 days, I found both cores down by about 10%. I think that’s acceptable and can’t be sure everything was at the right or equal pressures to start with so I topped it all up to 100 psi and 33 for the tyres and will check again in a while. Tubliss do say to check pressures before each ride. Unfortunately, checking the high pressure cores blew the brains out of my digital tyre gauge (right) and those metal sliding rod types only go up to 50 psi. I have a bulky Cycle Pump gauge (left) that’s sat around for years and whose moment may have come. As mentioned, a mini-compressor able to deliver 100 psi without fatal results will be needed. Not sure my Cycle Pump (below) or anything like it can manage – we’ll see on the Himalayan. Anyway, there are always roadside garages.
Should you have a flat on the road it’s only the tyre chamber that loses pressure, not the small sealing tube of course. Once quickly plugged (left), the tyre can be reinflated with a regular bike compressor to normal road pressures.
Initially Tubliss didn’t claim to be suited to road riding let alone overlanding, but that seems to be changing as the system has proved itself. What is important is making sure the tyre sealing tube is kept at around 100psi. That may take more frequent checking than you’re used to, at least until you get a feel for the rate of loss, if any. On the road and out in the world a reliable mini-compressor is a vital tool.
A mate with Tubliss in his TTR has had no probs, including air freighting it around the world. He’s reminded me that, as the video above mentions, injecting sealant like Slime/Oko/Ultraseal (right) is a good idea and over time helps seal the tyre right up. I did the same to the Tenere when I sealed those wheels (right) and if nothing else it helped highlight leaks oozing out of the front.
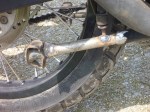
The GS500R Overlander project bike is taking shape, although it’s not quite a fully set jelly. The critical mod: adapting the rear DR650 hub and brake to fit the donor bike’s swing arm and chain run has been completed pretty seamlessly by Matt and his team of farmyard engineers (see pic below).
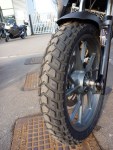
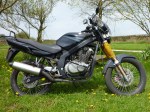
I know what you’re thinking: why does the front tyre look fatter than the back – is it the camera angle? No, it’s just that at the time I didn’t want to waste money on new 19-inch tyres in case the GS turned into what the French would call, unpiège de mort. So I bought used cheapies just to get the thing rolling, first for the front, and a while later another for the back which was not identical. Just as well really, as following my recent Morocco trip I’ve discovered that Heidenau K60s are the ‘bomb’, as the bloke on the right would say.
Half-built impressions of half-baked bike It took a bit of firing up off Matt’s V8 Landrover offroader to get the GS running while whipping out a plug to dry and blowtorch. Even then the GS didn’t seem to run well. Was there a badger nest in the air filter? I could barely pull up the track to the road, and while slipping the clutch mistakenly thought it was because the gearing was way off. As with most things on this build, we took an educated guess here, but at 42/16 the gearing’s actually turned out to be in or around the ball park.
Running down to the village to top up on fuel I thought, jeez, this 500 really is a lot slower than the BMW FGS650 twin I’ve been riding lately. Of course that bike has got at least twice the horsepower and 20 years of development on the G. Heading back, the weight of that extra tenner of unleaded in the tank saw the bike struggle to escape the dale. Something was not right. I pulled over and pulled off the left plug cap – no difference. A ha! as the bloke on the right would say. A little bit of fiddling with the plug cap got past more cobwebs, the second barrel fired up like a Saturn V and suddenly the GS500 was running like… a GS500.
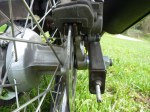
I tore off up the lane like a teenager on his first moped, awestruck at the feeling of raw power. Like Ogri’s beaky-nosed mate Malcolm (left) I was heading for a prang, so it was time to consider braking. The DR650 front end’s disc had been binding a bit as the pads off one scrapped DR got to know the disc rotor from another. A quick check at the fill up proved that the rotor wasn’t getting hot and causing the lame performance. In fact, yanking the lever did see the forks dip hard in response so it can get there if it has to. I guess it’s just not the quality of braking I’d got used to while running the 2012 BMW. The back brake was considerably slacker, partly we suspect because the DR650 calliper which had to be used to clear the Talon spokes, may not compliment the bore of the GS’s master cylinder. So the back brake is mushy and with a long throw. Maybe a bleed or a braided hose will bring it round, or a master cylinder off a DR.
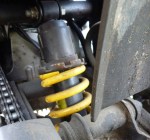
Another problem. The main stand had to be extended by several inches (right) and it now takes an extreme heave to get the bike up; not something I could see myself being able to do with baggage at the and of a tough day on the road. The feet are now clearly too far back from the pivot point for the factory-set leverage. And yet it’s as long as it needs to be, lifting the back a couple of inches off the deck, like a normal stand. Curved stand feet could get round this.
But in fact when I think about it, the GS is a bit too high; I can’t get my feet flat on the ground. With the new suspension and the 19s it’s probably jumped up at least four inches judging by at the extended stand. I really appreciated the BMs low height on the dirt in Morocco and am not looking for masses of clearance on the GS-R. In fact this will be easy to modify: slide the forks up the clamps and back the shock off max preload where it is set now (left). Didn’t get a chance to do all that, as it was a flying visit to the Mattlabs.
Steering feels a bit slow too, but I think the height may have something to do with that. As it is I don’t think the steering of a regular GS500 would get a job in a bread slicing factory. Getting used to the bike and modulating suspension levels may fix all that, and anyway there are new tyres to come. The dirt bars too felt a bit narrow for my liking, or no wider than stock and maybe could do with a lift. Again, easily done. It’s hard to tell if a thinner back tyre greatly affected the steering or ride, not having ridden a bike with back-to-front tyres before. My plan is to run identical-sized tyres front and back. One thing’s for sure, the seat feels great, although as mentioned earlier, the rear-set pegs could stitch the knees up on a long day – and that could be crippling. So maybe some sort of highway peg off the crash bars will work. One good thing, even though it’s tall right now the GS feels pretty light for what it is and a good 20 kilos lighter than the BMW GS650 which was at least 200kg. Might try and weigh it one time.
What’s left to do Once the above mods are seen to Matt the Mig or Andy the Arc are going to fabricate a rack, but not just another off-the-shelf, too-far-back, 18-mil loop jobbie like I used on Morocco on the BMW. Something as securely mounted, but with a hinged or somehow retractable platform plus a ‘sheep rack’ platform on the back – always handy. That way the pans can sit rather than hang – a much better arrangement for an overland load, IMHO.
I was going to fab’ some PVC pannier liners with a heat gun and roller, and a mate had offered to sew me up some Cordura outers. I would have kept the Monsoons I used in Morocco if only they had been my ‘Fibonnacci shape’: less wide, more long and bigger, but since writing this Adventure Spec have started selling a ‘Magadan bag‘ with input from Walter Colebatch and based on the Steel Pony Gascoyne he’s used in Russia and a bag whose dimensions I’ve admired myself, if not the canvas fabric. If all the hard work’s been I’m be happy to order me a pair.
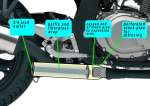
One thing I was also thinking of is junking the fat OE pipe and fitting something like this (right). A cheap ‘one-size-fits-all’ mega can be bought of ebay for 30 quid but I’m not 17 anymore and couldn’t bear a loud pipe or unravelling all the jetting and valve-burning issues. It seems the GS muffler only weighs some 5 kilos anyway so if pannier space is so important why not just chop the regular pipe at the neck and drop the angle as in the gif below. It’ll be good to have the bags in close and the pipe underneath, and its an easy job, giving what, at least four inches more bag space. After my over-width Morocco experience and seeing how slim the GS is, it would be nice to keep it that way.
Anyway, I’m off to the Overland Expo in Arizona in a couple of weeks, a great chance to pick up some goodies in the US, including a pair of Tubliss liners (left)which enable you to run tyres tubelessly on spoked rims. As you may know, I tried doing that before without complete success.
I know Tubliss are said to be for off-road use only, but I’ve interpreted this to be an issue of legal liability on the pubic highway rather than anything to do function or real-world safety. Robin, with whom I rode in Morocco last month has run Tubliss on his TT250R all over the world for years (that’s him right with all his kit – including full camping gear).
A meekly powered GS500 with a modest payload isn’t going to tie the tyres in knots. I plan to fit the front 110/80B (59 T) K60 Scout (my review) I used on the BM in Morocco (left) and another new one for the back. The 100/90 57 H is a tempting 30% cheaper and still with a load index 230 kilos and a 130mph rating, neither of which the GS will see in its lifetime, but I’d need two so I’ll stick with the wider 110/80 at another 100 quid.


 How it works