Tag Archives: Heidenau K60 tyres

GS500R – A Ride Across Britain

Index page

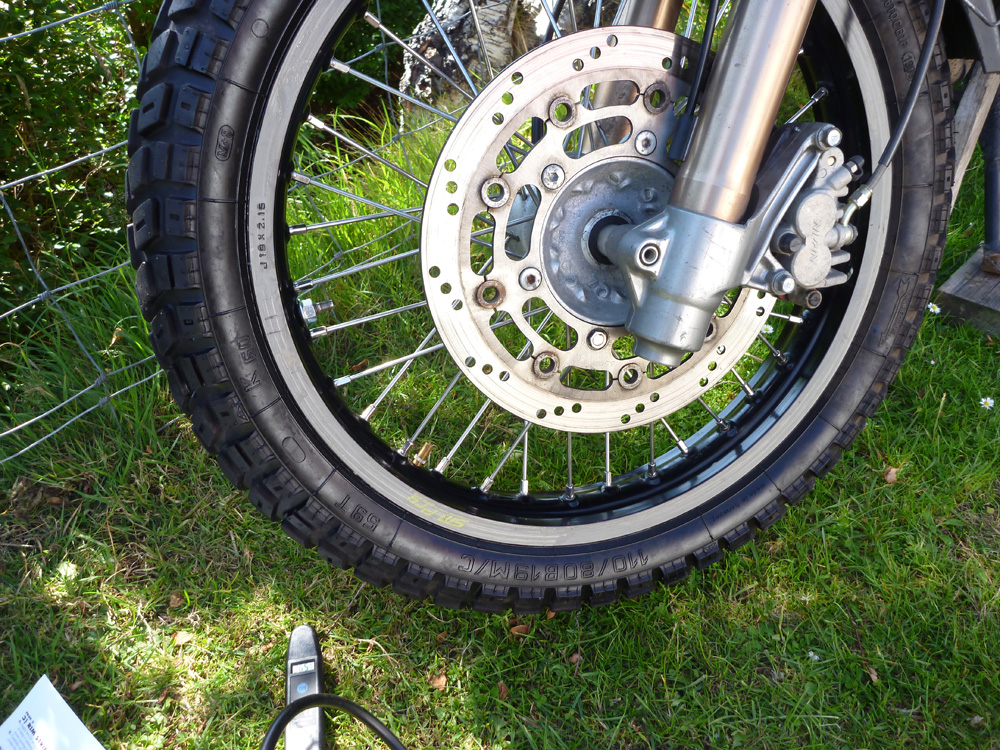
Since I rode the GS up to Scotland in June it’s received a few mods and the 700 mile ride back south (right) was a chance to put them to the test. Among other things I’d fitted K60 tyres on Tubliss liners with a splash of Slime. I made the back brake work, nearly finished my piperack, fitted flat track bars and an LED riding lamp.

Setting off for the first 250-mile stage to a mate’s near Stirling west of Edinburgh was a sparkling day (left), but already there were warnings that an incoming storm would wipe any traces of late summer warmth off the face of Britain. Any chance of enjoying a slow ride home would be better compressed into the usual dash. A day after I got back it was another ‘month’s rain in a day’ story we’ve been hearing all summer. Roads I’d ridden hours earlier were closed by flooding or high winds, the trains stopped running to Edinburgh and a coastal town near Aberdeen got caked in wind-borne sea foam.

Backing up, the ride over the Cairngorms proved I really should have remembered my Aero Kanetsu electric vest. Running it off the GS’s battery was one reason for fitting the SR-M LED lamp (to reduce the alternator load). Even in the sun the Trail Tech Voyager (to be reviewed) barely reached 9°C, so a hot soup in Aviemore spread a bit of warmth back into the limbs.

Day two was going to have to be a 10-hour, 450-mile haul right through to London if I was to miss the much forecast gales. Even then, I could’t bare the thought of the dreary but functional M6 and M1 motorways, with the statutory pile-up/hold-up somewhere in the Northamptonshire area. Instead, a more interesting line jumped off the map: A7 from Edinburgh to Galashields, hop over to the A68 which led over the border to Darlington, and from there slot onto the A1 to London. The variety made covering the necessary distance satisfying and I knew the run through Northumberland and County Durham would be fun.

The miles piled on and the GS got notably smoother, as engies do. The lightly loaded Magadans sat behind me, tucked well in and attached or resting on the piperack, while the Voyager kept tabs on various aspects of my progress as I rode up some sweepers to the English border strung across the Cheviot Hills (right).

It was a sunny Sunday and there seemed as many road bikes out as cars, but it has to be said cars do get in the way of enjoying a smooth ride, even on a GS500. I must have been stuck behind one of these or eyeing up the Voyager when the A68 took an sneaky right just before Otterburn while I blundered on along the A689 towards Newcastle. Didn’t want to go there so I turned right onto single track farming roads which I knew would lead to the A68 somehow. Without maps or a satnav, the Voyager’s compass proved a handy aid to negotiating the angular byways until I popped out back on track near Corbridge where the weekend throng were enjoying pub lunches. A fill up saw the mpg improve to 62mpg after yesterday’s all time low of 57 (conversion table here).

I was due for a feed myself but wanted to catch up on my error and find an ambient eatery for a quick and casual refill. That turned out to be a Sunday bakery in a place called Tow Law near Consett. Consett I’d heard of – your man Edmund Blackadder (right) was born there, and in 1980 its steel mill – one of the oldest in the country – was not so much closed down as eradicated. The inevitable social consequences became a byword for post-industrial collapse.

Sat at over 1000 feet in the east Pennines, nearby Tow Law was a smaller version of Consett, established after a Victorian era coal rush but now plateauing out following a steep decline at the end of the last century. But it had a Greggs (left) – the first I’d seen in months, so Tow Law is alright by me. Two hot pies, a cream cake and a coffee. I was primed for the next 6 hours.

Soon enough the A68 ran into the A1, the Great North Road built by the Romans. The better part of the day was over now, all that remained was to ride into the rain. That started somewhere in Lincolnshire, a light drizzle that the winds kicked up into a full-on lateral hosing. Like many bikers before and since, I sat on some Armco pulling my Rukka one-piece over my legs and wrapped the top half under the waxed Falstaff which was to be put to the test, along with the Magadans, the Rukka itself, the GS with it’s new K60 tyres and my X-Lite. I was also seeing how neoprene kayaking gloves worked as wet weather gloves (short answer: they don’t).

What rider isn’t familiar with that trance of concentration that envelopes you when riding a busy road in the wet. The bike is humming as you try to maintain momentum while knowing it takes just one slow- or too fast reaction by you or others to become the unwelcome filling in a pile-up sandwich. Meanwhile your gear slowly begins to succumb or resist the 70-mph onslaught. If I was looking at myself behind the cosy flip-flap, flip-flap of some wiper blades I’d be thinking ‘cripes, rather you than me, mate’. The temperature dropped to 6 degrees, not a long way from snow, and the rain washed off the bugs but started running down the inside of the X-Lite’s visor, further reducing visibility while I bored through the spray. It was the autumnal equinox and luckily some sort of daylight shone through the murk. The thin neoprene gloves were proving to be a fast track to rheumatism, but the PVC Rukka lowers and even my old Altberg boots stayed immune. So too were the Magadans it turned out later. The insides got damp (they don’t claim to be waterproof) but barely a drop licked the outside of the thick inner bags. And the K60 tyres never missed a beat on the motorway or while cutting across Sunday night traffic through the middle of London.

Using the Magadans
Although it was only a short ride, I got a bit more of a feel for using the Magadans. The buckle idea I mentioned is definitely the way to go to replace the over-seat velcro. As the bags sag or lift with different payloads you want to make small adjustments and doing that accurately with the double-sided velcro is a pain. With a ‘friction-bar’ buckle (right) a quick tug or release and you’re done.
Opening the bags for access is of course easy but the inner bags are rather stiff when cold and so difficult to roll up and clip while complying with the outer form. But it was a cold day and anyway, the are scores of roll-top dry bags available, either full-size singles, or smaller multiples to help compartmentalise. Though it’s much thinner coated taffeta nylon, Exped make a light blue XXL 40-litre rucksack liner dry bag (left) with taped seams and a white interior. As with the Kriega Overlanders, a white or light colour would make digging around to find stuff a little easier.
I lashed on my sewn on D-rings to  the rack rather crudely and with numb hands had to yank them off when I got home. Once I have the rack finished I’ll be able to make some permanent attachment points on it and figure out a quick clip-on system, probably a smaller, one-inch version of the black clips pictured right.

Not so amazing or surprising, was the Falstaff’s performance. After an hour I could feel the wet against my arms just as I’d done in Spain months earlier, but more so. It was only when I got home that I saw the entire lining bar a small patch on the back (right) was soaked. My wallet and phone in the inside pocket were on the way to saturation. What a shame. Design and construction wise it’s a great bit of kit, but it doesn’t do what it needs to so I won’t be wearing that again.

Still, now I know what works which so far still includes the Suzuki GS-R. I can’t say I notice any negative roadholding or handling issues from what might be seen as a thin rear tyre or indeed running identical tyres front and rear like an old Lambretta. Again I’m surprised how comfortable and endurable long days are on this bike, even in sub-optimal clothing. A big part of it must be the seat which engages well with the corresponding part of my anatomy, but I also wonder if it’s something to do with a modest engine and braking power which puts little stress on the body, while being enough not to feel vulnerable and under pressure in traffic. That was the reason for choosing and adapting an otherwise ordinary machine.

GS500R – tyres and bars

Index page

The GS-R has now shed it’s used road tyres and taken on a pair of 110/80 B 19 Heidenau K60, the tyres that impressed me on the Morocco ride I took in March on the 650GS. At the same time I fitted Tubliss liners. I’m not completely set on these until they’ve proved they’ll hold air reliably – that will take a few days.

At the same time I inspected the front sprocket against a new one and found them near identical so will leave the current chain – age unknown – on the bike, even with the new back sprocket. In my experience o-ring chains last ages but then go quickly as the seals begin to fail. If I can catch the chain just before that, I might get more miles out of the sprox.

I also fitted a pair of taller, wider ‘flat track‘ handlebars, the sort of bars American street scramblers ran in the 60s and 70s, and the same price as a set of bar risers. What a great pair of bars, just as I knew they would be. The even looked good just lying on the floor.


Fitting was of course far from simple. Oh no. One crosshead on the LHS switch cluster turned into plastic at the sight of a screwdriver, cables needed re-routing rond the back of the triple clamp, but luckily the switch cluster wires – potentially the most complicated to modify – had plenty of slack tucked inside the headlamp. Anyway, much pissing about, dropped nuts, shorts cuts costing hours, but I got some bars, high and wide. Took the GS out for a lap and it feels so much more comfortable and confidence inspiring – just like a trail bike in fact. The front Heidi is worn in and normal, but I’m not keen about having to nurse an edgy back tyre while the new K60 on the back wears in. Without the weight, speed, power and breaking of the F650, it will take hundreds of miles, but I must say, so far it feels quite normal. Perhaps it was the bigger ‘Catspaw’ type K60 for bigger bikes that for a while felt odd on the BMW.

Anyway, here’s a cool film. Dave Aldana talking but shot in the UK of all places.

Fitting Tubliss liners (GS500R; Himalayan)

Updated 2020
Tubeless Conversion Index Page
GS500R Index Page Himalayan Index Page

Tubliss Generation 2 is now widely available in 18, 19 and 21-inch sizes for WM3 (2.15”) or slimmer rims. I fitted one to the front of my Himalayan

himtublie

My Suzuki GS-R ran 19-inch SM Pros and the plan was always to have them running tubeless, hopefully doing a more successful job than I did on my Tenere’s wheels a couple of years earlier. On that bike the sealed-up rear never missed a beat, but the 21-inch front leaked off-road and as I failed to monitor it, it got soft enough to ding a rim on a gnarly Moroccan climb and with that lose all pressure.
Back then I wanted to try Tubliss but they weren’t sold in Tenere sizes in the UK. I picked some up in the US for around £55 each. The vid below explains it all very loudly. Man that guy can talk!

I was expecting a hard time fitting them in my Heidenau K60s – it’s a stiff tyre and you’d imagine the bulk or shape of the red plastic core and rim-lock might make tyre mounting even harder. When a sunny afternoon came by, I left the 4000-mile old K60 out against a wall to warm up a bit and then followed the clear instructions carefully. Off with the old Cheng Shin without too much difficulty, clean off the duct tape/rim tape residue and the drill an 11mm hole a few spokes up from the regular valve hole. I then talc’ed the inside of the red liner to slide better against its mini tube, lined up the rim lock clamp/tyre inflation valve and the nearby core inflator valve with the two holes in the rim (pic above; the instructions stress this is critical) and then mounted the core onto the rim.

tubli-dual-airHow it works
Tubliss works by using a small but extra thick bicycle-sized inner tube at very high pressure to expand the red casing onto the tyre’s bead, sealing it against the rim (see image below). By doing so it isolates the tyre’s main air chamber from the spoke nipples where air would otherwise slowly leak out.
This can be an odd concept to get your head around; a high-pressure mini-tube is still used to press and seal the tyre bead against the rim, but the tyre chamber itself is effectively tubeless. An additional hole for a rim lock is required so as to pin down the red
casing and completely eliminate tyre slip and valve lean at low pressures (as happens with regular tubes at low psi). Because the thick Tubliss mini tube isn’t anywhere near the flexing tyre carcass and is inside the red casing, it would take an exceedingly long and sharp spike to puncture it. Plus everything remains cooler; the benefit of all tubeless tyres. You can still tune spokes, something not be so easily done with other spoke nipple-sealing methods. The rim lock uses a ‘hollow bolt’ which is also a valve to inflate the tyre chamber to a regular pressure. The original valve hole is used to inflate the red casing tube to 100 psi.

tubly

The core went onto the rim easily. Just follow normal bike tyre mounting techniques: make sure the red core is right down in the well of the rim as you lever the other end on.
Usually I use diluted washing-up liquid but that tends to dry up quickly. This time I used more slimy 303 Protectorant; it’s the same as Armor All that Tubliss recommend. Use lots so it’s lubed forever inside. The core slipped on with no levers. WD40 will do, if stuck.

Next came the tyre. This was going to be hard, or so I thought. I double checked I had the direction arrow in the right orientation, then pushed the wheel down into the tyre using the folded metal plate which Tubliss supply, rim-lock down. Following the instructions closely (and having changed a few tyres in my time), the plate did genuinely help the core-fitted wheel slide into the tyre with less effort than normal. And if you kept pushing down as they advise, with a bit of multi-armed Vishnu-ing I got the wheel inside the tyre walls.

The rest – levering the tyre bead back onto the rim – was like regular tyre mounting: minimal lever force where possible combined with maximum lube, while always making sure the tyre bead opposite the levers is being kicked and crammed into the tyre’s well (central dip) so as to free up vital slack when levering to reduce the effort which is when mistakes are made and tubes get pinched.
Like they say on the leaflet, lube is the key to this. In the end the last bit of tyre went on without the final lever. This used Heidi was not so hard to mount after all. The same-sized new K60 for the back was a bit more effort shoving inside the wheel, even with the Tubliss plate, but with slack and lube, it got there.

tbs-front

With all this done the next step was to see if the system held air once everything’s pumped up. There’s no reason to think the mini tube got pinched, protected as it is inside the red plastic core. The key is the red liner sealing against the bead of the tyre to keep the tyre at the right pressure. You need to put 100 psi into the mini tube to make sure it seals: You want to check your average mini compressor will have the power to do that, but because the volume is tiny it may be easier than you think – it’s not like pumping up a full sized moto tyre to 100 psi.

bestguage

Testing, testing
You may read complaints that fitting Tubliss doesn’t work first time round or doesn’t work at all – the tyre goes down – but so far overnight both tyres have held their pressure. Checking the tyre and core pressures after 10 days, I found both cores down by about 10%. I think that’s acceptable and can’t be sure everything was at the right or equal pressures to start with so I topped it all up to 100 psi and 33 for the tyres and will check again in a while. Tubliss do say to check pressures before each ride. Unfortunately, checking the high pressure cores blew the brains out of my digital tyre gauge (right) and those metal sliding rod types only go up to 50 psi. I have a bulky Cycle Pump gauge (left) that’s sat around for years and whose moment may have come. As mentioned, a mini-compressor able to deliver 100 psi without fatal results will be needed. Not sure my Cycle Pump (below) or anything like it can manage – we’ll see on the Himalayan. Anyway, there are always roadside garages.

tltwit

Should you have a flat on the road it’s only the tyre chamber that loses pressure, not the small sealing tube of course. Once quickly plugged (left), the tyre can be reinflated with a regular bike compressor to normal road pressures.
Initially Tubliss didn’t claim to be suited to road riding let alone overlanding, but that seems to be changing as the system has proved itself. What is important is making sure the tyre sealing tube is kept at around 100psi. That may take more frequent checking than you’re used to, at least until you get a feel for the rate of loss, if any. On the road and out in the world a reliable mini-compressor is a vital tool.

cyclepump
tubeless-slimer

A mate with Tubliss in his TTR has had no probs, including air freighting it around the world. He’s reminded me that, as the video above mentions, injecting sealant like Slime/Oko/Ultraseal (right) is a good idea and over time helps seal the tyre right up. I did the same to the Tenere when I sealed those wheels (right) and if nothing else it helped highlight leaks oozing out of the front.

More impressions to come with the Himalayan.

gsr-gsr