My 2004 GS runs a 2000 DR650 hub, rotor, calliper and just lately, a DR slave cylinder too, all fitted to a 19-inch Excel rim in the original swing arm. My non-bikey mechanic mate did the job, taking some suggestions from me.
The DR650 spindle is thicker than the GS so the swing arm slots and the spacers inside them were enlarged to take the DR size and a high tensile bolt was used. Can’t recall if this was because a used DR spindle was hard to find, a new one too expensive or the DR axle was just the wrong length so using a bolt was easier.
We considered lengthening the swing arm – apparently a DR650 will slot into the frame but is said to be rather long. Plus I thought the stresses on the already jacked up OE linkage with the SV650 shock might get too much and extending the GS5 swing arm a bit risky. But as it is, the bike handles normally within its limits. I can’t see myself skimming over the dune tops or powersliding like Gaston Rahier on his Marlboro BM.
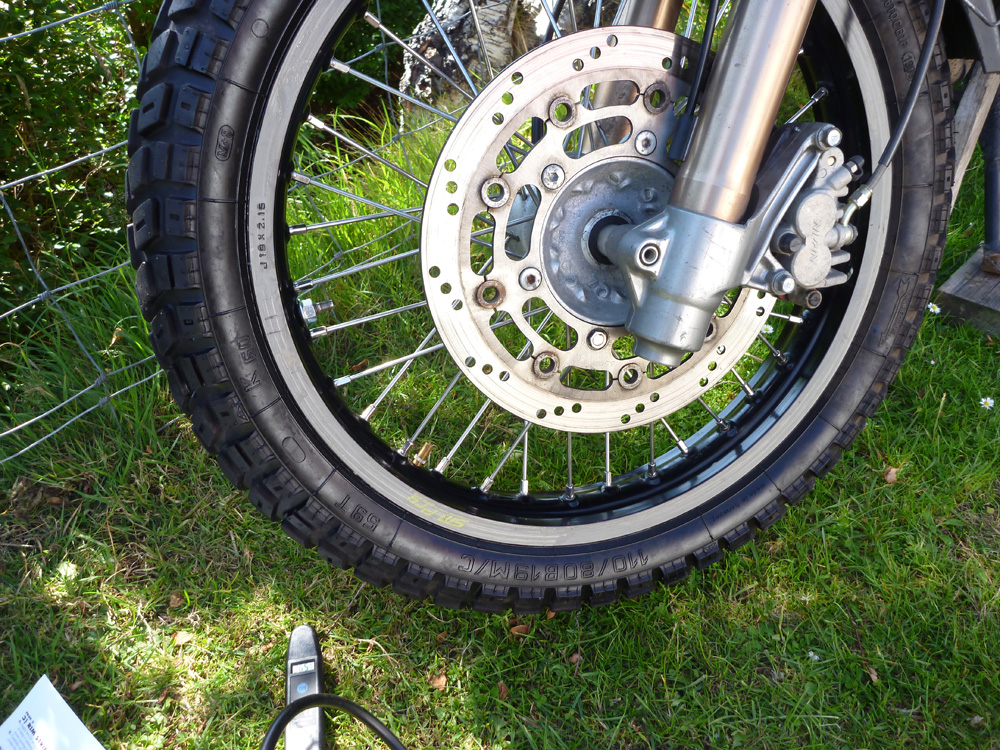
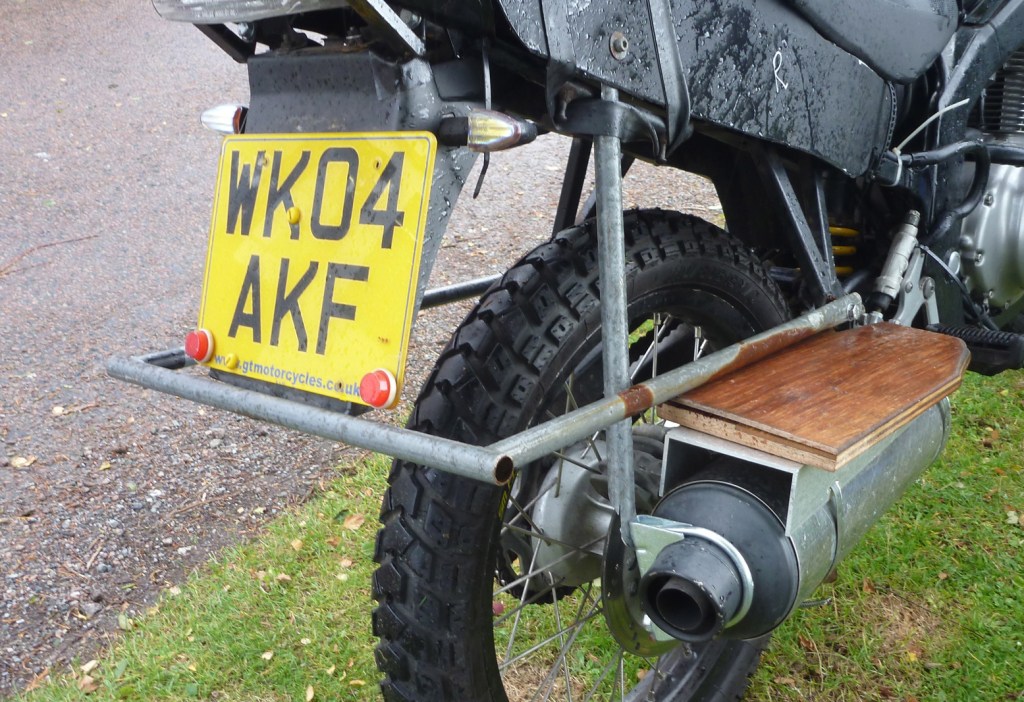
As for spacers and alignment of chain and rotor, we focussed on getting the chain lined up first (the new rim was offset to fit, I recall) and sorted the rotor after. From the picture left, it looks like the OS DR spacers or a very similar tube spacer were used with just a couple of washers between the calliper and the swing arm to fill out, so it was a pretty close fit.
A custom sprocket was ordered to fit the DR’s sprocket carrier with a guesstimate that 42T (rather than OE 44) with the OE 16T would make the gearing near identical to the original GS500 but now with a 19-inch wheel; the guess proved spot on. The same chain is used with no length changes, but with a couple of extra links I could run the wheel at up to 1.5 inches further back to lengthen the wheelbase which is currently about 58” (as short as possible on the swing arm slots – original is 55.5″) and feels fine. There are no chain tensioners needed, but an idler might be an idea to stop the lower run rubbing on the pad which makes a bit of noise.
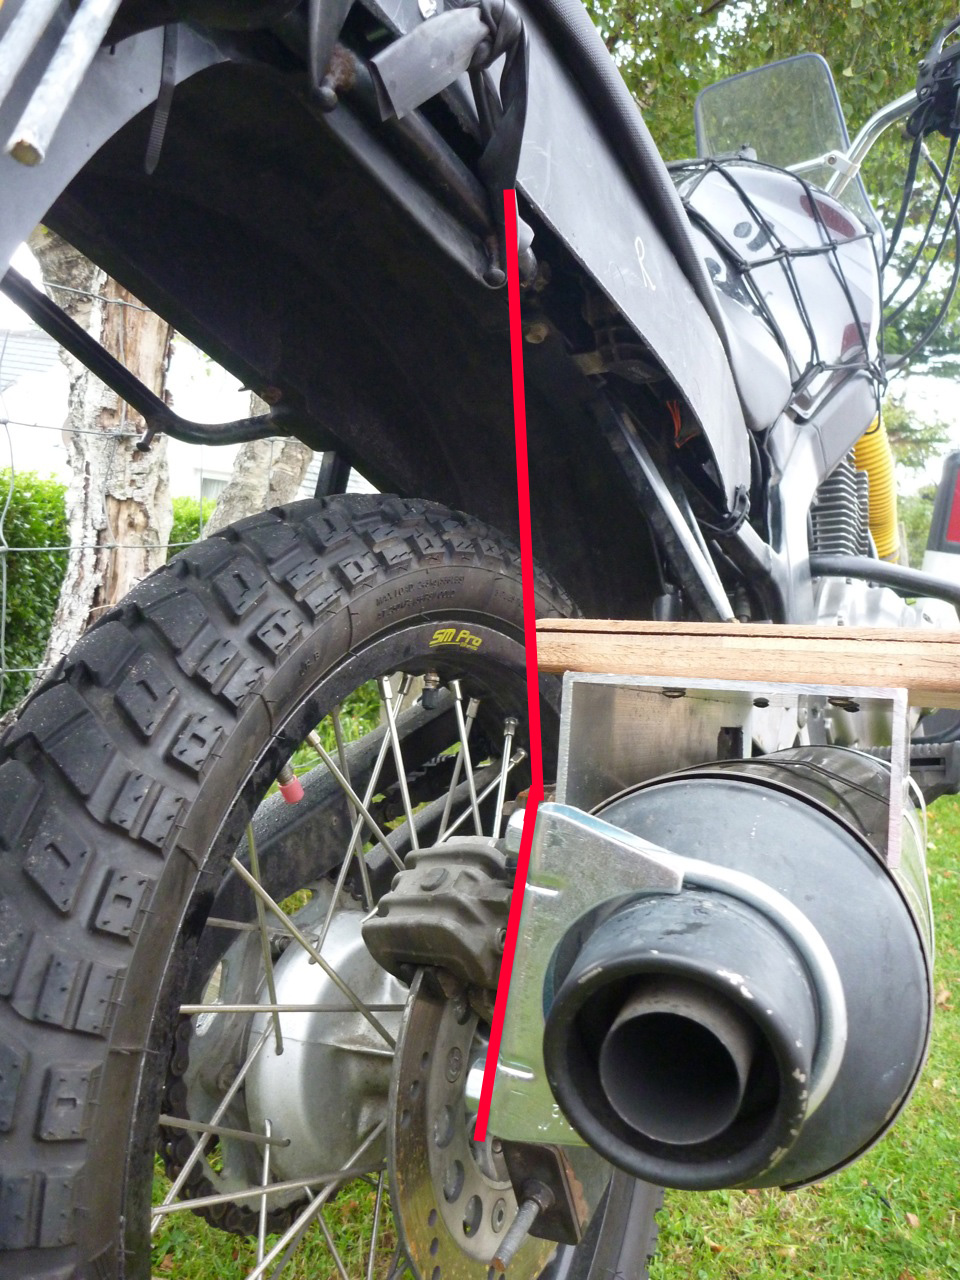
The OE GS slave cylinder didn’t work well with the DR rear calliper – mismatched hydraulic ratios meant weak braking, or so I thought. I eventually fitted a DR slave cylinder and rear braking improved to the point of being able to lock the wheel, but still requires a long throw of the pedal, even after replacing the linkage with a slightly longer item made from a bit of 3/4 inch tube (below right). I then found an image of a DR rear slave set up and the DR pedal pushes directly up on the vertical cylinder, not leaning over at 45° like mine which effectively lengthens from the throw. The GS brake pedal mounting splines are rather coarse so moving it around one notch didn’t work either. Alignment of the DR slave on the GS mounts is a bit tight anyway as it is now, but now I know the brake is working better than it was, an adaptor plate can be made to verticalise the slave cylinder so hopefully making a shorter throw and snappier brake.
I don’t think you could describe a GS500’s chassis (left) as something that Brunel would have tipped his hat to. Thin bits of box section glued together with spit and braced with stamped bits of plate. You get what you pay for and GS500s are not to be mistaken with the GSX-R pocket rockets.
Anything too clever or hefty would merely see the GS’s subframe wilt like late summer corn. Up to a point a beam could be added from the pillion mounts down towards the footrests to help support the back end (right).
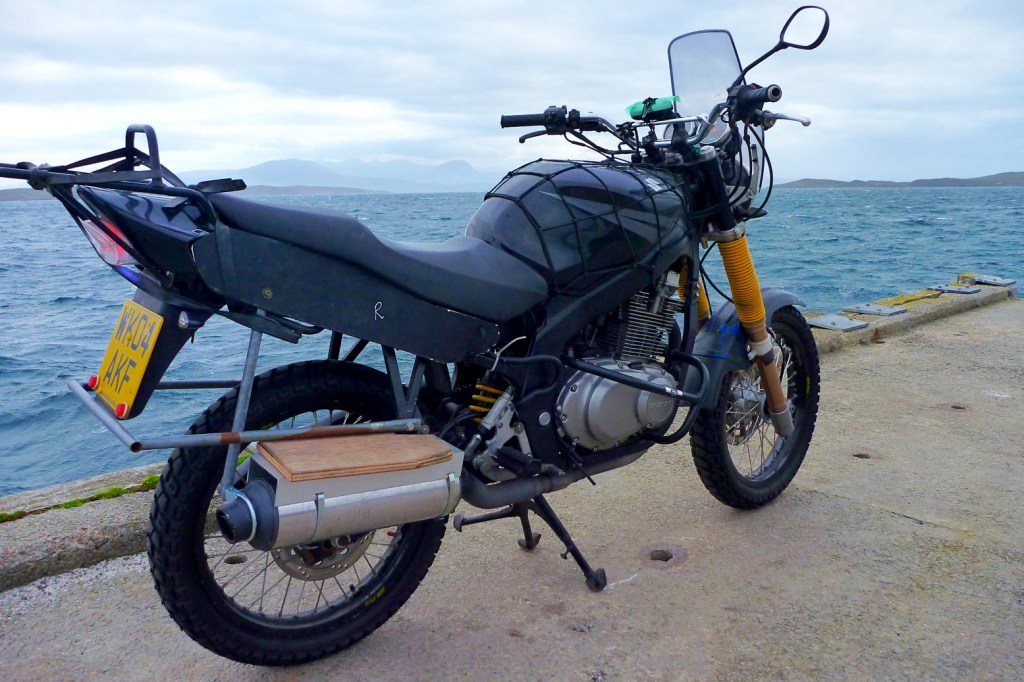
Trying to work out how to make the platform (or get it made), it occurred to me that a metal support tube as strong as any on the machine was staring me in the face: the silencer. By chance I’d had the pipe lowered to make room for my planned DIY panniers (which eventually became a set of Magadans) until a light bulb flickered momentarily: use the pipe.
All that had to be done was separate the pipe’s heat (not that much on the pre-catalyzed GS5) from the bag’s base and possibly add support at the back. A mention of Giant Loop’s good-but-too-short stainless pipe guard (above right; £15) gave me the idea to make my own from a bit of 2 by 4 ally off-cut.
On top of that screwed a layer of plywood on which rests the pannier. The good thing is that my Mags are throwovers so the full weight need not be taken on the platforms. But there’ll come a time when that needs to be done so I added a support from the silencer’s snout to the subframe using a 2 1/2 inch exhaust clamp (left).
Update – autumn 2015 Had a pair ready for my next Morocco trip but sadly they didn’t fit the rack/pipe combination. So back under the bed, ready for next time.
Update – summer 2014 I bought a pair of Mag 2s and used them with a 650 XCountry in Morocco.
Update – May 2013 I finally got a chance to actually use my Magadans for a few weeks’ ride around the Southwest USA. Admittedly it was only America and I was mostly moteling, but I did enough off-roading to put them to the test. Full story on that ride here.
I am pleased to say – but not surprised to learn – that the Mags lived up to expectations on both trips. It’s only a bag, but the no-nonsense design is simply functional and effective – like the Steel Ponys below but much better construction and materials; there’s nothing there you don’t need – other manufactures take note.
Mine were actually semi-permanently mounted on prototype Al Jesse platform racks – with each siderack removable, so I either pulled out the liner to take inside – or removed each side rack where that felt a better idea – or for day rides. More news of the Jesse MonoArm racks in a few weeks.
It never poured with rain but it did when I used them last year so I have no reservations about that aspect. The corner tabs I added on not so elegantly (see below) may become a feature on future versions. For my sort of riding prefs they’re the best thing out there.
ABR magazine compared half a dozen soft bags. Highest score? Magadans.
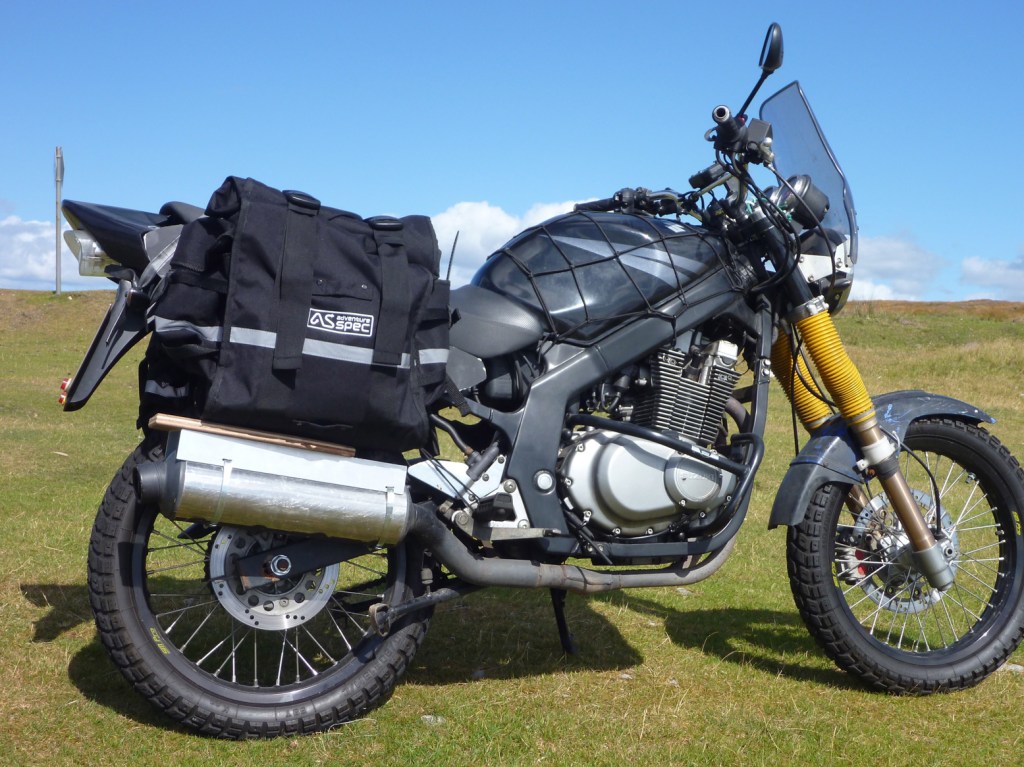
Adventure Spec Magadans
Bags supplied in exchange for an Adventure Spec advert in my AMH6.
The Mags are based on the proportions on the 36-litre Steel Pony Gascyones [no longer made] Walter C used or my design if you include the pockets and which I feel is near perfect: bigger than the Andyz, narrower than the Monsoons, zip-free closures unlike the Zega Flexes, and with a chunky lift-out liner supplied unlike any of them.
Two layers of regular-looking (PU-coated?) Cordura make up all the panels of the outer bags, joined with a thick edging. Can’t tell if one is or incorporates the mysterious and slash-proof Twaron, but one has a ‘ripstop’ like appearance in the weave although it’s possible I may have felt the thin later of Twaron between them. Inside, as with many soft bags, a flexible panel behind a zip slips down the back panel and under the base to give a bit of shape while still retaining two panels facing the bike or the rack. Magadans are designed to be used against racks, as many other soft bag makers are beginning to realise. I made the dimensions about 24 litres rolled up with two folds (left image above) – the regular way of using them. In what I call expanded mode, with just one, less weatherproof fold on the velcro’d top edge of the outers, you can get 32 litres in each side plus 3 litres in the pockets. They weigh 4.7kg (10.3 lbs). The Gascoynes are about the same size but are 23cm wide – an extra two inches giving another six litres in the main bag. However, I’m happy to lose that extra width. The outer rolls up with a velcro closure and two chunky clippy clips incorporating enough slack to still work in expanded mode, or to lash things down on top with the bag fully rolled up in regular mode against the weather.
The two outside pockets are a great idea to keep fluids handy but also out of the main bag. It’s what’s always missing on vinyl Orliebs and something I’ve bodged on myself on other bags using army ammo pouches. Both with velcro flaps, one will take a 1.5 litre water bottle (green bottle) sticking out, or 1 litre flap closed; the back takes 2 litres sticking out with room to spare, or 2 litres closed.
The weight is taken on throw over straps, but as mentioned, with a rack. One bag gets doubled velcro ‘hook’ straps (4), the other gets the double sided ‘loop’ strap. A secure system sandwiching the loop strap from both sides to cope with the large hanging volume and onto which velcro can be re-sewn should it wear out, or a buckle easily fitted. With velcro the less you use it the longer it will last but with a buckle (two types shown right) macro adjustments up or down are much easier to make, especially when the bags are loaded. That’s what I plan to do. The distance on full velcro overlap is 50cm and I’d say you could run them out to 75cm (half overlap) if you’re bike is wide.
I was keen to see how the back of the Mags looked so as to work out how they could mount securely to my planned rack. The Magadans are designed to be merely held against a regular flat ‘hanging’ rack rectangle which most alloy box makers produce for all sorts of bikes. It does this with a horizontal strap which passes through slots behind the side pockets just above the level of the reflective stripe. To me this is not so effective, but is perhaps the best ‘one-size-fits-all’ solution for the moment. It’ll stop the bag flapping outwards but, depending on the width of rack verticals, will still allow some forward and (less common) back sliding which could get annoying on the legs, unless you add a retaining strap across the back as the Monsoons had.
The good thing with the fabric outer being separated from the inner (like the Monsoons) is that you can sew or rivet on whatever suits your needs and that’s what I did to mine (right) so there’s a direct attachment point. As it is I plan to use a platform rack so the attachment won’t be so critical and may even work without the throw over straps. If I was to suggest a solution it would be something like two horizontal rows of loops sewn across the back panel, a bit like was on the top back edge of the Monsoons (right – for what reason I was not sure). With two rows of such loops you could even eliminate the throw over element, or reduce its stress loads. But it’s unlikely that Magadans will be modified in this way. A mate asked Adv-Spec and was told:
‘We have always found that tags sewn onto panniers result in [them being] ripped off panniers as soon as there is any real load applied or a constant tugging or pulling. The Magadan panniers are designed to have a strap tied around the entire pannier and then around the frame. There are slots in the front and rear bottle holders which allow the strap to pass through to help hold everything in place.
I have to say that from my experience with similar panniers that’s not such a convincing explanation. And even if it was, a tough fabric mount could feature a ‘sacrificial’ ring or loop which could be replaced should the pannier be wrenched away in a heavy fall. But if that’s the Magadans’ biggest flaw then it’s not so bad.
I was pleased to see the inner bags are not some cheap PU-coated drawstring stuff sacks, but full size, roll-top PVC ‘dry bags’ shaped to fit the outers. Sewn seams are taped (right). I suppose I’d have preferred heat welded, like an Ortlieb or Seal Lines. The great thing with separate bags is you can lift them out clean to carry into a tent or hotel room, leaving the mucky outers on the bike if you wish. These are chunky PVC bags that will resist the rubbing against the outers as well as impacts better than most things, and anyway, you can fit a selection of your own in there to compartmentalise better.
As well as the horizontal back strap to locate the bags, the Magadans feature a similar arrangement of loops to take a vertical strap or indeed an adjustable cable lock to wrap around a frame – where used – so securing the bags against opening or removal. Combined with the slash-proof fabric, this ought to make the Mags the most secure soft bags around. It’s hard to know how effective this slash-proof Twaron is without doing the obvious. There are a couple of vids on youtube citing the wonders of Twaron for offshore and ballistic uses, but if nothing else, if you use a rack you’ll be able to cable the bag on (although you could sort of do that with any soft bag).
All up I’d say the Mags look the business: a great size, good features and modifiable for rack fitment. The quality of manufacture (somewhere in the EU) looks good too. Nice work Walter C and Adv Spec; you’ve save me doing a less good job myself. There’s more on using the Magadans here and here.
With Monsoons costing £220, old Kriega Overlanders from £500 all up, Steel Pony Gascoynes AUD350 and Andyz going for £245 in the UK, at £350 I’d say the Magadans are fairly priced when you think what a key component your luggage is on a genuine overland trip.
The GS-R has now shed it’s used road tyres and taken on a pair of 110/80 B 19Heidenau K60, the tyres that impressed me on the Morocco ride I took in March on the 650GS. At the same time I fitted Tubliss liners. I’m not completely set on these until they’ve proved they’ll hold air reliably – that will take a few days.
At the same time I inspected the front sprocket against a new one and found them near identical so will leave the current chain – age unknown – on the bike, even with the new back sprocket. In my experience o-ring chains last ages but then go quickly as the seals begin to fail. If I can catch the chain just before that, I might get more miles out of the sprox.
I also fitted a pair of taller, wider ‘flat track‘ handlebars, the sort of bars American street scramblers ran in the 60s and 70s, and the same price as a set of bar risers. What a great pair of bars, just as I knew they would be. The even looked good just lying on the floor.
Fitting was of course far from simple. Oh no. One crosshead on the LHS switch cluster turned into plastic at the sight of a screwdriver, cables needed re-routing rond the back of the triple clamp, but luckily the switch cluster wires – potentially the most complicated to modify – had plenty of slack tucked inside the headlamp. Anyway, much pissing about, dropped nuts, shorts cuts costing hours, but I got some bars, high and wide. Took the GS out for a lap and it feels so much more comfortable and confidence inspiring – just like a trail bike in fact. The front Heidi is worn in and normal, but I’m not keen about having to nurse an edgy back tyre while the new K60 on the back wears in. Without the weight, speed, power and breaking of the F650, it will take hundreds of miles, but I must say, so far it feels quite normal. Perhaps it was the bigger ‘Catspaw’ type K60 for bigger bikes that for a while felt odd on the BMW.
Anyway, here’s a cool film. Dave Aldana talking but shot in the UK of all places.
Tubliss Generation 2 is now widely available in 18, 19 and 21-inch sizes for WM3 (2.15”) or slimmer rims. I fitted one to the front of my Himalayan
My Suzuki GS-R ran 19-inch SM Pros and the plan was always to have them running tubeless, hopefully doing a more successful job than I did on my Tenere’s wheels a couple of years earlier. On that bike the sealed-up rear never missed a beat, but the 21-inch front leaked off-road and as I failed to monitor it, it got soft enough to ding a rim on a gnarly Moroccan climb and with that lose all pressure.
Back then I wanted to try Tubliss but they weren’t sold in Tenere sizes in the UK. I picked some up in the US for around £55 each. The vid below explains it all very loudly. Man that guy can talk!
I was expecting a hard time fitting them in my Heidenau K60s – it’s a stiff tyre and you’d imagine the bulk or shape of the red plastic core and rim-lock might make tyre mounting even harder. When a sunny afternoon came by, I left the 4000-mile old K60 out against a wall to warm up a bit and then followed the clear instructions carefully. Off with the old Cheng Shin without too much difficulty, clean off the duct tape/rim tape residue and the drill an 11mm hole a few spokes up from the regular valve hole. I then talc’ed the inside of the red liner to slide better against its mini tube, lined up the rim lock clamp/tyre inflation valve and the nearby core inflator valve with the two holes in the rim (pic above; the instructions stress this is critical) and then mounted the core onto the rim.
How it works Tubliss works by using a small but extra thick bicycle-sized inner tube at very high pressure to expand the red casing onto the tyre’s bead, sealing it against the rim (see image below). By doing so it isolates the tyre’s main air chamber from the spoke nipples where air would otherwise slowly leak out.
This can be an odd concept to get your head around; a high-pressure mini-tube is still used to press and seal the tyre bead against the rim, but the tyre chamber itself is effectively tubeless. An additional hole for a rim lock is required so as to pin down the red casing and completely eliminate tyre slip and valve lean at low pressures (as happens with regular tubes at low psi). Because the thick Tubliss mini tube isn’t anywhere near the flexing tyre carcass and is inside the red casing, it would take an exceedingly long and sharp spike to puncture it. Plus everything remains cooler; the benefit of all tubeless tyres. You can still tune spokes, something not be so easily done with other spoke nipple-sealing methods. The rim lock uses a ‘hollow bolt’ which is also a valve to inflate the tyre chamber to a regular pressure. The original valve hole is used to inflate the red casing tube to 100 psi.
The core went onto the rim easily. Just follow normal bike tyre mounting techniques: make sure the red core is right down in the well of the rim as you lever the other end on. Usually I use diluted washing-up liquid but that tends to dry up quickly. This time I used more slimy 303 Protectorant; it’s the same as Armor All that Tubliss recommend. Use lots so it’s lubed forever inside. The core slipped on with no levers. WD40 will do, if stuck.
Next came the tyre. This was going to be hard, or so I thought. I double checked I had the direction arrow in the right orientation, then pushed the wheel down into the tyre using the folded metal plate which Tubliss supply, rim-lock down. Following the instructions closely (and having changed a few tyres in my time), the plate did genuinely help the core-fitted wheel slide into the tyre with less effort than normal. And if you kept pushing down as they advise, with a bit of multi-armed Vishnu-ing I got the wheel inside the tyre walls.
The rest – levering the tyre bead back onto the rim – was like regular tyre mounting: minimal lever force where possible combined with maximum lube, while always making sure the tyre bead opposite the levers is being kicked and crammed into the tyre’s well (central dip) so as to free up vital slack when levering to reduce the effort which is when mistakes are made and tubes get pinched. Like they say on the leaflet, lube is the key to this. In the end the last bit of tyre went on without the final lever. This used Heidi was not so hard to mount after all. The same-sized new K60 for the back was a bit more effort shoving inside the wheel, even with the Tubliss plate, but with slack and lube, it got there.
With all this done the next step was to see if the system held air once everything’s pumped up. There’s no reason to think the mini tube got pinched, protected as it is inside the red plastic core. The key is the red liner sealing against the bead of the tyre to keep the tyre at the right pressure. You need to put 100 psi into the mini tube to make sure it seals: You want to check your average mini compressor will have the power to do that, but because the volume is tiny it may be easier than you think – it’s not like pumping up a full sized moto tyre to 100 psi.
Testing, testing
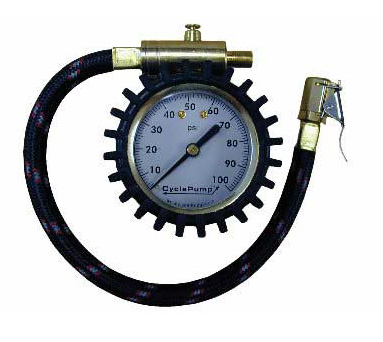
You may read complaints that fitting Tubliss doesn’t work first time round or doesn’t work at all – the tyre goes down – but so far overnight both tyres have held their pressure. Checking the tyre and core pressures after 10 days, I found both cores down by about 10%. I think that’s acceptable and can’t be sure everything was at the right or equal pressures to start with so I topped it all up to 100 psi and 33 for the tyres and will check again in a while. Tubliss do say to check pressures before each ride. Unfortunately, checking the high pressure cores blew the brains out of my digital tyre gauge (right) and those metal sliding rod types only go up to 50 psi. I have a bulky Cycle Pump gauge (left) that’s sat around for years and whose moment may have come. As mentioned, a mini-compressor able to deliver 100 psi without fatal results will be needed. Not sure my Cycle Pump (below) or anything like it can manage – we’ll see on the Himalayan. Anyway, there are always roadside garages.
Should you have a flat on the road it’s only the tyre chamber that loses pressure, not the small sealing tube of course. Once quickly plugged (left), the tyre can be reinflated with a regular bike compressor to normal road pressures.
Initially Tubliss didn’t claim to be suited to road riding let alone overlanding, but that seems to be changing as the system has proved itself. What is important is making sure the tyre sealing tube is kept at around 100psi. That may take more frequent checking than you’re used to, at least until you get a feel for the rate of loss, if any. On the road and out in the world a reliable mini-compressor is a vital tool.
A mate with Tubliss in his TTR has had no probs, including air freighting it around the world. He’s reminded me that, as the video above mentions, injecting sealant like Slime/Oko/Ultraseal (right) is a good idea and over time helps seal the tyre right up. I did the same to the Tenere when I sealed those wheels (right) and if nothing else it helped highlight leaks oozing out of the front.


 How it works