Like many two-wheel travellers, I enjoy coming up with creative ways of doing things or adapting gear to suit my specific riding needs. Over the last year I had what I thought were noteworthy innovations. There were a couple more, but clearly they did not survive the memory test.
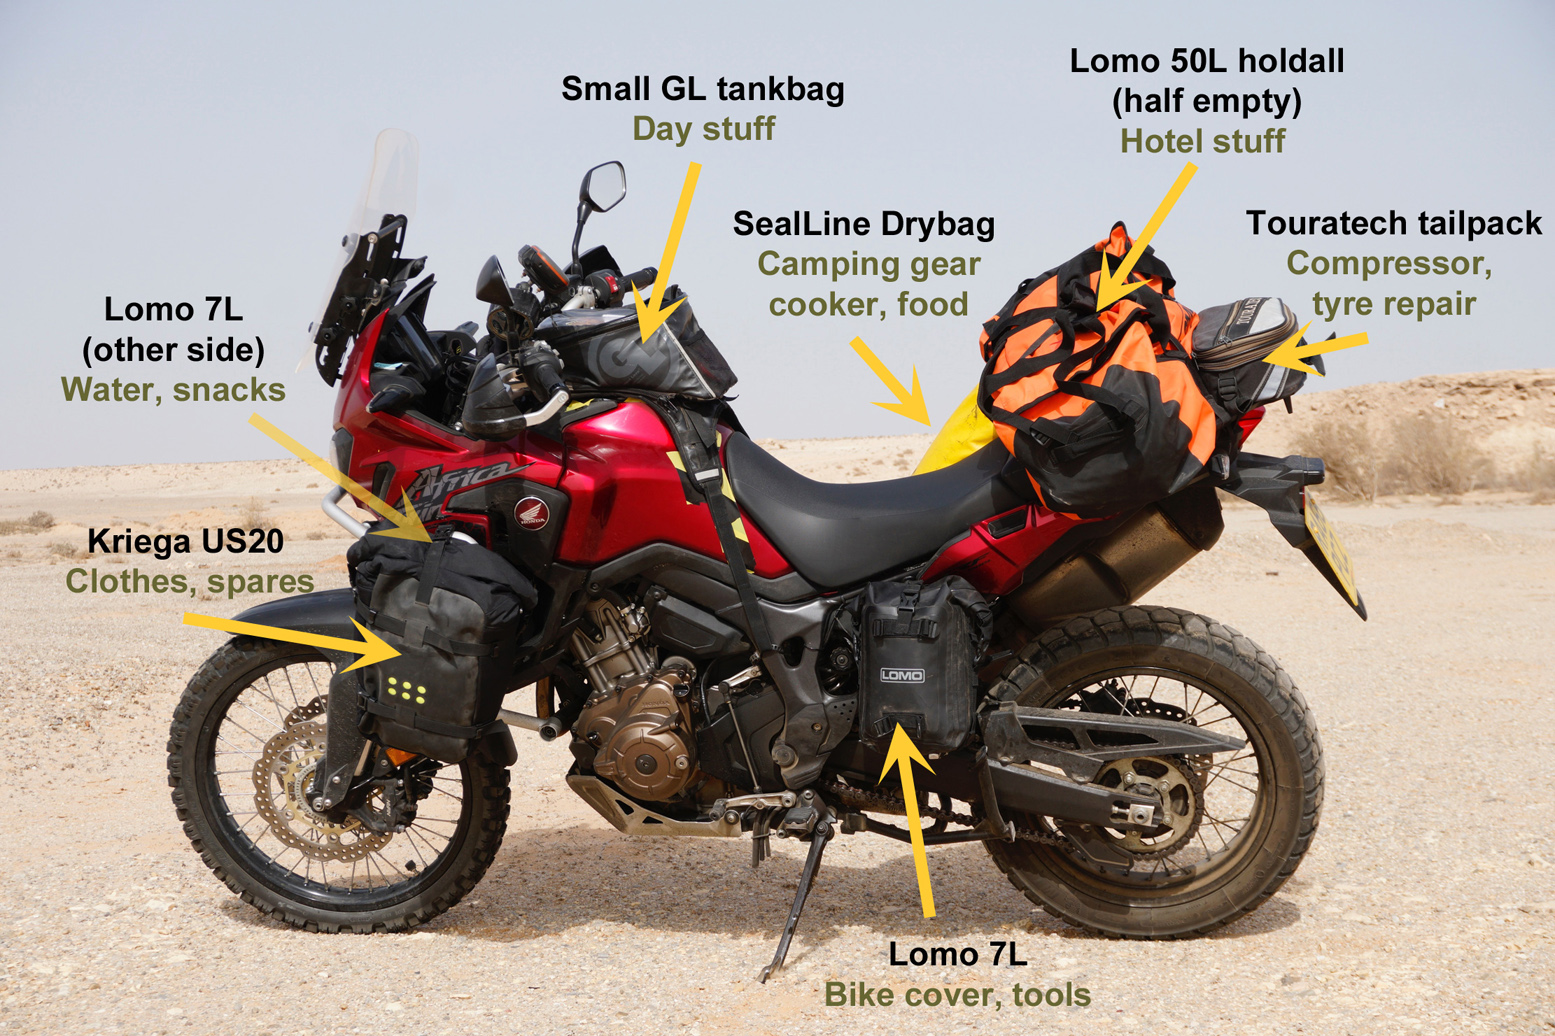
Pillion Peg Panniers People ask: Where should panniers be positioned? ‘As Low and Forward as Possible’ (AL&FAP) comes the cry, because an all-terrain travel bike is more stable and responds more predictably when the loaded mass is centralised, especially when off road. I would also add ‘As Narrow’ to the acronym, but in the end we need the volume.
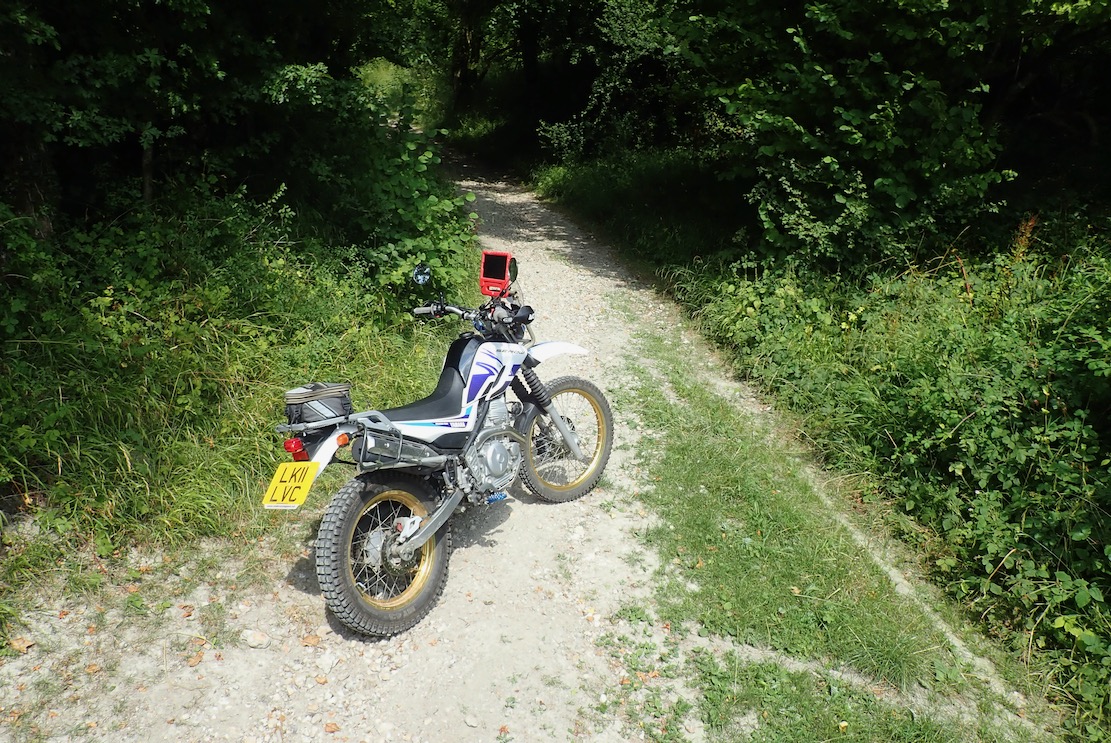
Behold the pillion peg mounting
The AL&FAP optimum can be hard to achieve given that most off-the-shelf racks are set too far back and panniers – soft or hard – are usually box shaped. (this combination is probably designed to accommodate pillions). The elephant on the subframe are the pillion pegs: a mounting point as strong as any rack. Support your mass on them (while ensuring room for paddling) achieves the AL&FAP ideal. I first experimented with this idea riding a massively heavy Africa Twin to the Mauritanian border during Covid, refined it on my 450MT in 2024, and stumbled on the best solution so far adapting Mosko Moto’s Alpine R60s on my skimpy Serow. The Alpine’s ‘sock’ shape is perhaps coincidentally ideal for the application of AL&FAP. Click the links for more.
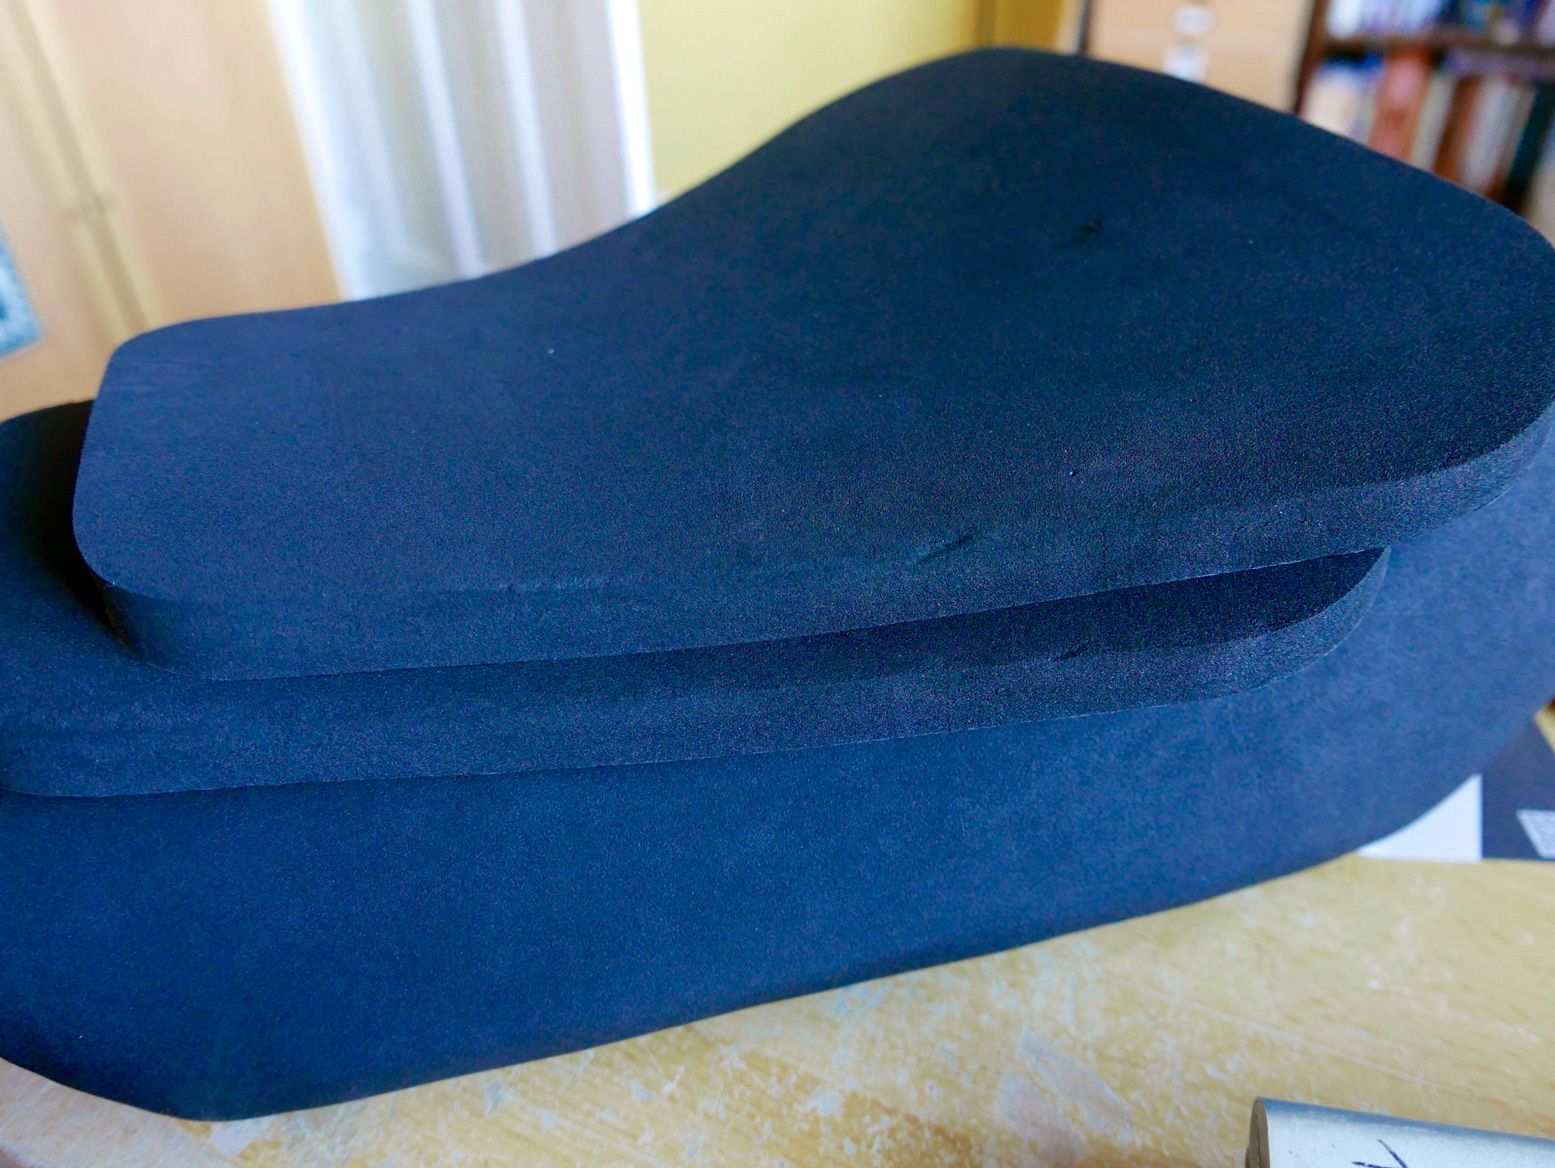
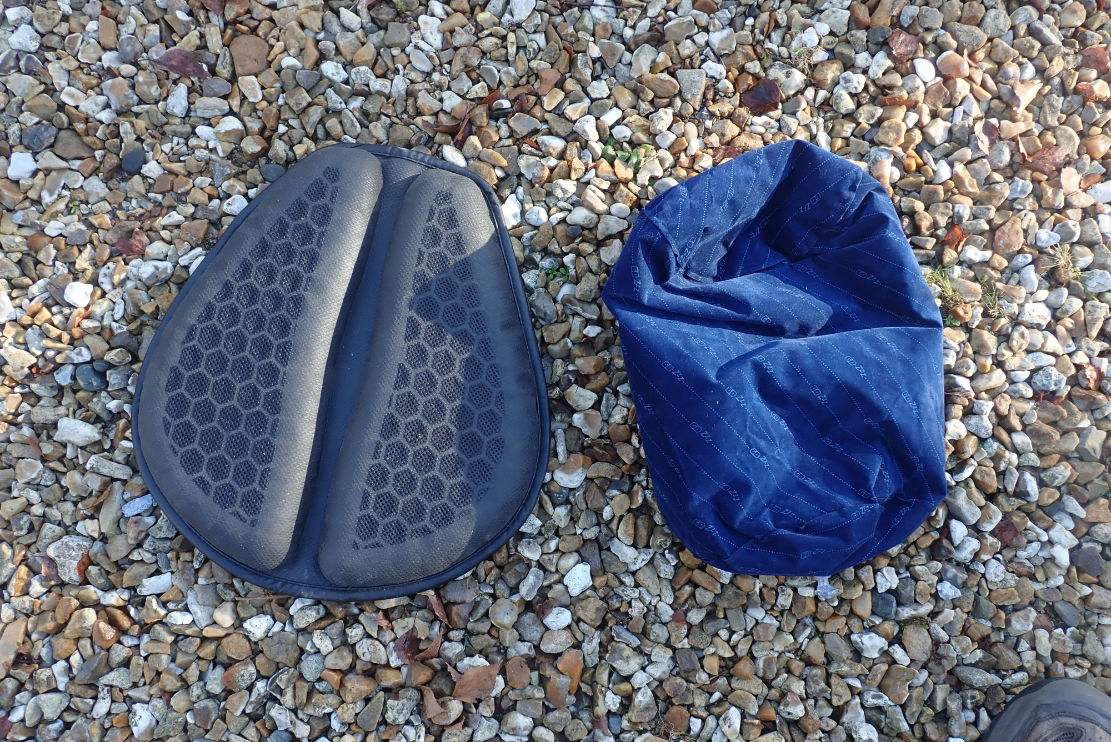
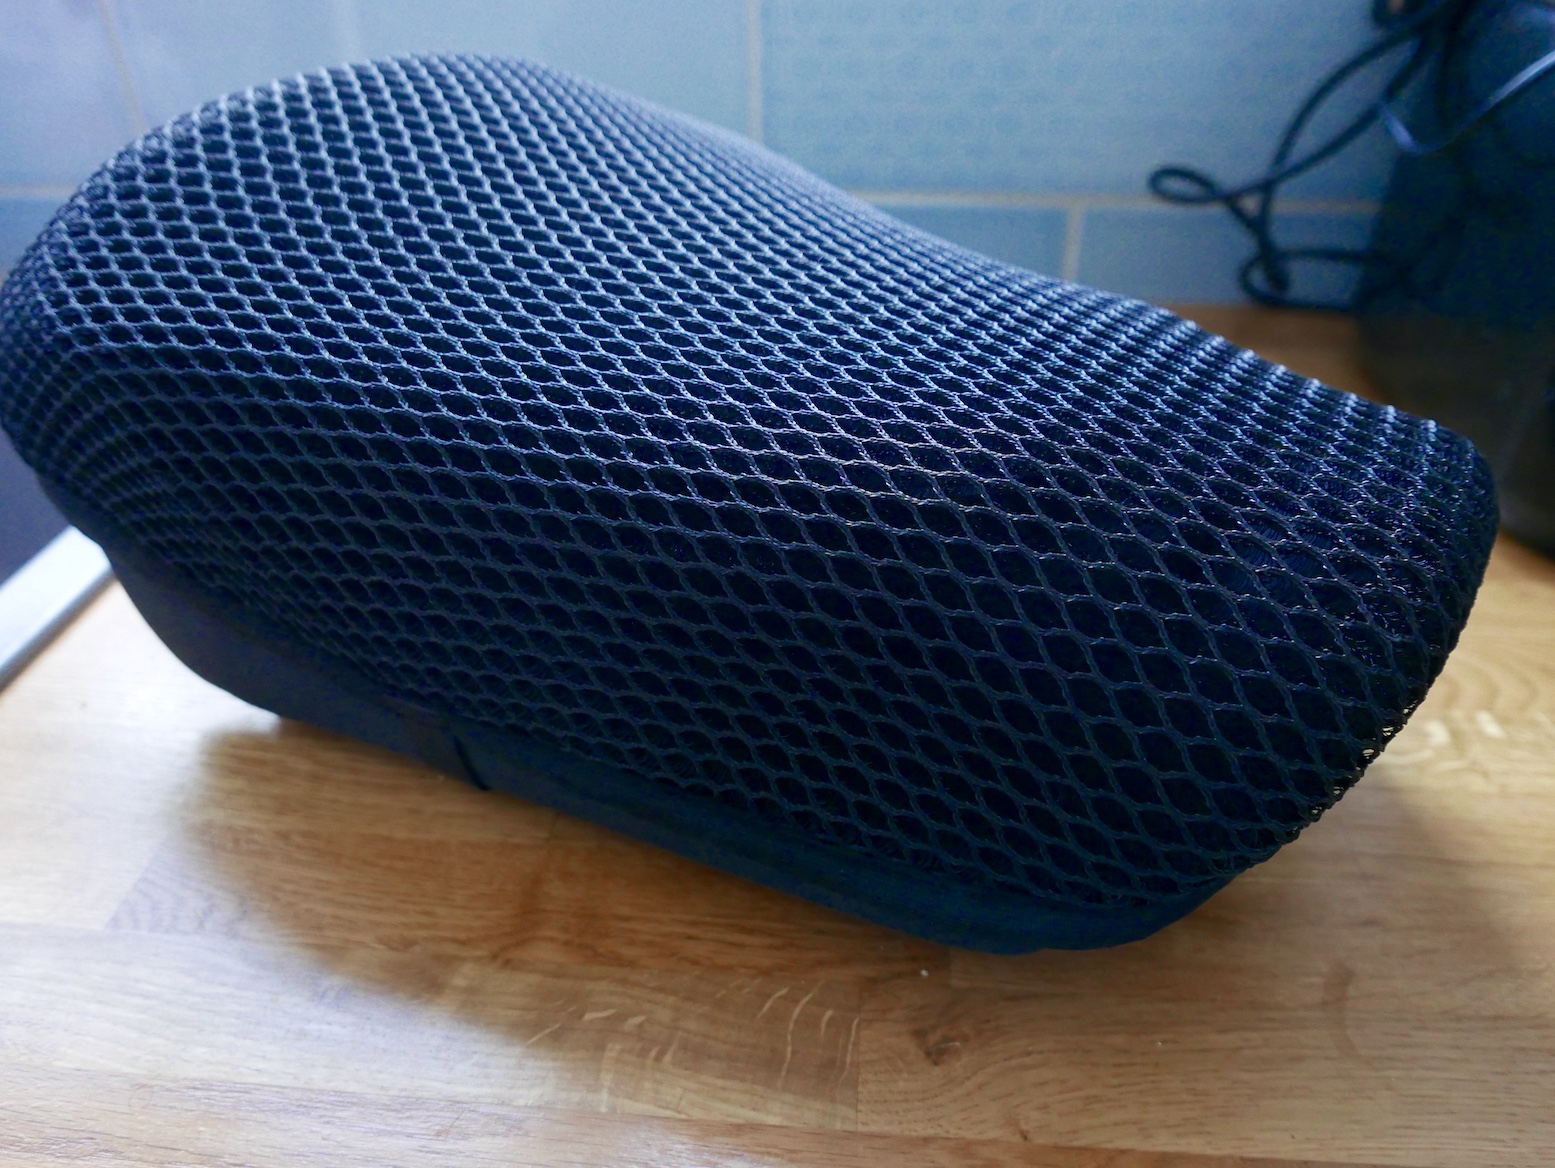
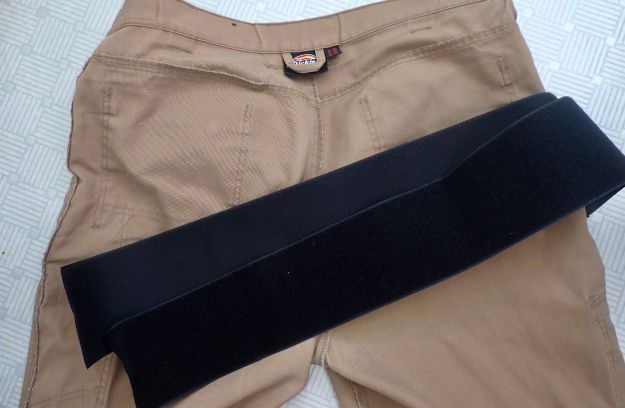
Seat pad inserts for riding pants Sore arses on narrow trail bike seats; What. Is. New? Apart from changing or reupholstering the seat (a bit of a black art, imo), there are all sort sorts of seat pad solutions: DIY neoprene foam slabs which worked well on my Himalayan 411, air cushions, sheep skins, ibuprofen, mesh seat covers,
I’ve tried them all but one problem is they increase the seat height which – 411 excepted – may not be what you want, especially on a CRF300L. Then I moved the padding from the bike’s seat to my own seat with some Moto Skiveez padded pants, similar to cycling pants but not quite as close fitting. They worked well on the CRF, extending the comfort range, but as some reviewers have noted, it’s a bit like wearing a filled nappy, plus makes having an urgent roadside slash a bit awkward. Another thing I found was forgetting to put them on each morning until, just as I’m clamping up the boots I think scheisse, I need to go back three spaces and pull on my riding nappies or I’ll regret it in a few hours. With riding pants we have knee armour pockets or velcro, and even hip padding. Why not add something similar but obviously softer to the seat of the pants. No Skiveez needed which means no additional washing, dozy forgetfulness or desperate roadside fumbling – and no elevated seat heights. Slip on your riding trousers or over-trousers with the optional butt pads fitted and ride off into the sunrise.
If like me you prefer to wear normal cargo trousers like above, plus over trousers when needed, sewn-in velcro patches for quick removal won’t spoil your butt line when off the bike. On the bike attach the foam pads and hit the road.
Dynamically adjustable seat height I probably ride my MTB more than motos in the UK, and this is another pushbike derived idea that’s a bit left field. It gets its own post. Click this.
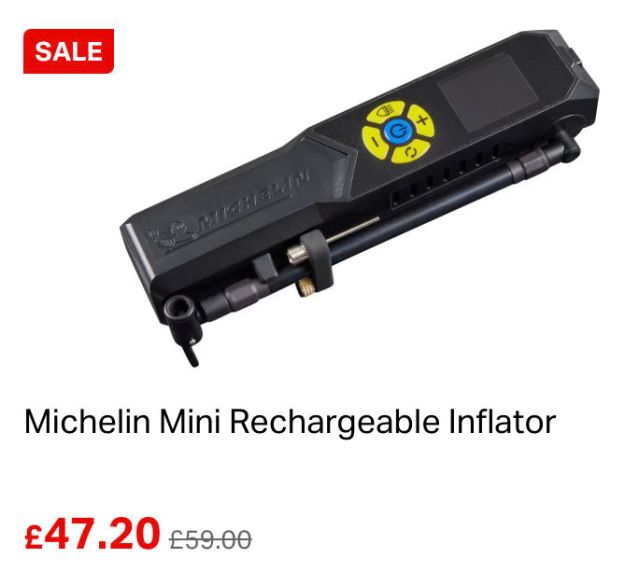
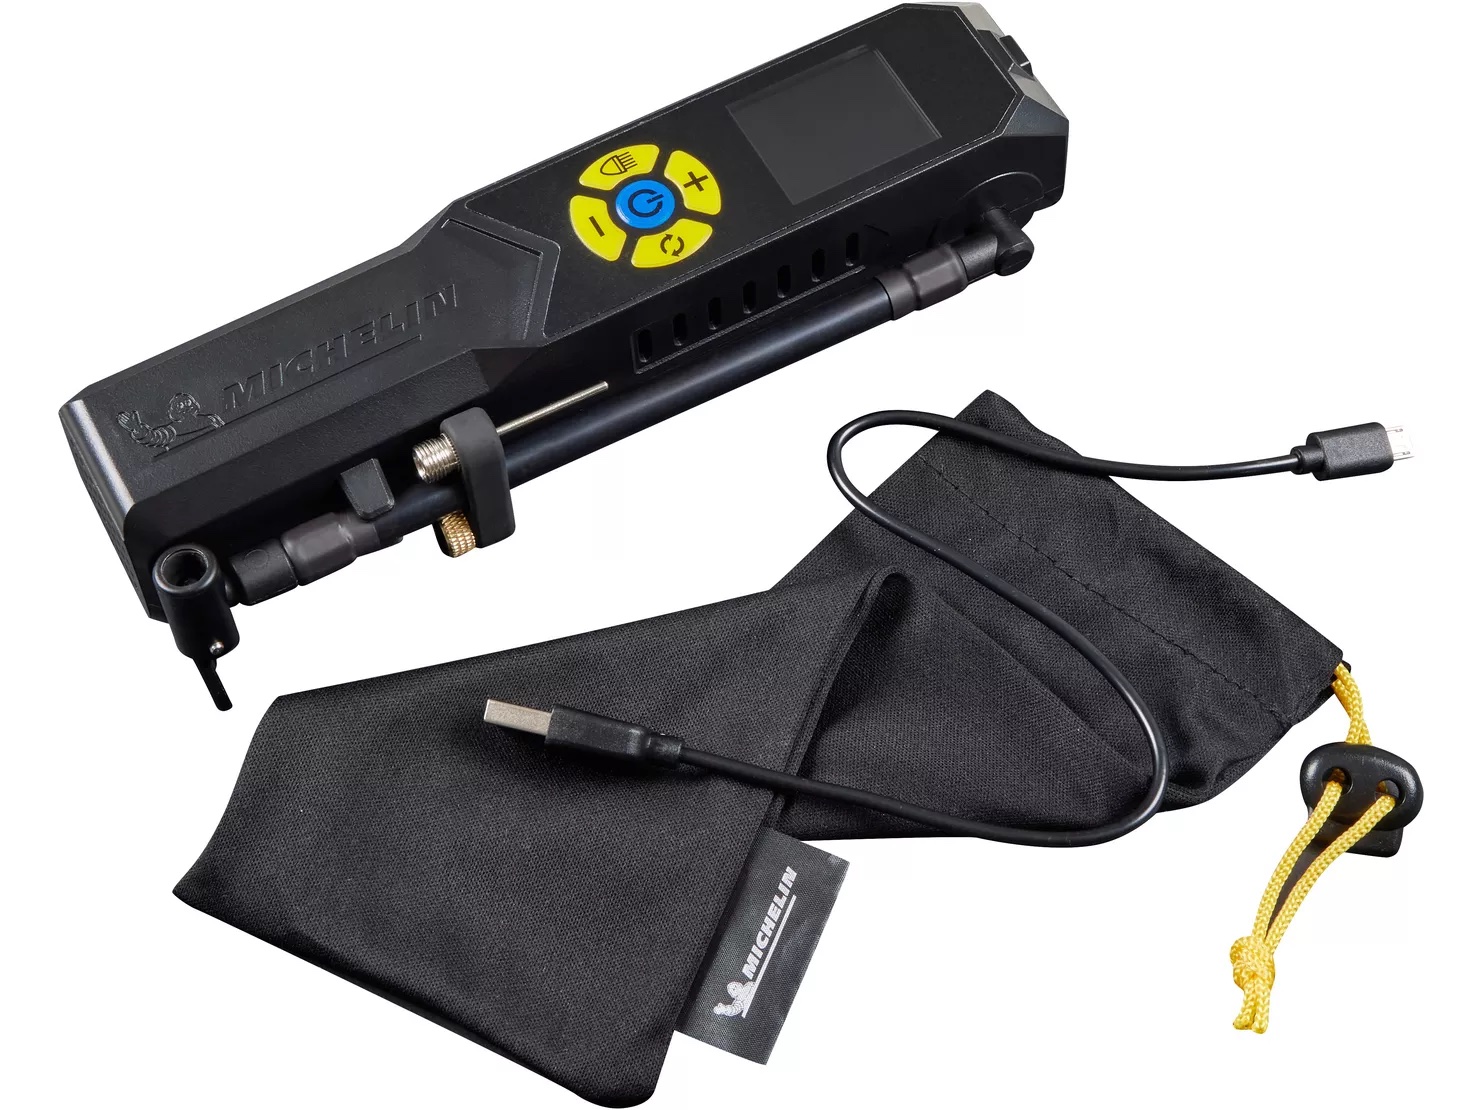
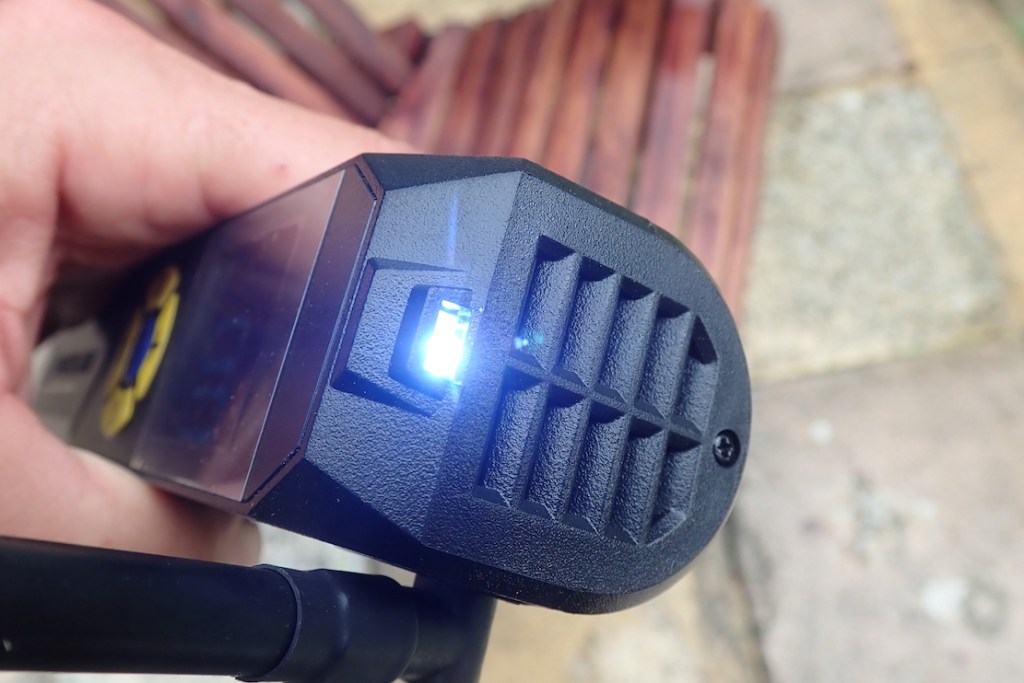
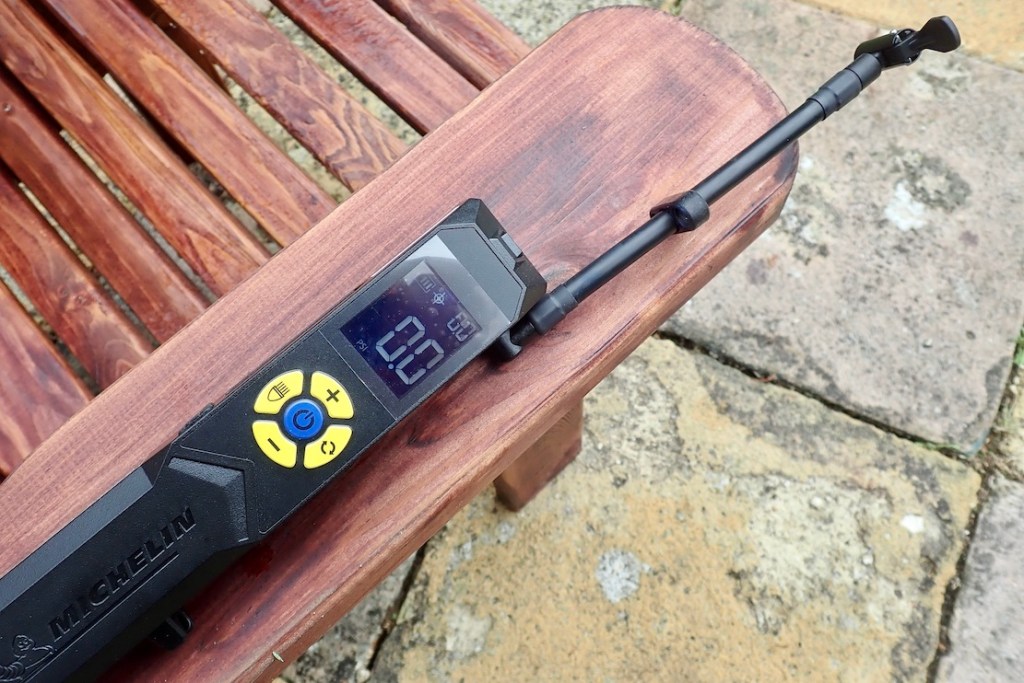
IN A LINE Handy Mich-branded tyre inflator with Presta adaptor, clear LED display and a light.
WHERE TESTED At home and on the road in Morocco.
COST & WEIGHT £47 discounted at Halfords. 450g verified.
WHAT THEY SAY Compact design fits in the glove box. Designed for topping up tyre pressures. Digital gauge is accurate to +/- 1 PSI up to 50 PSI. Switchable between PSI, BAR & KPA. Cordless, lightweight and portable, the Michelin Mini Rechargeable Inflator is remarkably easy to use. With four programmable pre-set pressure settings the cordless inflator is ready to inflate bicycle, motorbike and car tyres as well as a sports balls and other small leisure accessories. It’s [sic] integrated lithium battery is rechargeable in aprox. 3hrs. Built-in high intensity LED light at the top, enables for use in emergency or low light situations.
OK price at Halfords
Clear, simple display and function buttons
Dead easy to use
Fairly quick fill for it’s size
Can’t turn on accidentally once hose is folded back in place
Presta pushbike adaptor included
Works as a tyre gauge too
Vibrates a bit
The lever-down valve clamp is hard to detach quickly without losing air
None of the presets can be stored after changing (I did RTFM)
Play up occasionally but always works in the end
REVIEW My £20 ebay cheapie died after two years, longer than expected. And the bulk and faff of my ancient, 12-volt wired Cycle Pump remains off putting. Once you go wireless it’s hard to go back. Bring on the day when all electrical household items are cable-free! I like to think the 20% saving at Halfords on the Michelin Mini Rechargeable Inflator covered the premium for Michelin branding. The handy pump is about 8 inches or 20cm long, and comes with a tiny LED ‘phone’ light, and adapter nozzles for pushbike Presta valves and a football clipped to the swing-out hose with a fold-lever tyre valve connector. Plus there’s a flimsy bag.
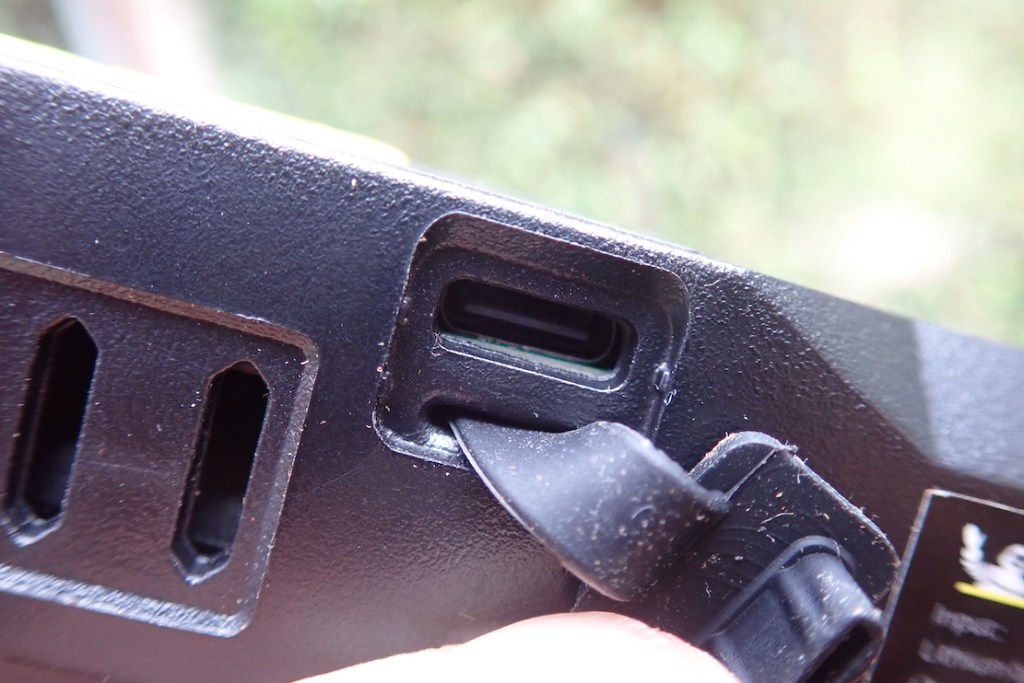
Clear displayLED lightType C USBUnfold hose to wake the display
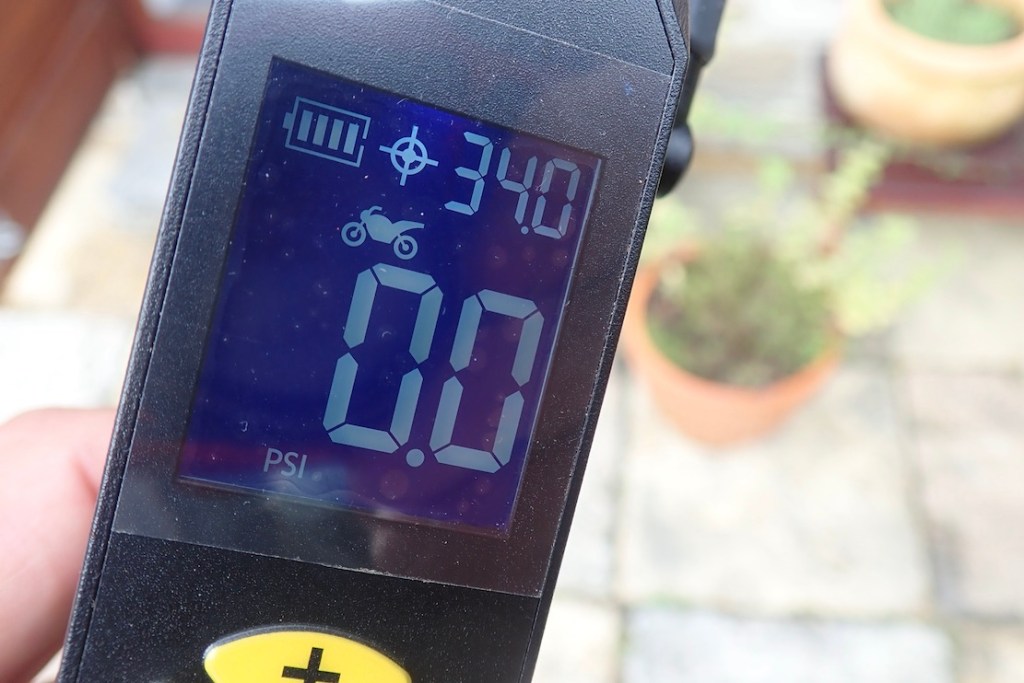
Jabbing the blue button won’t work. You wake it up by swinging out the hose at which point the LED lights up and the thing is live. Only then does the blue button set it off. You can scroll through four fixed-psi presets (bike 45, moto 34, car 32, football 8psi). It says adjustable which is true but that doesn’t mean ‘storable’ afaict. There’s a fifth, empty one to set as you like. But that isn’t stored either. I did read the leaflet and tried a few times. This all reminds me of the TPMS glitches (see below). Or maybe it’s as it was supposed to be. But honestly, you don’t really need presets. Just clip on, hit the blue button and watch the numbers rise to the pressure you want. Then hit the blue button again and it stops.
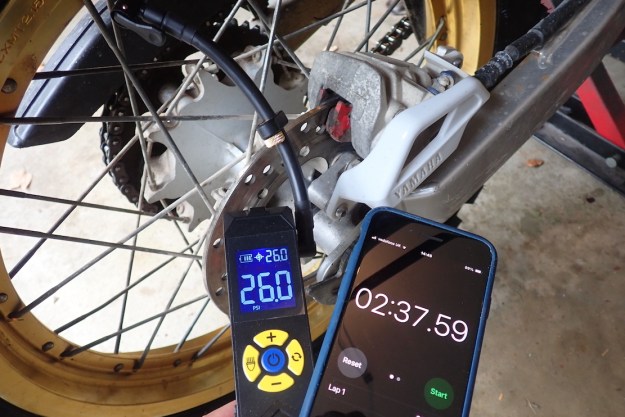
Zero to 26psi in 2:38
Fully charged out of the box, I inflated the new rear Michelin Wild tyre on my Serow from empty to 26 psi in 2:38s. The gadget vibrated a bit but didn’t get too hot. The battery dropped to ¾, but recovered back to full four bars in a few minutes. In Morocco my Serow’s stick tubeless rear leaked on most days – as some do. The Mkch pumped up up, though some days it didn’t light up and I was reminded of the flakey Michelin branded TPMS I tried a few years ago. But maybe it was a knack I needed to learn. I’ve never been a fan of these fold-down clamps on any inflator and this one was a tight fit on my valves which made quick removal without losing air tricky. Maybe it’ll loosen up or I’ll get used to it. but so far so good for the Mich pump.
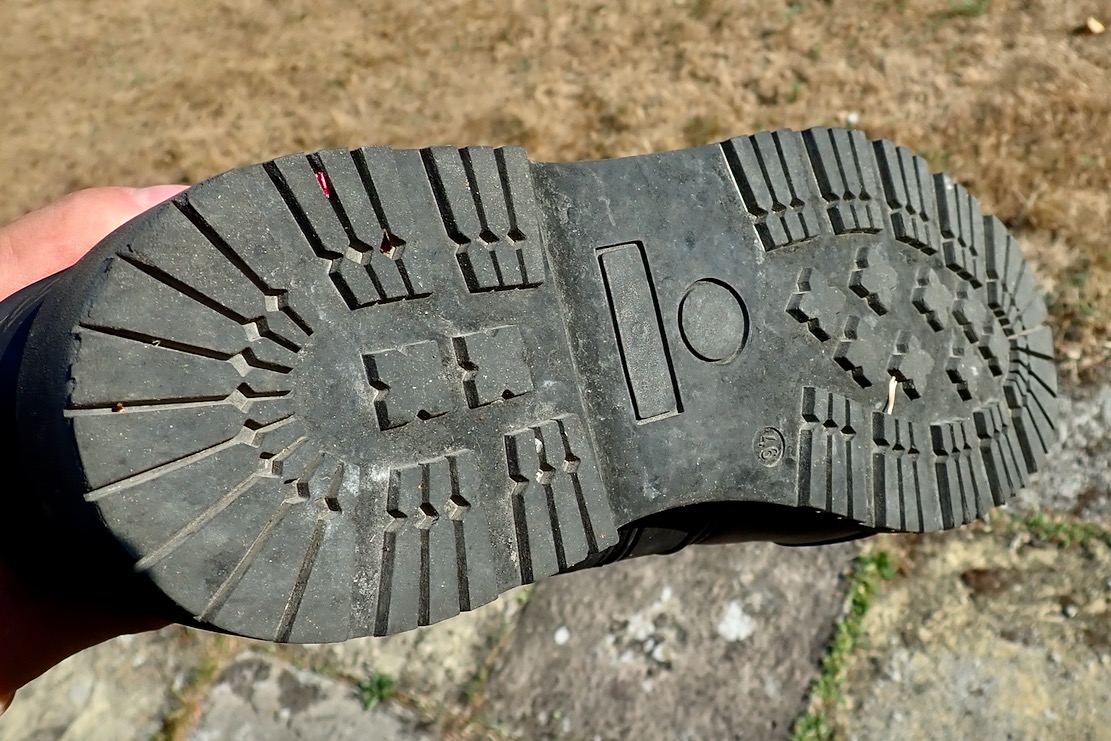
IN A LINE Quality, heavy duty off-roading Mids with Gore-tex. Tall on the shin but narrow across the foot.
WHERE TESTED For the moment, just local lanes.
COST & WEIGHT £280 rrp (from £210). Mine used for £86. Weight: 1100g per boot.
Used bargain!
Very solid build
Stiff instep for standing on pegs
Grippy, Vibram-like sole
Mil green version looks best
Gore-tex membrane
Comes with detailed manual in 13 languages
Mine in boring black but price was right
Right now heavy, stiff and clumpy, but may ease up
On the narrow side
Like all Mids, the top edge can chaff on the shin
What They Say A shorter, more practical version of Adventure 2 Gore. While the non-slip rubber outsole provides optimum grip and total control in all situations and terrain, the micro-adjustable buckle system ensures total comfort. Versatile and untiring, the special Gore fabric is a bonus for the best possible exploration, even in rain and muddy conditions. • Full grain microfibre and suede construction • Waterproof Gore-Tex breathable membrane • Non-slip rubber sole • Hook and loop strap and buckle closure system • Inner gaiter • Plastic support on ankle area • Back reflective inserts for night-time riding • Nylon inner sole with removable arch support
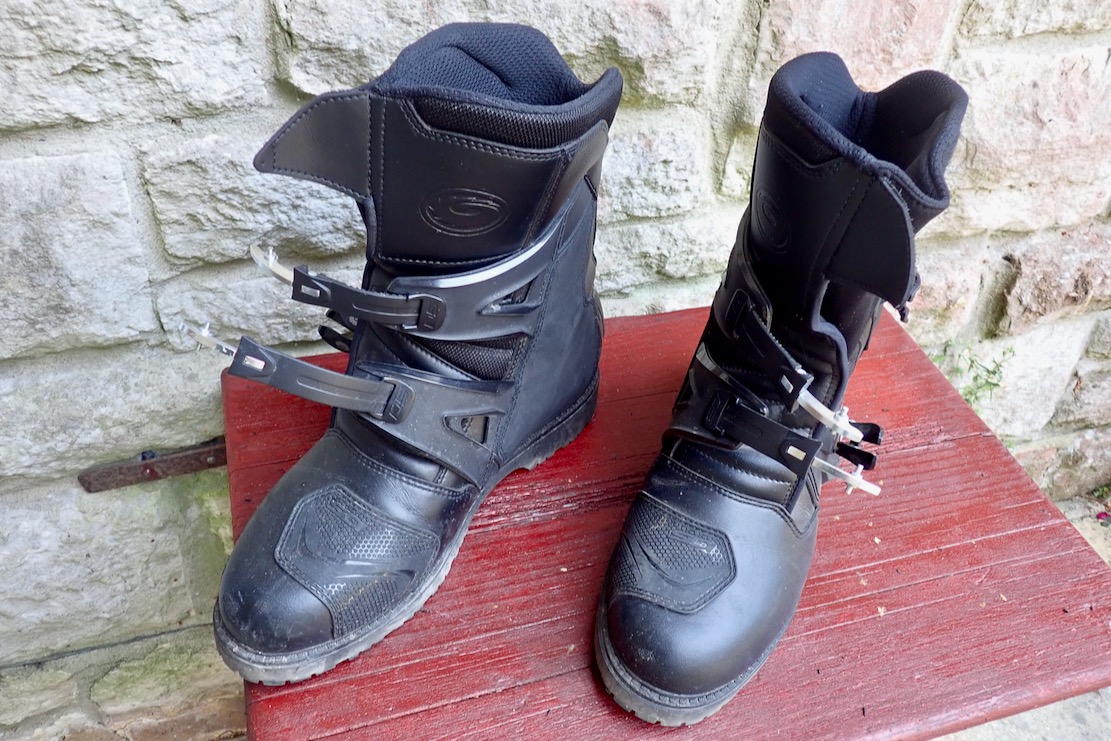
REVIEW After seven years my TCX Baja Mids were as comfy as old slippers but wearing out. One buckle clamp was bodged from something else, then recently in Morocco an unnoticed flying stone poked a hole in the toe like it was cardboard. No longer listed by TCX, remnants crop up from £190.
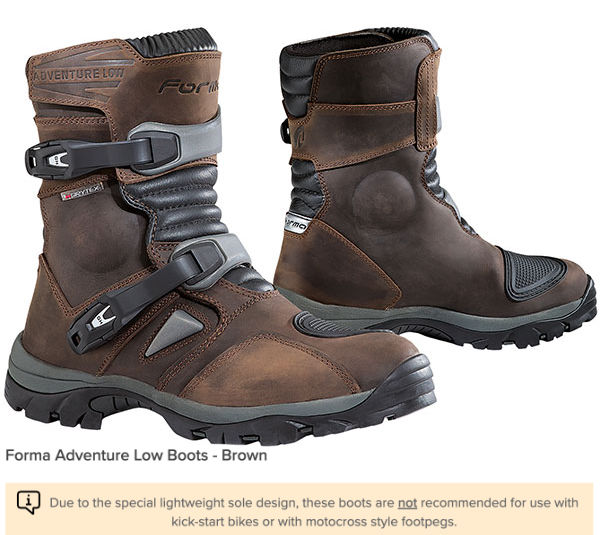
Forma Adventure Low – too soft
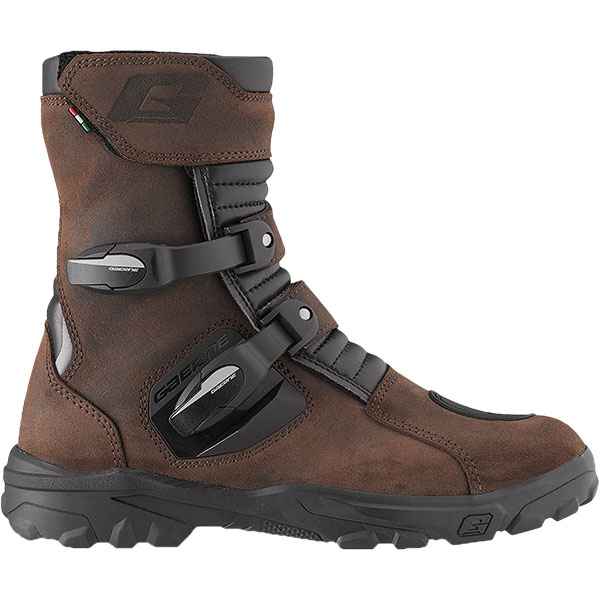
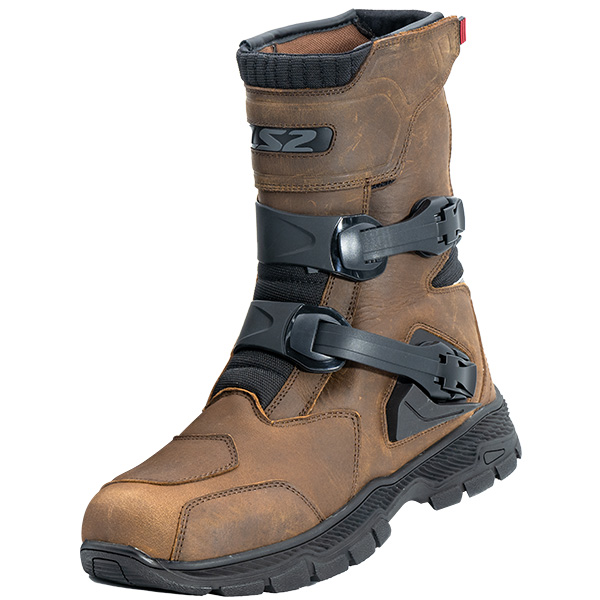
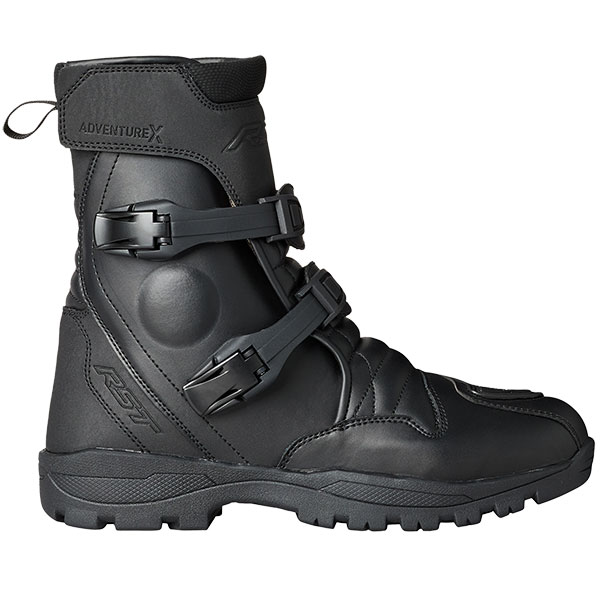
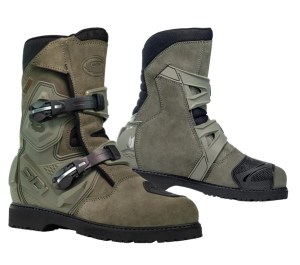
For my next pair of Mids I definitely wanted a less mushy instep for standing up foot-ache free. And a treaded sole would be better too; I’m forever slipping around when clambering on the roadside to shoot a quick pic. Similarly good looking Forma Adventure Lows (left; rrp £214) caught my eye until I clocked the unusual warning on SBS about the soft instep. The current trend for wider pegs helps spread the load of course, but if they’re advising this upfront, the Formas were no longer contenders. There’s an ‘Adventure look’ with boots that doesn’t correspond with actual all-terrain adventuring – a parallel to the entire ‘style before function’ Adventure Motorcycling Phenomenon some might say! My old Bajas may have been in this category, and so might similar, two-clamp Gaerne G-Dunes, cheaper LS2 Adventures and the even cheaper RST Adventure-X (below; left to right).
They all have the appearance of MX boots – rugged clamps and ankle protection – but underneath aren’t really up for it. This shop product video review seems to confirm this lamentable trend while claiming these Sidis are a cut above.
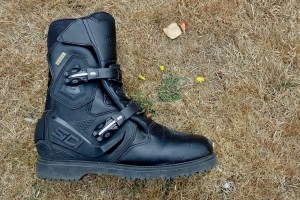
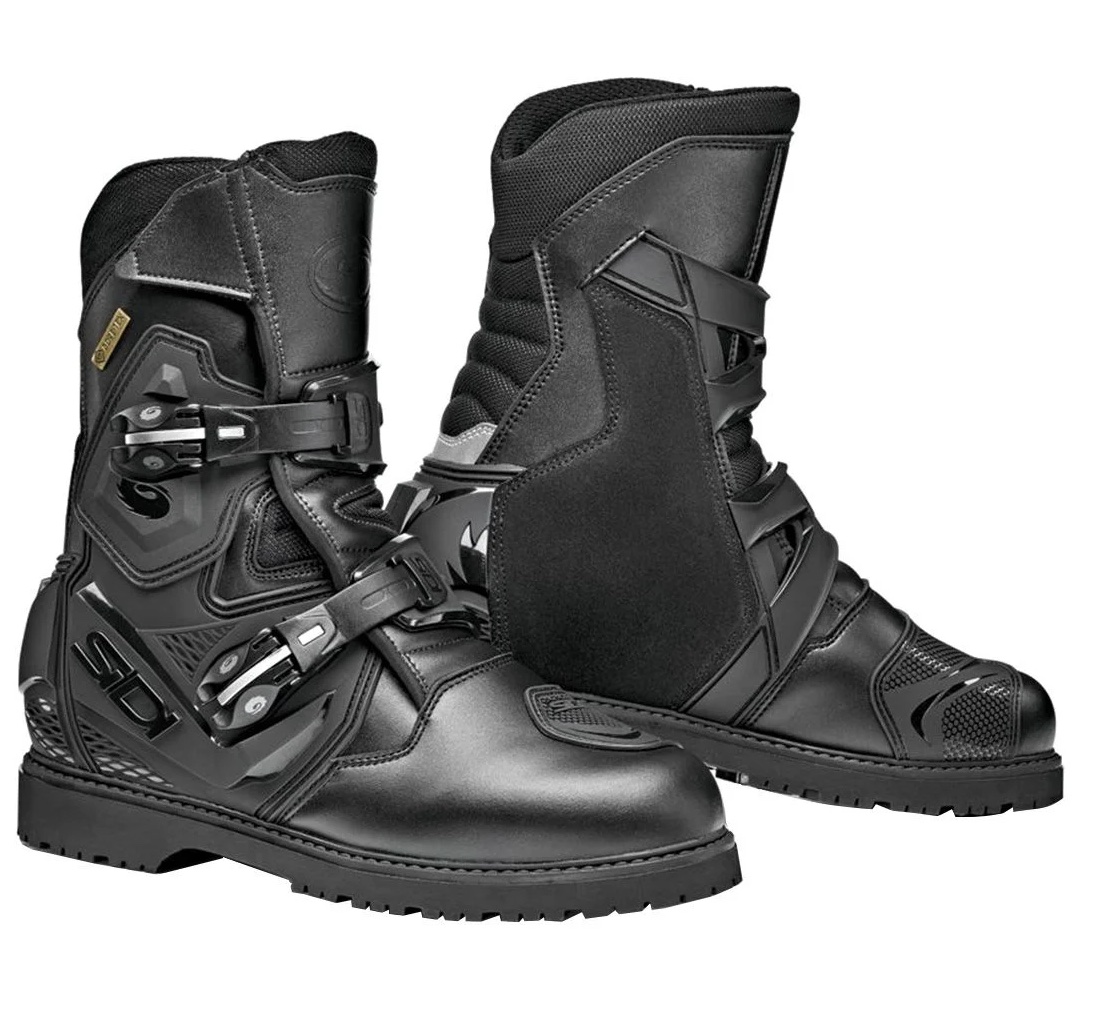
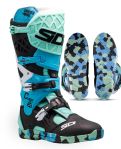
I thought I’d treat myself to some Sidis who, like Alpinestars, have had a solid rep in off-road moto footwear as long as I’ve been riding. Or should I say, some turned up in my size dead cheap ;-). They certainly look like they could give and take a good kicking, have a Vibram-style sole and, in ‘military green’ (left) looked way more interesting than ‘tobacco’ or boring black.
I’d have sized up a green pair from SBS, then waited for a sale or used, but as said, my size in black and used once was ending soon on eBay for just £86. Boring black it would have to be, but at least they’re better than the ‘messy coral’ Crossair X for just £630 (right).
Narrow
Sidi Mid Adventure 2s Out of the box the 11s (46) looked solid but unnervingly narrow. Once on my feet they felt the same, initially pressing on my small toe, even with thin socks. I didn’t get the chance to read before buying but many reviews and customer reviews on SBS (left) testify to this. But had I gone up a size to 47s they’d be way too long. I’ve had width issues forever with hiking boots, but with the Sidis the pressure goes away after a while, and it’s not like I’m heading up the Pennine Way with a full pack for a fortnight. If they’d been that bad I’d have put them straight back on eBay and might even have made a few quid.
Note that the video above compares the Mids with the full-height version with an ankle hinge for full articulation. The Mids don’t have this but being tall for Mids, lose out on that ankle movement when walking or sliding into a corner, extended inside skimming over the dirt. The simpler, one piece body will probably do me, plus there are bellows above the heel for a bit of give.
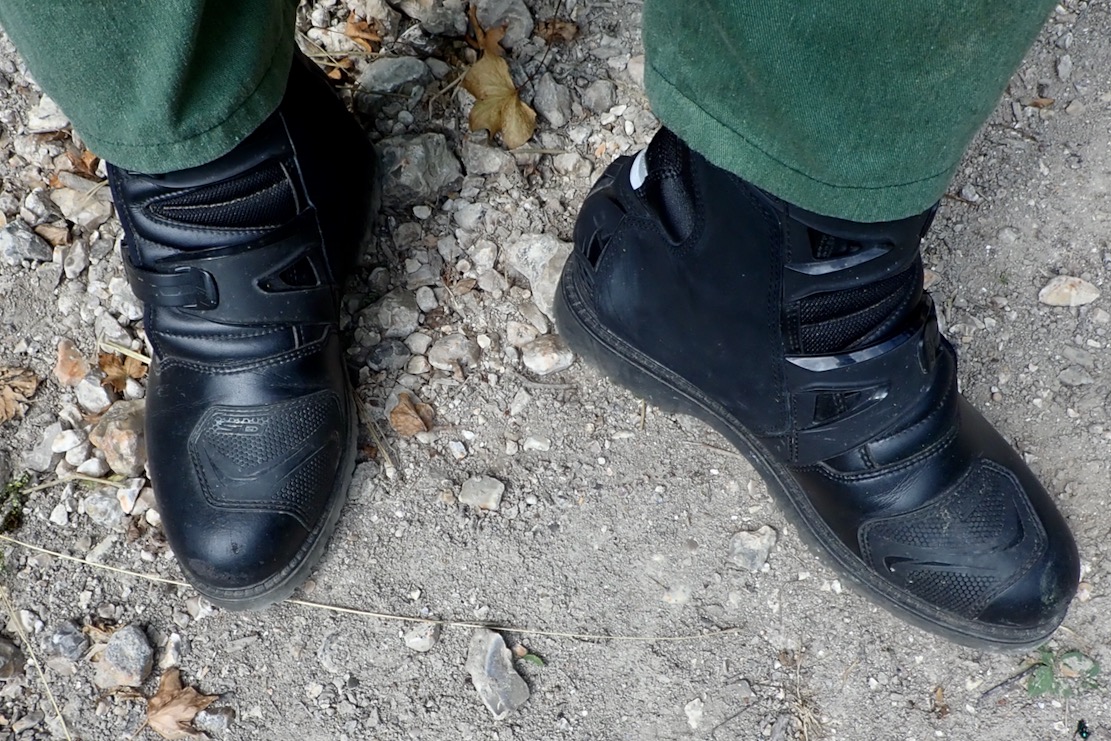
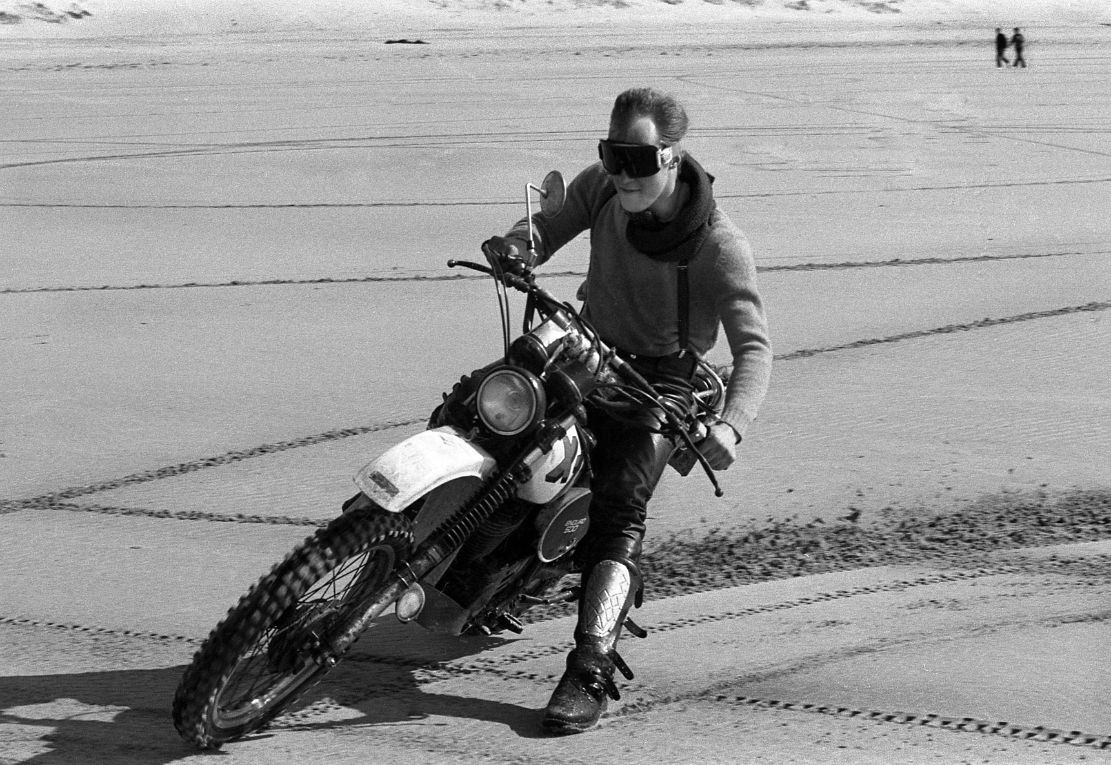
Green laning locally on the Serow, the Sidis proved they had what the Formas, my Bajas and maybe the other softies all lacked: a rock-hard MX instep offering pain-free standing support on the narrowest, spiked footpeg. And the lugged ‘Vibram’ sole (left) will add grip when paddling or scrambling about off the bike. My smooth-soled Bajas were a pain in this regard, though a real dirt racer’s boot would have a smooth sole for crossed-up broadsides, like I was practising below (1970s Alpinestars Super Vics).
The Sidi’s straps clamp down securely with a bumper protecting the lower one, and ought not fall off like the Bajas. With the unusually tall height (300mm in my 46s), they could be run ITB (tucked in), and ought to keep the feet dry in downpours and through fords. The Bajas were too short for reliable ITB; these taller Sidis ought to hold the tucked in trousers. Plus you get an actual Gore-tex membrane for as long as it lasts, not some no-name ‘SplashBack™’ version, though the vid review above notes the membrane ends about halfway between the top edge and the upper buckle.
Inside you get the usual cheap, thin removable insole (left). I’might put in one of the better ones I’ve lying around, or if you need more volume you could ditch it; it’s not like to need the all-day walking support. One thing with Mid height boots like this is that the top of the boot can chaff on your shin – my Bajas were like this too. It’s one reason to go ITB or wear knee-height socks.
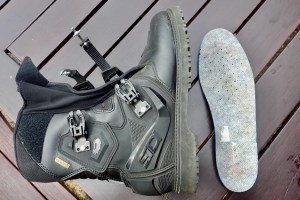
Weighing 1100g each (only 80g more than my Bajas), they don’t feel anywhere near as comfy right now, but will hopefully respond to breaking in. To speed that process up, I bought some boot spreaders (left). We’ll see how effective they are, but once that’s done the Sidis look like they’ll take whatever terrain and weather’s thrown at them. More to come.
The other evening I had a great idea while riding my MTB along a Purbeck ridge. My Merida hardtail bike (left) has a dropper seatpost: thumb a lever and the saddle drops 6 inches under your weight; press again with your weight off and the post springs back up to full height for efficient pedalling effort. Far from another MTB gimmick, I use it all the time when approaching a gate, on steep downhills or even just getting on/off or stopping to look at the map. I think motos could use a similar feature when off road: there are times you want it high and times you want it low, with no faffing in between. Automatic ride height adjustment as found on some H-Ds and BMW 13GSs is not the same thing. Nor is static saddle height adjustment by repositioning the seat base on its mounts; the sort of thing you usually do once. The main reason I never got the otherwise great XT700 back in 2019, was the seat was too high for what I like to do.
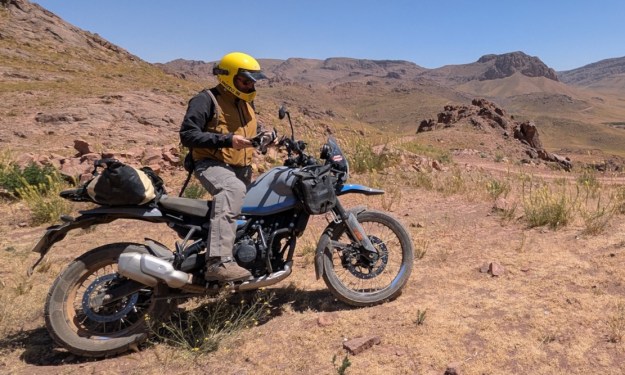
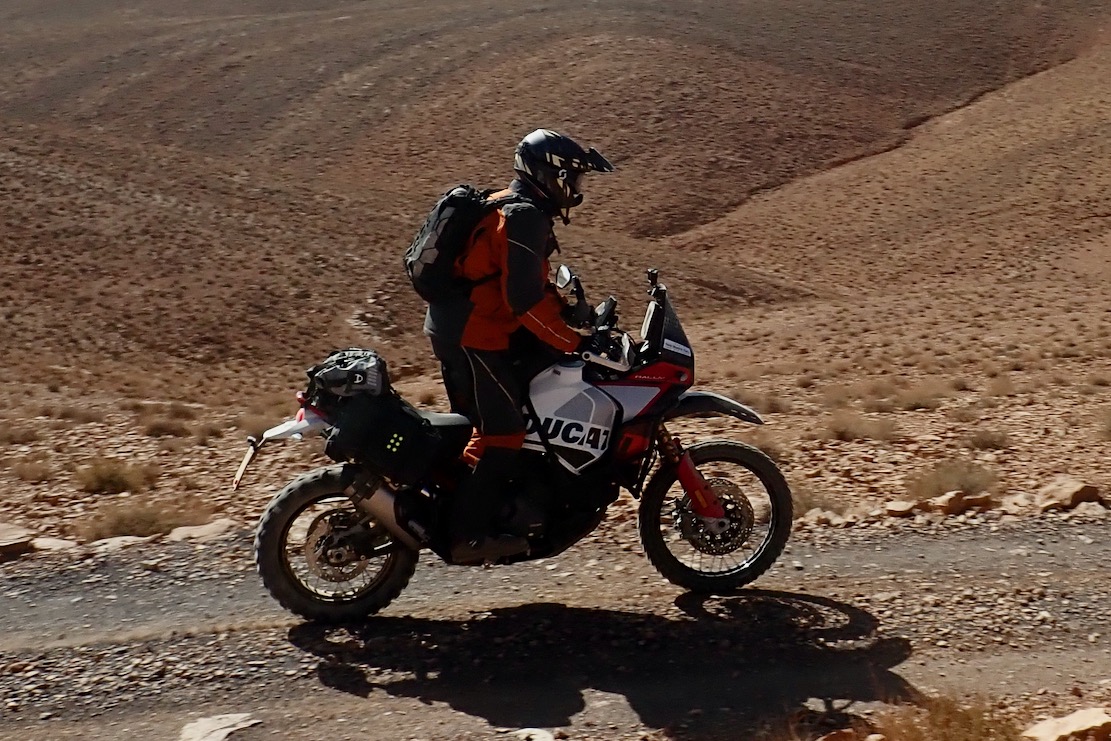
Do all-terrain motos really need dynamic seat height adjustment? Well, until MTB droppers came on the scene, I’d have said ‘no’ and managed by manually dropping saddle for rough descents. On a moto, a high saddle – or more precisely a long peg-to-saddle distance – reduces the effort of standing up and is why competition bikes have yard-high saddles: dirt racers are on the pegs most of the time. Those bikes are of course feather light and easy to manage in the rough. Bring a similar saddle height to a 230-kilo loaded travel bike, like the Desert X Rally I rode with (below), and tackling rough stages requires skill and commitment, assisted by plush suspension and good armour. I can tock off all four, but I do find some low saddles (above: Him 450) a bit hard on the knees, even if I can reassuringly get my feet down.
Desert X. Touchdown? No chance
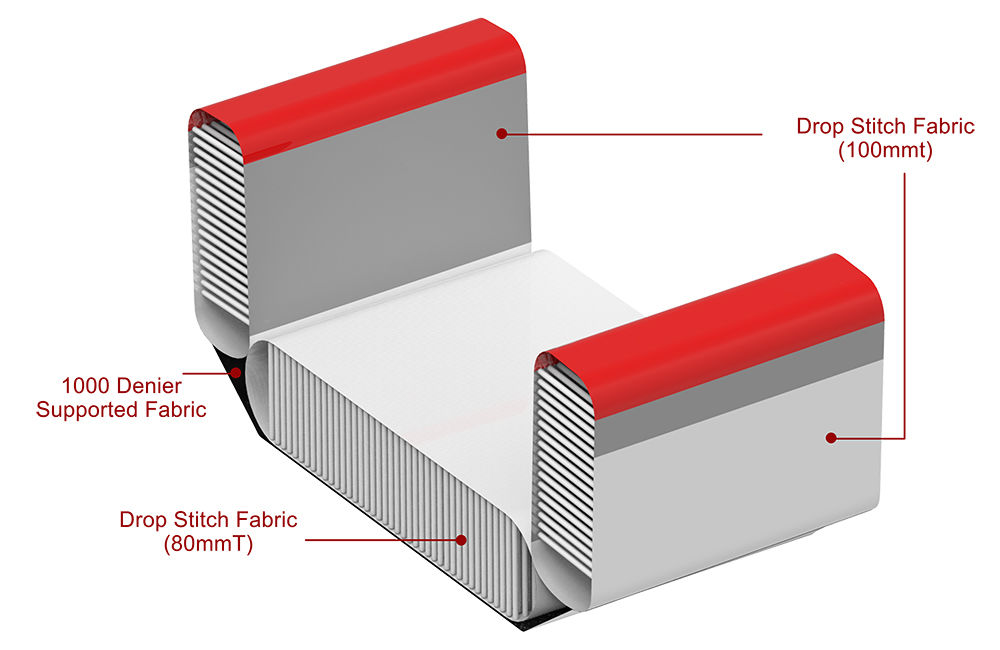
My brilliant idea uses an inflatable chamber integrated in the bike’s seat foam, tech I know from inflatable kayaks. IKs attempt to mimic the hydrodynamic form of a hardshell kayak and a few years ago drop stitch panels from paddle boards were adapted to make boxy, ‘3-plank’ IKs (below right).
Drop stitch (DS) panels hold much higher pressures than tubes (15psi+ vs 3psi on I-beams) while retaining the flat panel shape. The result is hardshell-like rigidity with the transport and storage convenience of a roll-up kayak. Decades ago, Goodyear even developed a drop stitch airplane for the US military.
For this moto seat application, it’s not about rock-hard rigidity, but being able to increase saddle height by 2-3 inches while retaining a normal looking moto seat. The bladder could be integrated in the seat vinyl which would need stretchy sides or some other idea so as not to look crumpled when set low and not to wobble about like some non DS air seat pads. Sadly, my pitch stumbles when it comes to inflating and deflating this chamber at the flick of a switch. Exhaust gas being too hot, some sort of separate on-board compressor would be needed which adds weight, cost and complication. And you’d want a fast purge valve because when you want less height, you probably want it fast.
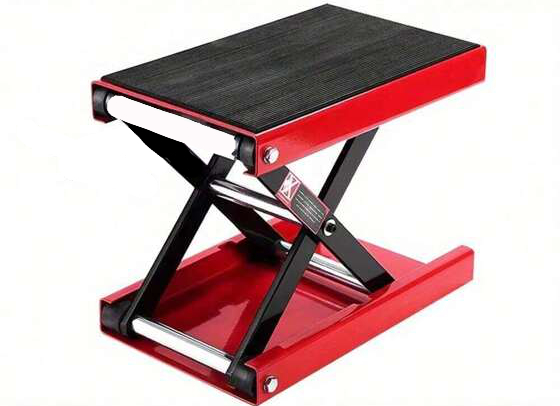
PS: I have to admit Dave K’s comment suggesting a scissored lever with similar click/release mechanisms to a pushbike dropper is much better. On the jack pictured below, the base is the bike’s subframe rails and the top is the seat base. The seat is raised by spring/s under compression to engage a lock-out to stay up. A thumb lever cable (a bit like the old compression release lever on an XT500) disengages the upper lock and, aided by body weight, the seat drops to lock in the lower position. Thumb the lever again and it springs up, but ideally with a bit less force than 007’s DB5 (right). Issues I foresee include retaining a secure seat when raised. You don’t want it wobbling about laterally when bashing about off road which may mean hefty beams. Alongside that, the inelegant gap in the raised position could be designed around.
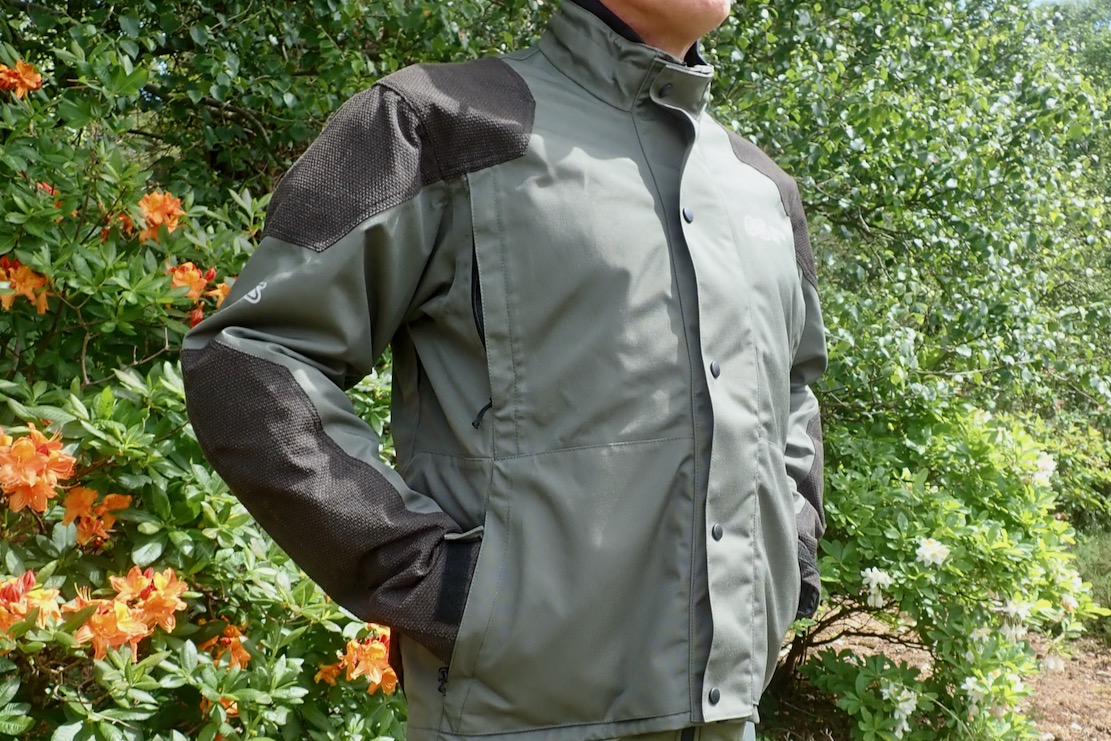
In a line: Well featured, fully armoured, all-season shell for cooler or faster rides
Price: £549
Size andWeight: XL; 2520g or 1440g without armour (verified)
What they say: The Gravel Jacket is a CE AA certified, highly durable, lightweight, waterproof, breathable adventure touring jacket. It combines everything Adventure Spec has learned about extreme off road and trail riding into the lightest adventure touring package. The Gravel Jacket is designed to be partnered with the Gravel Pant. It is constructed from a three-layer waterproof fabric that features a blend of Cordura Nylon 6-6 for high abrasion resistance, and PU film for extreme water resistance and breathability. Additional protective panels and removable level 2 armour protects back, shoulder and elbow impact zones. The Gravel Jacket and Pant is designed to keep you comfortable and safe while adventure riding on road, gravel and trails.
I had a close look for review purposes, took some photos, then returned it.
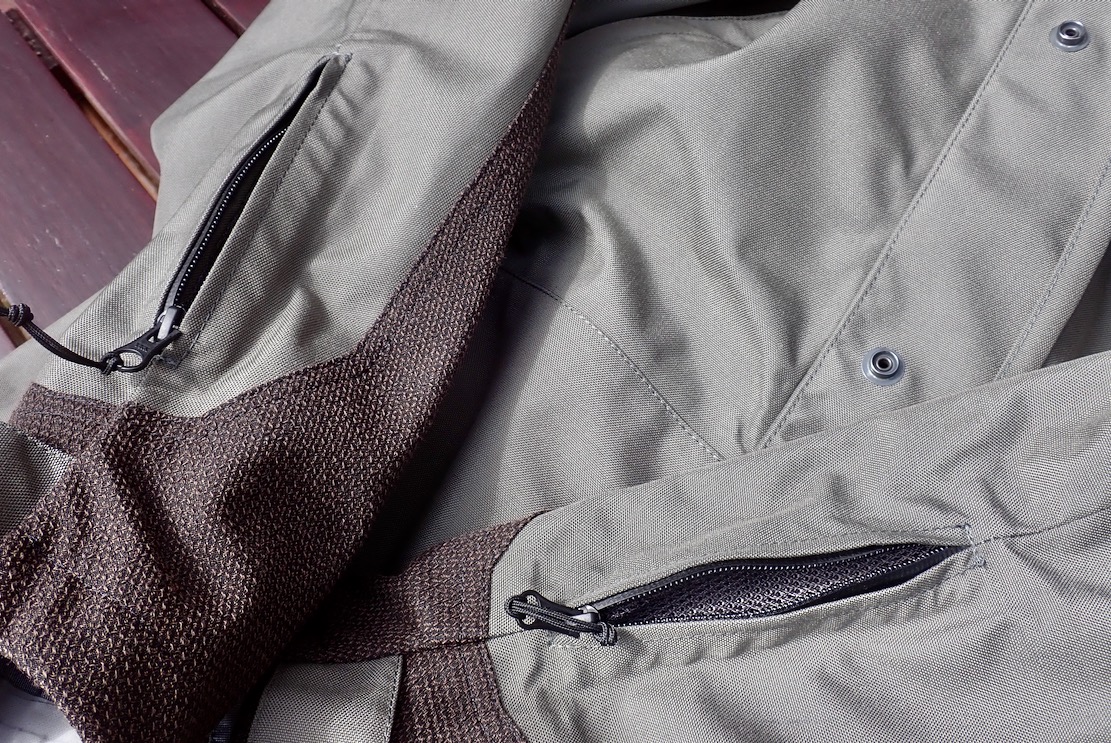
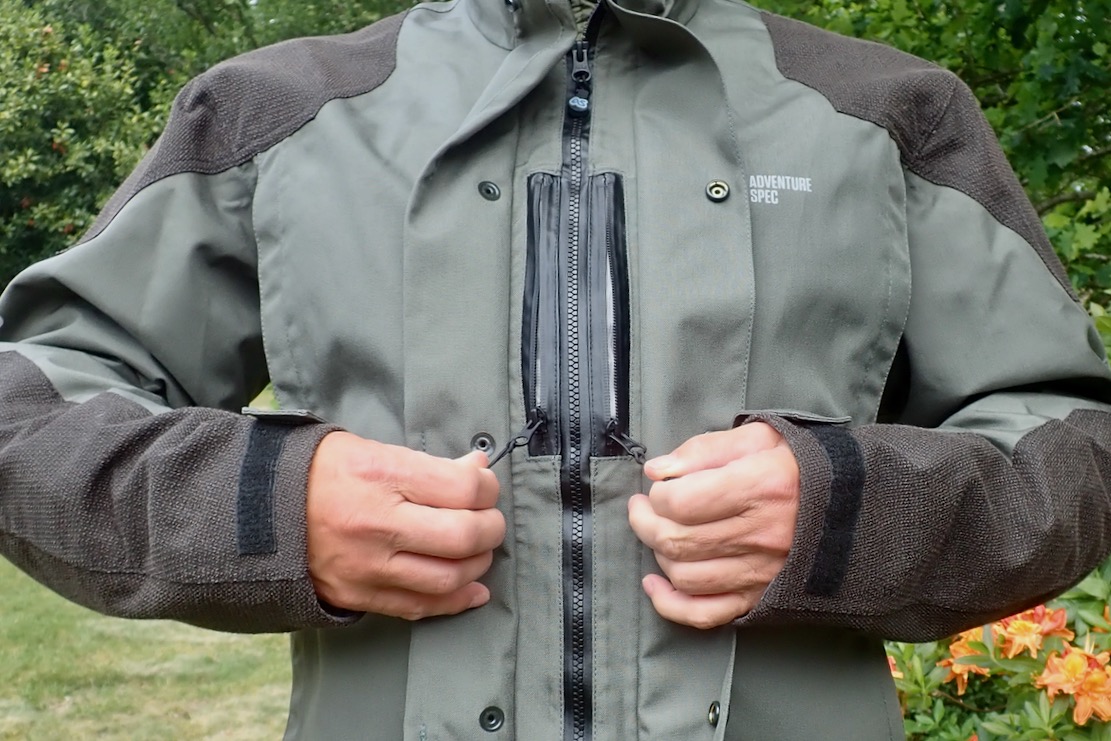
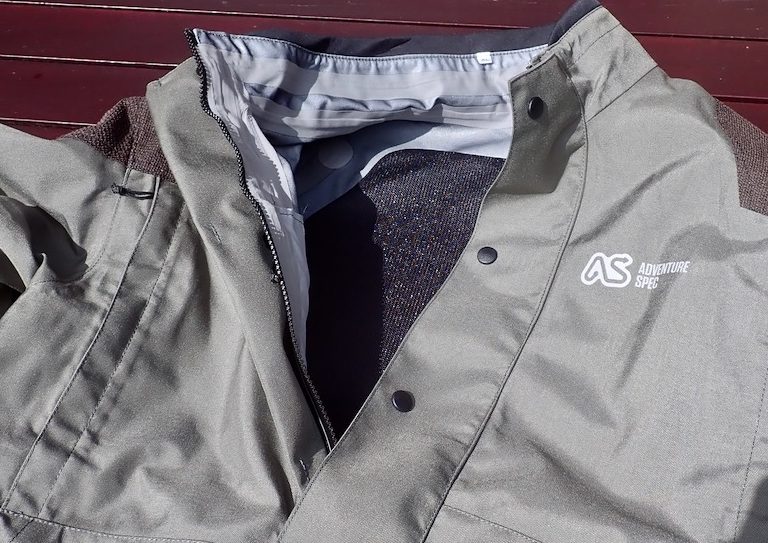
Front one-way zip is double storm flapped with an added ‘gutter’ fold on the inner flap to slow down water ingress
Quick Look Adv Spec’s Gravel Jacket came out in late 2024 with matching Gravel pants. Up till now most of AS’s apparel has been gear for more active enduro or trail bike riders who value minimal clobber and may be layering up and down throughout the day. At £549 The Gravel is their top of the range CE AA, all-season jacket pitched at touring riders on bigger Adv bikes which are suited to long road miles and easy gravel trails. Using non-proprietary armour and PU membrane help keep the price down, while ticking many other boxes.
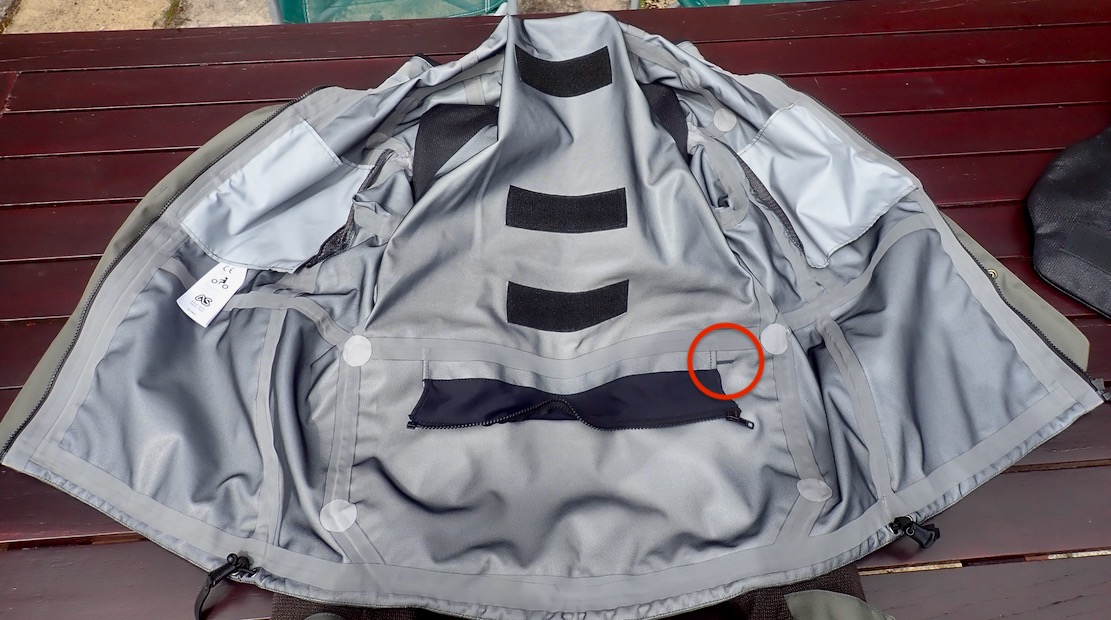
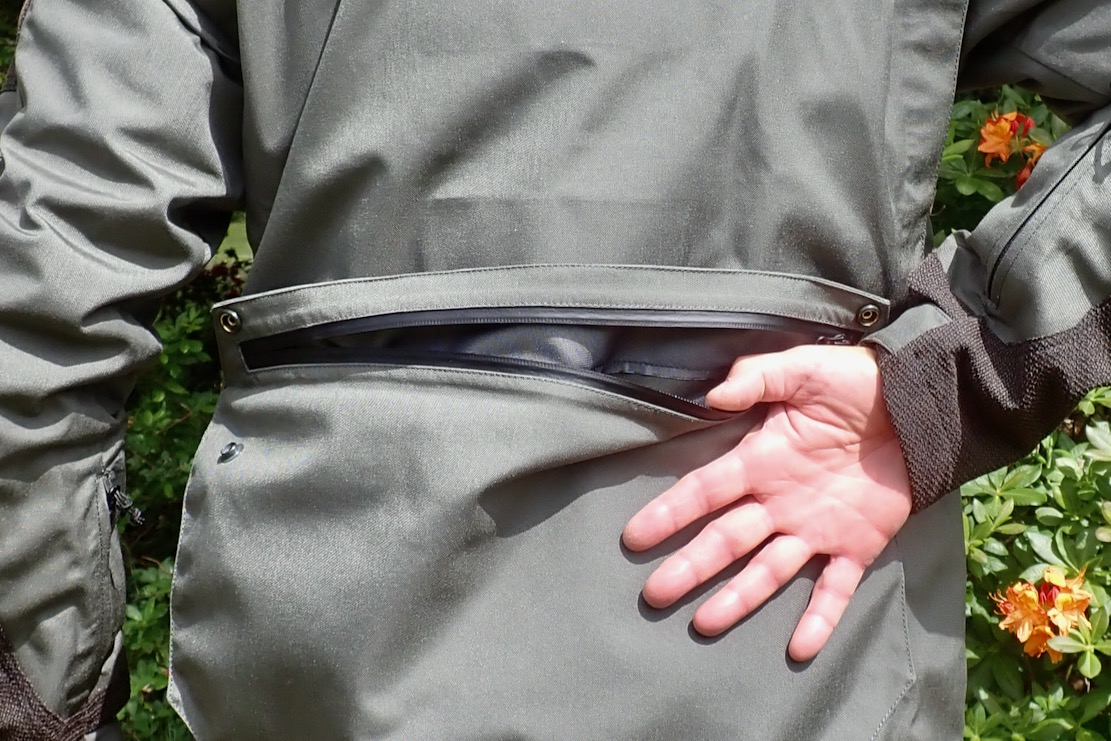
The wicking lining is bonded to the shell fabric, not a separate, loose mesh, which shows taped seams sealing the stitched panels. Ringed: a slot in the back pocket for a hydrator hose.
Out of the box the Gravel feels hefty with all the armour in place, and once on, the fabric is pretty chunky and stiff too – at least while new and compared to what I’ve been wearing lately. (Fyi: I am 6ft 1in/186cm, 210lbs/95kg.)
The 500D, grey nylon body fabric is an abrasion resistant, 3-layer bonded laminate, sandwiching a no-name membrane. That’s the best way to do it, compared separate zip-in liners found on cheaper gear which I like to think have had their day. Oddly, the contrasting woven, 240D kevlar reinforced polyester abrasion panels are also 3-layer. You’d think any simple, tough abrasion-resisting patch would do, and in fact according to the AS table, this 240D is less abrasion resistant than the plain old 500D shell fabric (which is how Aerostitch do their impact-area patches), but helps add a textured look to the jacket. This additional layering will improve water resistance but reduce breathability. It also means these impact-prone areas get no less than seven layers of protection if you include the armour pads underneath. You’re elbows, back and and shoulders will be well protected from impacts.
80-minute, feature-length video? Hard to think the salient facts could not also be packed into a snappy, Mosko-style <5 minute version.
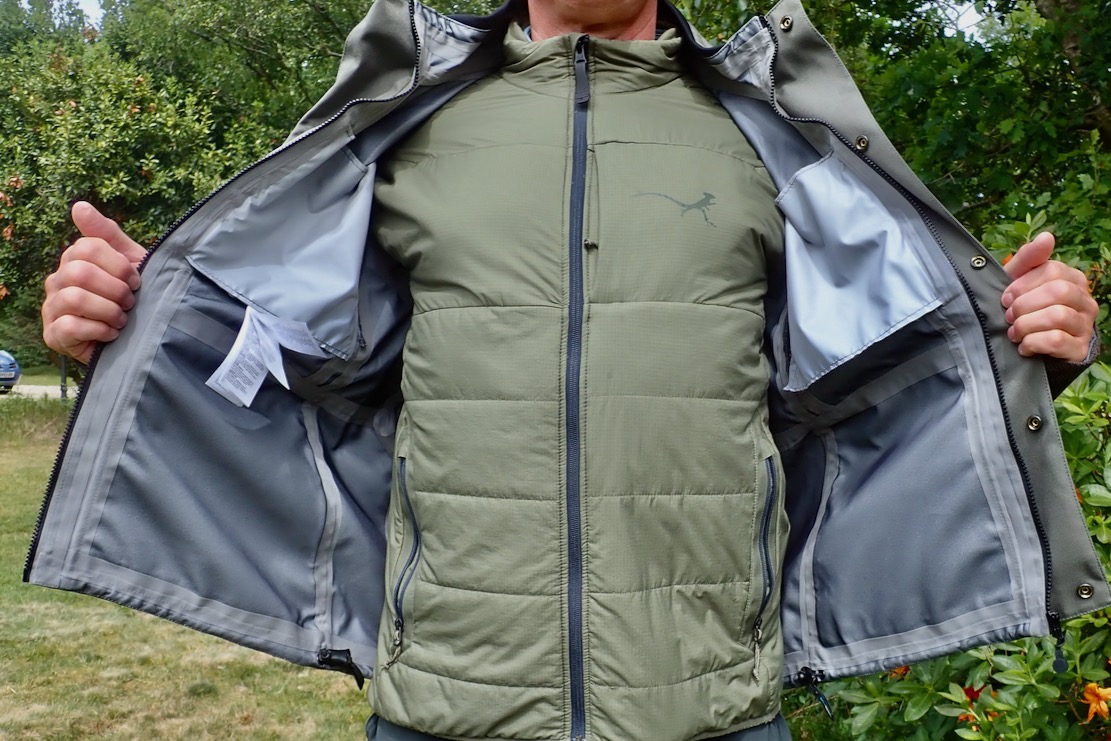
Size wise, new and stiff out of the box the XL Gravel initially felt a bit tight on me. But once the back protector was removed it felt much more comfortable, even wearing my Mosko electric puffa over a denim shirt – a typical riding set up for cooler temps. Sleeves are long, so is the back while the front is short. More dims below.
Adjustability includes two cinch pull tabs along the hem sides – it took a close look to work out how to operate them – plus velcro cuffs and another cinch at the back of the neoprene-edged, unlined collar.
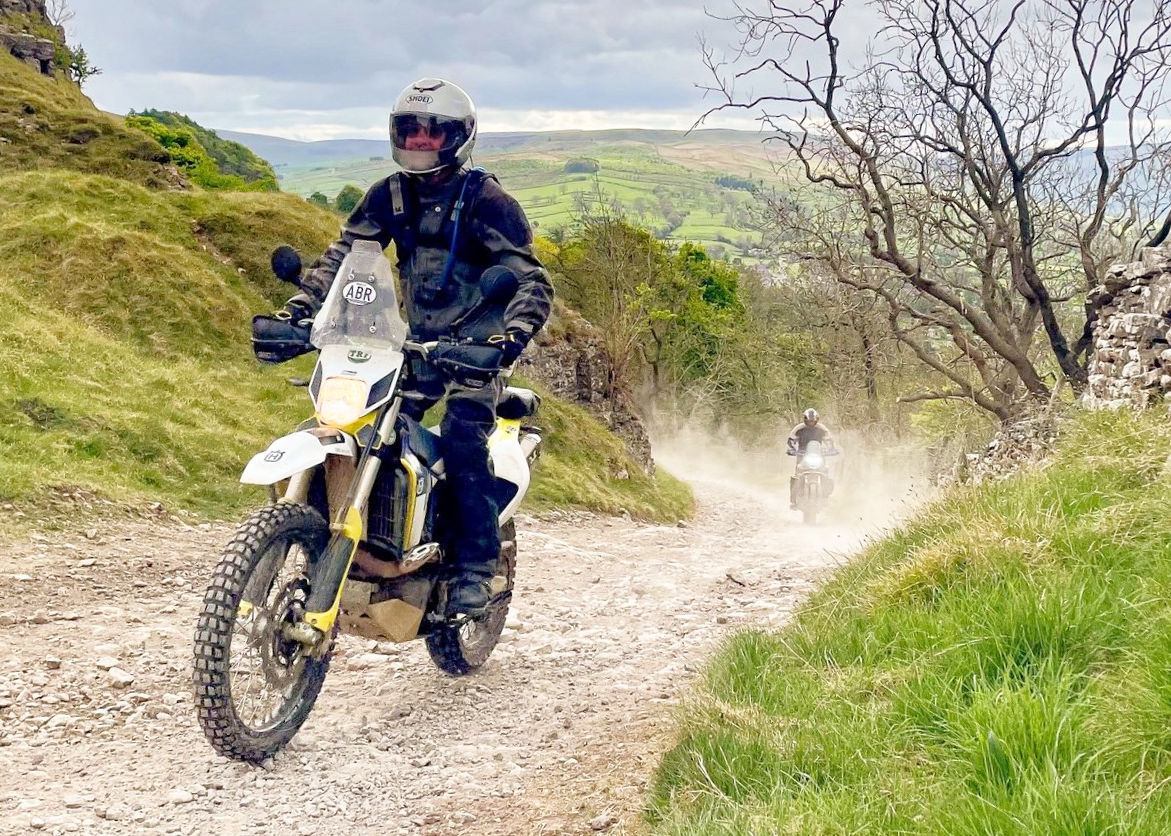
Dave K on the gravel
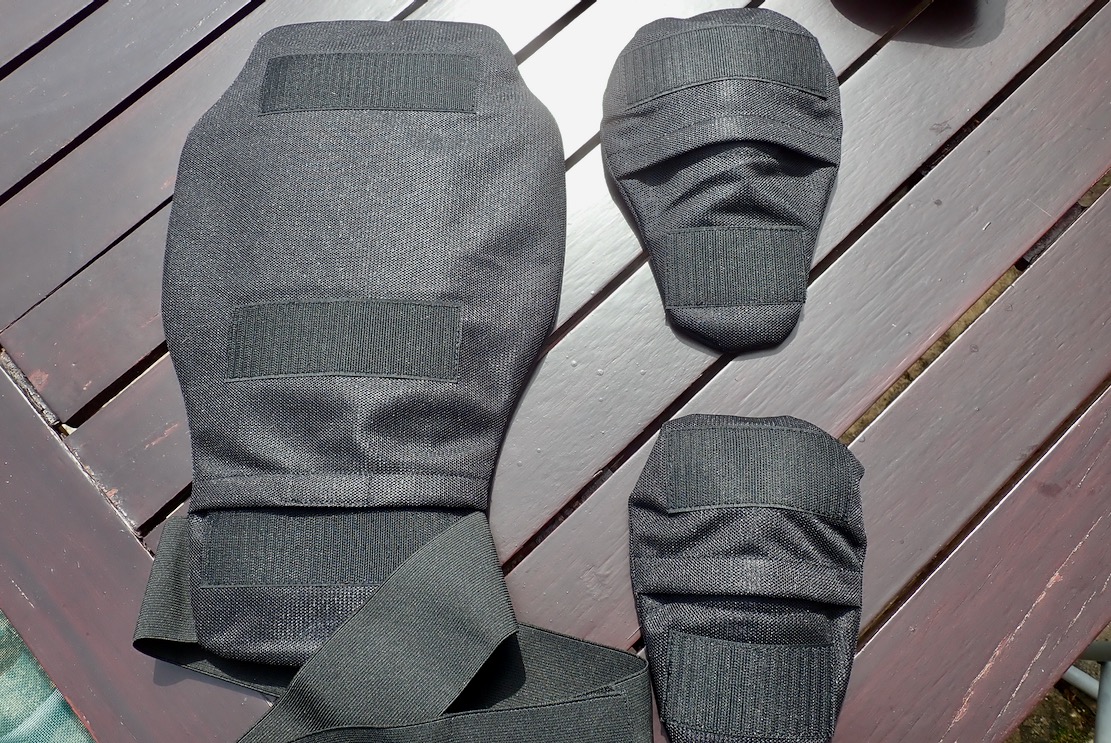
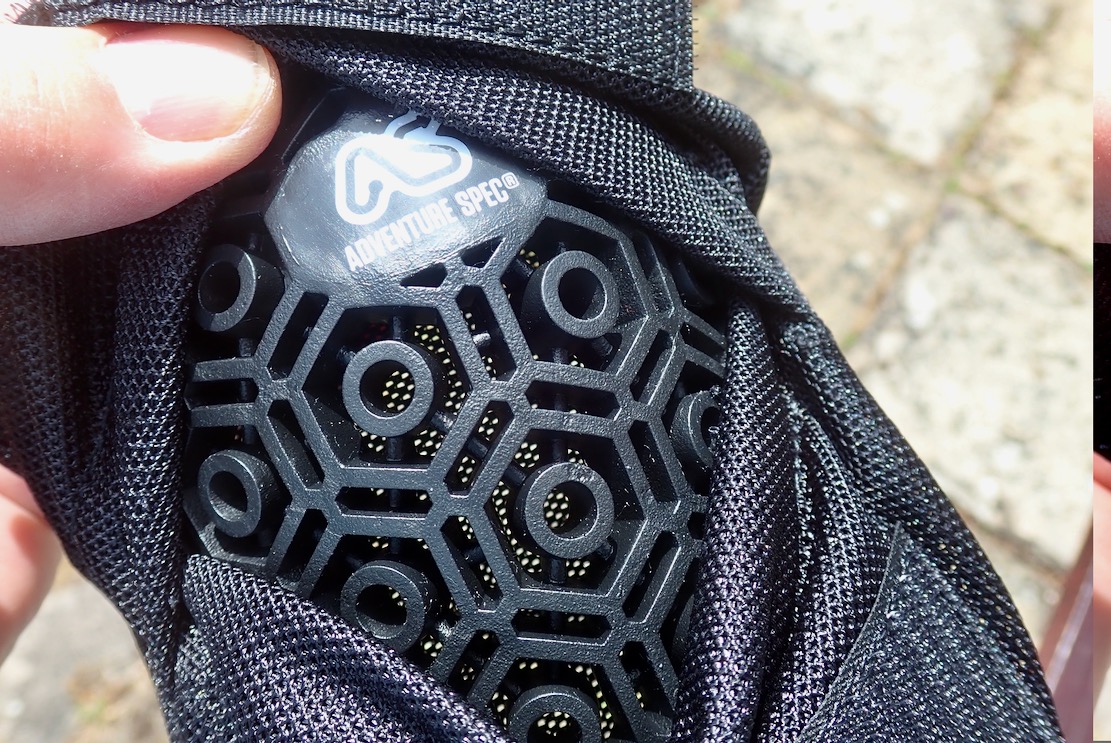
Armour Underneath and inside, five pieces of A-Spec-branded armour sit in pockets velcro’d to the shell’s interior. I wonder if an included back protector is mandatory to secure a CE AA rating. While good insurance for high-speed crashes, as said, I found the Gravel much more comfortable without the back plate (as I do with most jackets). On the scales this back pad weighed 565g, or over 20% of the jacket’s overall weight.
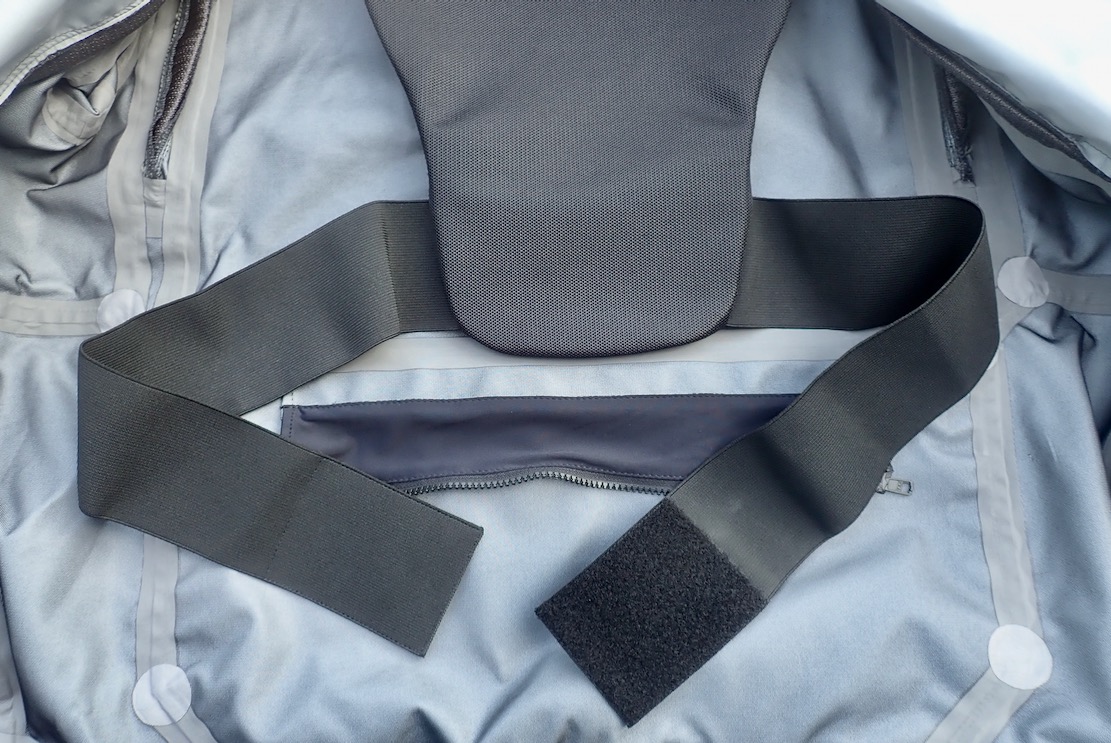
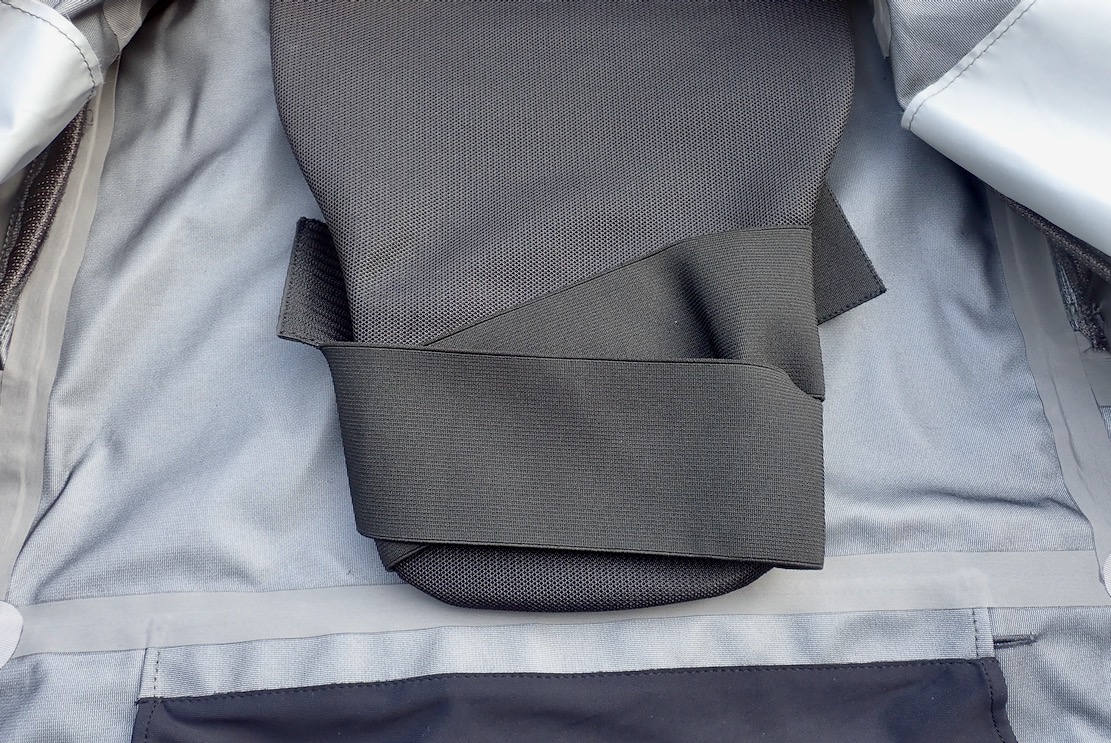
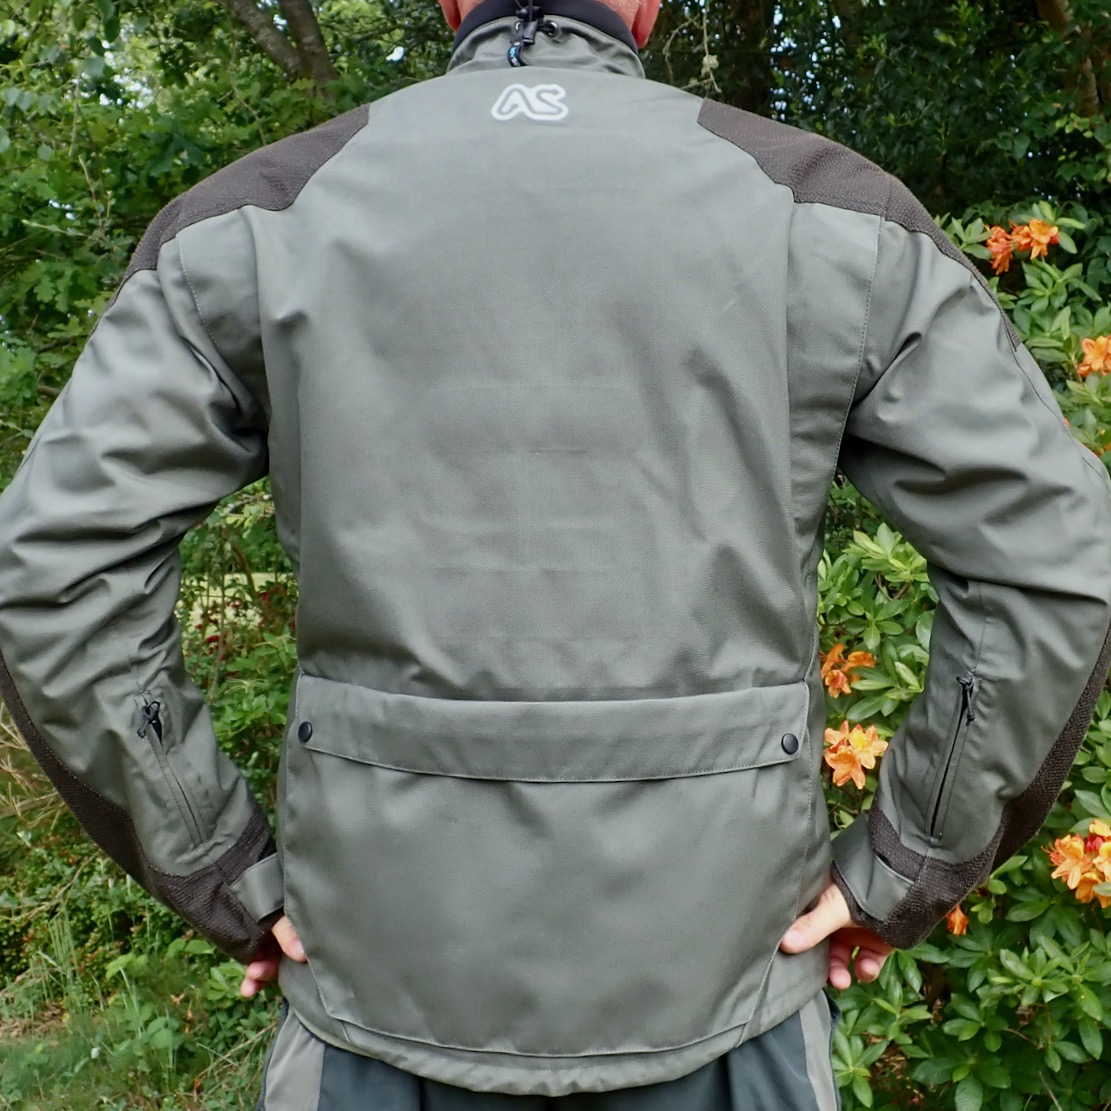
An elastic waist strap is sewn to the nylon sleeve housing the back pad (above left; below). They call it a ‘kidney belt’ but that’s something else: a stiff girdle-like band which MX racers use to support the lumbar region and keep their organs in place. All this stretchy band does is pull in the base of the back protector which may help keep out draughts. That could be even more effective with a couple of belt loops on the sides of the inner shell to pull everything in. When not used, the belt dangles down, or you can tuck it out of the way behind the back armour (below right). You’ll also notice a half-zip to join up to Gravel pants for the same draught eliminating effect.
On the arms, the two pairs of shoulder and elbow armour came in at 514g. I’d be happy to leave those in place, but by comparison the more pliable and slimmer D3O on my new Klim weigh 380g and could be easily swapped into the Gravel’s armour sleeves.
The whole elbow/shoulder armour thing must be another CE requirement, but it won’t stop over-the-bars broken collar bones. Some jackets I’ve had included a bicep cinch strap to pull in baggy arms out of the mirror line, while also keeping otherwise loose elbow armour in place. If you’re serious about armour, remove everything from the Gravel to save over a kilo, and wear something like A-Spec’s padded SuperShirt. It’s yet more clobber, but will probably be way more comfortable and effective.
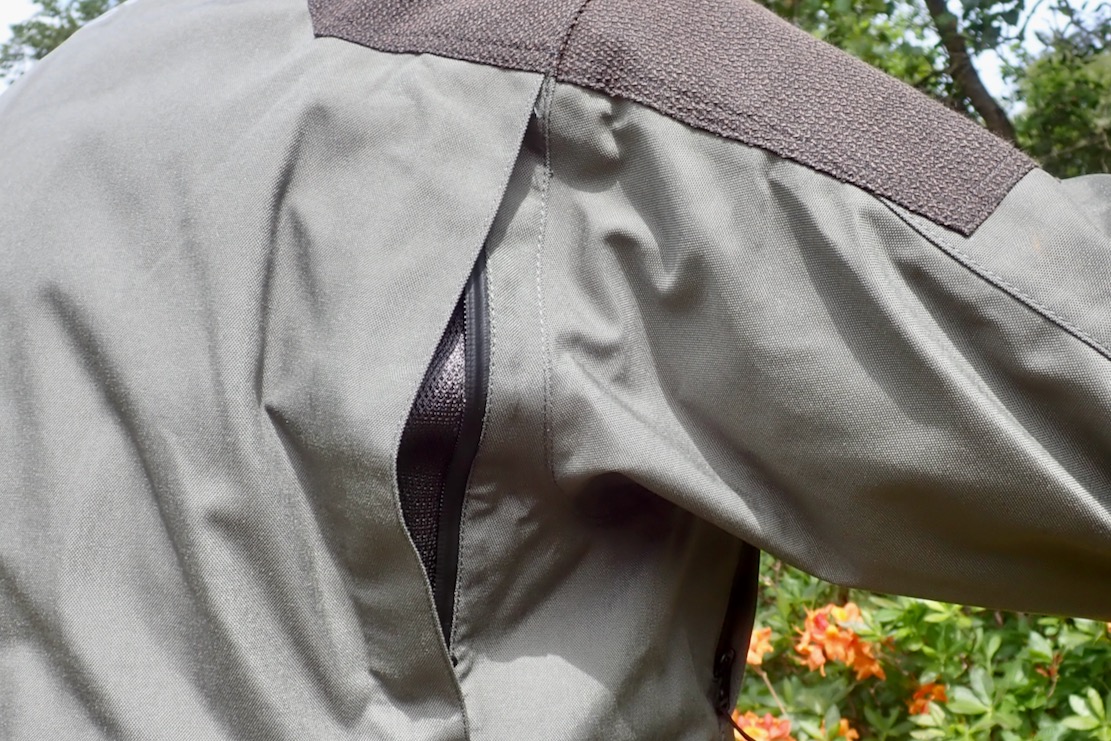
Short, mesh-backed arm vents
Venting air flow looks a bit constricted on the Gravel, but then I’ve not actually tried it. On the forearms you have a couple of short, mesh-backed zip vents (above) which it’s hard to see being very effective. There’s another set on the upper sides of the chest with exhaust vents on the shoulder behind (below left and right).
Apertures are on the small side and will be better than nothing, but as on other jackets, the trend for mesh backing means they can’t open fully to get a flow on. For more venting you might as easily open out the cuffs and unzip the one-way front zip, then do some of the poppers back up. Or, do as Dave did in the Comments, and cut open the mesh to maximise the flow.
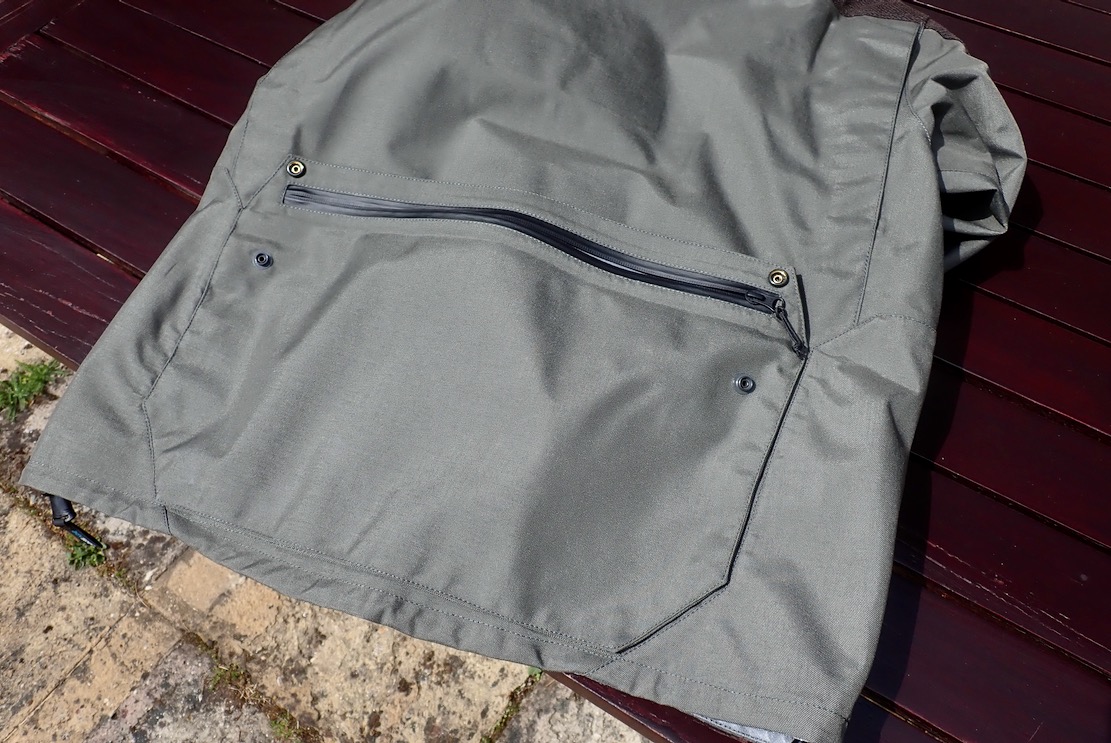
Pockets add up to a couple at the hem (below left), and another pair outside on the chest but behind the poppered storm flap (below right) which means you don’t need to open the main zip to access them. Water-resistant zippers up here mean that a passport, wallet and phone ought to be well protected from downpours, but condensation in a pocket may add humidity.
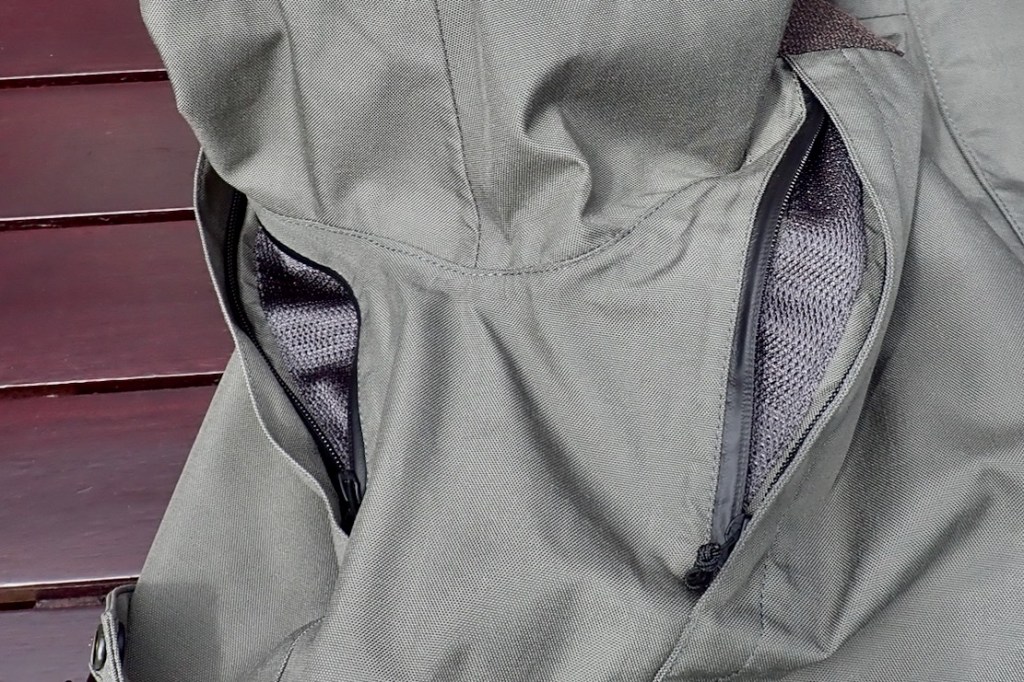
On the back is a huge ‘game pocket’ with studs over another water resistant zip. I find pockets like this a handy place to stash essential but rarely needed items which you never want to be parted from. It’s a long time since I’ve been as supple as Olga Korbut, but I was able to open both poppers and slide the zip while wearing the jacket. They don’t mention it, but inside the game pocket is a buttonhole slot to feed out a long hydrator hose. It would have to come out around the neck – close enough to your mouth – but means you can dispense with wearing a hydrator daypack, another clobber ‘win’!
For comparison I tried on my new Klim Traverse GTX (to be reviewed). It felt flimsy by comparison – or you could say it felt a whole lot lighter and less clobber-like, while still being Gore-Tex waterproof and armoured at the arms.
As I found with Mosko’s similar Basilisk, the Gravel Jacket would be too heavy for the sort of easy trail biking I do in Morocco. Road touring on a big Adv you’ve already surrendered off-road agility for all-conquering road manners, and something like the Gravel Jacket, or even the full outfit, will add to your feeling of invulnerability. Thanks to Adventure Spec for sending out the Gravel for a quick look.