CRF250L INDEX PAGE
Original pics for this post sadly lost in the clouds

In Phoenix the CRF was waiting for me, as were a dozen boxes of accessories to finish off the job the first owner had started before he flogged it with less than 1000 miles.
As a reminder, he fitted a pipe, plate, EJK fuel controller, tail rack, 13T, Shorei battery and the white plastics. Most of the original bits were there too.
Lying on the floor there on the left I had a set of Aussie Barkbusters with the large Storm handguards, a Spitfire screen, some bar risers, a 12V socket, a couple of RAM mounts and some Double Take mirrors along with lube, filters, a Trail Tech Vapor and some maps.
The cheap risers and 12V socket were clearly sourced from the reject bin in some Guandong factory and needed redrilling; the 12v socket even had the blue and brown wires the wrong way round which caused a small bang and some smoke! At least there was enough cable on the Honda to get 2 inches out of the risers. The Barks went on easily enough; I refitted the original 14T, replaced the shift lever with a folder, got an AZ plate and some insurance ($28 for half a year!) and then we set about the shock and the side racks.

On the plane over I had a thought that the shock wouldn’t be up to my weight and the load. The L I’d tested in February had been reassuringly firm but when it came to loading the rear spring on my Phoenix bike the collar adjustment rings were factory-set solid. We unbolted the shock (the usual near blind nuts make it easier with two people and the battery out) and Al whacked the collar rings apart. He pointed out a useful trick in turning the loose top sleeve out of it’s notch to give another 5mm of tension, but on bounce testing we decided to go all the way and fabricate an additional half-inch sleeve, splitting a right-diametre tube, fitting it and tacking it in place to rack the preload right up and have a bit more to spare. That required compressing the spring in a press but the shock is otherwise unmodifiable and a decent compression damped unit starts at $600.
Al Jesse was also using my bike to try out the prototype of the new MonoArm rack he’s designed. Jesse mount systems are typically cunning affairs with minimal metal; my version is a bit heftier until the final form is pinned down.
I didn’t know what to expect but what we have here is a q/d platform rack no less (he must have read my mind) onto which I’ve chosen to semi-permanently attach my Magadans (I could as easily remove the pans from the plate, but the whole point is the rack itself is q/d). Each side plate locates into corresponding slots and the mounting system’s special feature you’ll learn about later makes it particularly well suited to slinky sub-framed dual sporters like the L. Removal of the platform with bags attached is with a nut and spacers, but production versions will use the tamper-proof QRDP lock by the time it’s all out.
Sunday Al put a cooler full of water in his KLX 250 S’s top box and we went for a ride up in the Weaver Mountains around Castle Hot Springs to see how my adaptions weighed up and pull off an mpg test. I was concerned the EJK black box might might have affected this as the original owner had intimated. Even then, with the Honda’s tiny tank (I’ll have a 5-litre fuel bag and may need another) it’s going to be stops every two hours to pay out for 8 bucks of fuel at a time.

First impression was a lot of noise and no jaw-dropping gobs of extra power over the Honda test bike I road in February (I do wonder if that press bike had been fine tuned…). With pipe and airbox and EJK, power should have been up some 30% (18 to 24hp supposedly) but Al’s Kawasaki was having no difficultly keeping ahead. We’d already tried to quieten the FMF ‘Q-Pipe’ by fitting a restricting washer up it’s spout and though it made a small difference in the garage, once on the road I couldn’t see myself living with that racket. Acceleration was especially noisy; we hoped the holes that had got drilled into the airbox side might address that, but back at Al’s, tapping them up made no difference. Luckily the stock pipe was at hand and easy to refit.
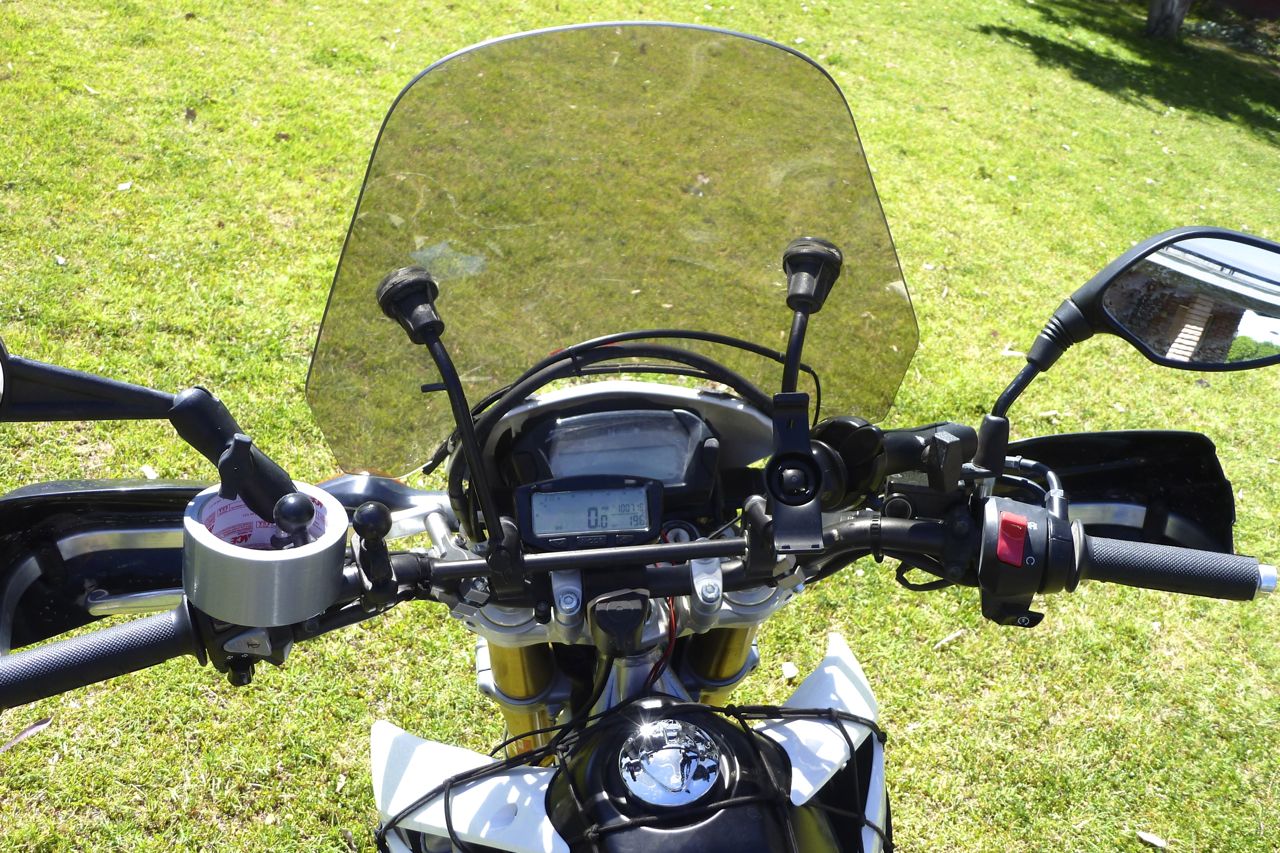
Other than that all was well. By the end of four hour’s riding the old backside was getting warm; that shock is pretty firm now and chattered into bends, but should be on form with a load. Standing up the bars were still two inches too low – Al’s KLX by comparison was just right. Not sure how to get around that without cable issues. Tyres at street pressures were OK and the brakes a bit touchy on the loose gravel inclines, but that will just be me getting used to the bike. The Slipstreamer Spitfire screen too felt a bit close to my face when bashing over ruts but the ‘pressure balancing’ gap at the base caused no turbulence on the highway. I did think it could pull still more gearing but there’s no room in there for a 14T so it will have to be 3 or 4 teeth off the back end. Unfortunately it was the din that left the biggest mark.
As for mpg. Al’s KLX recorded 96 miles on the loop; the Honda 83.5 – an unlikely 15% discrepancy so one odometre was out; tyres and gearing were standard on both our bikes. Assuming the Kawa’s distance reading was correct then the Honda was doing an impressive 62.3 US or 75UK mpg. If the Honda’s 83.5 miles is in the ballpark it’s more like 54.2 US but still 65UK mpg, what I recorded last March on the stock press bike. We were going pretty slowly (no more than 55mph on the KLX or 50 on mine) so I suspect somewhere in between is right.
Back at base I checked the speedo against a Nuvi satnav and up to 30mph it seemed spot on for speed though over a mile the odo was 10% under. A closer test with my Garmin 62 or even the Trail Tech Vapor unit will get to the bottom of it. And it sure was nice to ride the back streets with that quiet stock pipe back on, even if at 12lbs it’s double the weight of the Q Pipe.
Unfortunately the proto side rack doesn’t fit round the fat OE can and needs to be modified a bit. That and the fact that my ‘two-day’ helmet delivery is still with UPS meant I was running out of time to get to South Sound BMW for Saturday. We talked about good routes on the weekend but a 250 is not the best machine when you need to cross a continent in a hurry.
The northwest was never my plan on this trip and my decision to fly up north (about the same price when you add it up) was made easier by today’s weather warnings across the Southwest. Here in Phoenix it’s been baking at over 30 Celcius last few days but today in Flagstaff it was snow and 60mph gusts – undesirable conditions aboard a skimpy 250.
It all gives me more time to get the Honda in shape for a shorter ride for a presentation at Roseville, CA before swing back through Utah’s Canyonlands.

You say you refitted the stock 13t front sprocket? Did you run a 13? I know the bikes come stock with a 14/40 gearing. If so I am impressed with your fuel economy.
LikeLike
Hi Matt, you spotted a typo above which I’ve now corrected.
Bought the bike with 13T. Refitted original 14T as mentioned here:
http://adventure-motorcyclingh.com/2013/04/24/crf250l-tuning-an-ejk-fuel-controller/
So I used the bike on stock gearing, but with other mods.
LikeLike
Ah, the never ending rack and bag saga, I’m fascinated to see how this combination turns out as so far the Magadans seem the best of an OK bunch. What I’m particularly keen to see is how well they work in combination with the platform racks before I put my money and someone else’s machining and bending skills where my mouth is.
I’ve been reading posts on ADV Rider about jerry can panniers which have given me a few more ideas since the last time we traded comments back when you were building racks for the GS500 and I’m now pondering the idea of a half rigid pannier. The back and base made from a plastic jerrycan with the front and sides made in Basically the platform racks are built in to the bags not the racks. Why? Because I think it could be lighter, easier to mount/dismount without the annoyance of strappage and with less risk of straps chafing against rack. Throw in some deliberate but easily replaced break points at the mounts and if I do have an off I know the neither pannier nor mount should suffer.
Oh and the other reason? My cousin’s just bought a new industrial sized vacuum molding machine and we want to play.
Safe trip, can’t wait to hear all about it.
LikeLike
Hi Callum, haven’t had a chance to try alt tanks. The WF Safari looks similar but at 12.7L (verified in your link) is not much better than the 11.7 (claimed) IMS tank that’s made for the CRF. If I’m going to go to the hassle of making the wrong tank fit I’d want at least 15L (4USg) to be worth the bother. For the moment I’ll be using the OE 7.8L + a 4-5 litre Liquid Containment bladder (would have preferred their 7L) which will give me about 12.3L which should give 180 miles at 58mpUSg. To me 250 miles/400km is the benchmark to avoid being preoccupied with the next fill up.
LikeLike
I’ve been watching the last few posts with interest re the crf. Did you end up having a play with different model’s fuel tanks to see if any would fit? You inspired me to do a google image search and the wr250r tank on visual impressions only looks similarish.
(As per link http://www.thumpertalk.com/topic/702003-safari-tank-for-wr250r-review-install-photos/)
LikeLike