Skip to 5000-mile report
I’ve been a long-time Tenere fan. Before the XT600ZE which is featured on the front of my Desert Travels ebook, I owned the first-generation kickstart model, and like everyone else of a certain age, in the 1980s adapted XT500s in the days when there was nothing better.
The British biking press didn’t get it with the new Tenere when it came out in 2008. No surprise there, but owners’ impressions were better than expected so I got one to finish researching my Morocco Overland guidebook. I bought the bike used but not even run in, for £4200. A year or two later the price jumped to an astronomical £7000, but for a Jap overlander it’s still in a class of its own back then.
Early impressions and modifications
After less than 500 miles I found I liked:
• Engine and FI /ECU problems ironed out on the 660X and R models
• Pulls smoothly and feels nippy in town and stable at speed
• Fuel consumption (71.7 mpg/25.4kpl so far = 380-mile/610km tank range)
• Can change speedo/odos between mph and kph (but not as described in ‘TFM’)
• Clear, eye-level dashboard display
• Good-sized 23-litre tank
• Seat seems good by trail bike standards after a 300-mile day
• Screen
• 9:1 comp ratio: good for crap fuel and long engine life
• Fall over tank protection
• Suspension seems good and firm
• 6000-mile service intervals (on semi-synthetic oil)
• It doesn’t look too bad, either
… Don’t like:
• Screen is too low – buffets my head
• Feels heavy to wheel around – it probably weighs 200kg wet
• Twin front discs seem OTT
• Fuel gauge is way out – the digital bars disappear at around 240 miles with at least 100 miles left (common to many bikes, tbh)
• Little bits of rust already – naturalmente, fatto in Italia!
MODIFICATIONS
The great thing with bikes like Ténérés, KTM- and BMW Adventures is that, unlike my previous Honda XRL, they’re pretty much ready to go out of the crate. Assuming you have all the bits at hand (tyres, luggage, etc), the bike can be prepared in a few days for, in my case, a month in Morocco.

Although they’ve long been the adventure pneu de jour I’ve never tried Conti TKCs before, usually settling for more dirt-oriented T63s, MT21s or full-on Deserts. So it’ll be interesting to see how they perform on the ride down and the pistes and how long they last.
So far on the road you can hardly tell the difference from the Metz Tourances which came with the bike, but those tyres would surely be hopeless in the dirt. The Contis seem a good compromise while they last. Mine of course got Slimed and are now tubeless on spoked rims.
The front wheel weighs a ton. I’ve never has such a heavy wheel on a trail bike. I hope it corresponds to a strong wheel too (it didn’t). I do wonder if 48hp really needs two front discs. It wouldn’t be hard to remove one disc and its carrier, stick something in the empty caliper and see if the bike can manage safely with one front disc.

I chose Barkbuster Ego handguards, because everyone else seems to be going for Acerbis which are 30% more expensive and have tedious drilling issues. The Barks went on OK (covering the tank with a towel helps avoid scratches). I had to remove the cross brace and move the brake olive down a bit – and of course remove the bar-end weights which I’m told will expose some vibration. And I had to cut the end of the clutch lever.
By chance the Bark mounts lined up with the old cross brace mounts which I had to break off, so although the alignment is far from perfect at the moment, the brace went back on and might stop the bars folding up. Hand protection from the elements isn’t great but it’s easily improved.
You’ll notice I’ve made some throttle position markers (pink tape) – an old trick from the twin-carb Tenere days to watch your economy, though at a regular 25kpl (low 70s mpg), with this bike, it won’t be so critical.
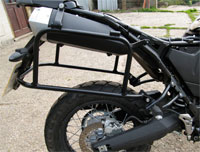
I got the German Off The Road rack for 200 quid (no longer made?). It’s similar to many other designs and goes to show how simple and light a strong rack can be – as long as you’re hanging bags off them and not trying to support them.
Fitting was a bit tricky – nothing new there then! You may need help lifting the back of the bike to get the front pillion mounts to line up and you’ll have to remove the fuse box and loosen the nearside rear wiring loom and the back rack/plate thing to move the rear light hanger back to get the nuts on for the back mounts.
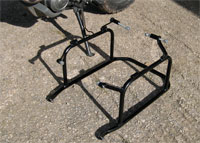
I’ve always fancied some TT Zega Flex fabric panniers (full review). Compared to the ubiquitous alloy Zegas, I’ve never seen a set of the much smaller Flexes in action. ‘Semi rigid’ means they keep their shape but won’t bite at my shins when I take a dab through a oued. The TT catalog says they can only take 5kgs which must be a misprint. Whatever, I’ve weighed them packed for departure and there’s 9kg in each one, plus 6kg in the Ortleib on the back.
The adapter plates supplied didn’t fit my OTR rack (as expected – they’re for TT racks). I managed to get 3 of 4 mounting hooks on; the last mount point needed a coat hook from B&Q. Nice, light bags, abouy 25 litres capacity; a bit expandable, an outside zip pocket and a less useful under pocket too. I don’t expect they’re waterproof so will use bin bags. An Ortlieb bag goes across the back for light/soft stuff.
The Zegas are supposed to join together to make a backpack – how often will you use that compared to carrying them into a hotel? So I cut off the backpacking straps and knotted on a pair of holdall-style handles (top right) with the spare strapage left over. Looks messy but much more functional for carrying the bags or getting inside them. I can also tighten a strap across the back seat to join pull up handles and so take the strain off the mounts frame mounts. This makes them ‘assisted-throwovers and on the dirt is bound to help while barely getting in the way.
The locking device (left) is pretty flimsy but let’s face it, it’s only there to stop them falliing off. Anyone could get into these with a sharp, hot knife. Once you have the knack, mounting on and off is a breeze. Hopefully the bags will absorb the shock and preserve the mounts when the bike falls over.

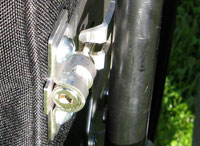
There is a small bar above the clocks/display for GPS mounting but space is limited and my bulky Garmin 76 set up (right); it would obscure the clocks and probably shake loose so it’s gone down on the bars; not so line-of-sight but closeat hand to work the buttons. There is a power take-off plug behind the headlight cover I’m told but it’s some odd connection apparently, so until I have a chance to make something neater, I kept it simple and wired an old 12v cig plug from the bars under the tank to the battery with a fuse nearby. It means stuff can be run with the bike electrics turned off


I’ve also got a Touratech Windscreen Spoiler as my first abiding impression of this bike was how noisy it was at speed. The screen is great for sure but at 6′ 1″ (186cm) it’s too low for me – and as far as the ears go is actually worse than nothing. Hopefully this quickly removable gadget will ease the transit across Spain. It may need bending and curving which can be easily done with perspex with something like a hair dryer, commonly found in the sort of hotels I frequent. It’s the sort of thing I would have spent a day making myself badly out of an old bit of aquarium. How times change…
Oh, and Matt welded on the all important side stand foot while I stood by and took a picture.

